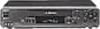
Sony SLV-N70 Operating Instructions - Page 9
Audio/video A/V hookup, switch to the A/V inputs for your VCR when you play back a tape or operate
 |
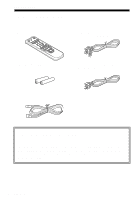
View all Sony SLV-N70 manuals
Add to My Manuals
Save this manual to your list of manuals |
Page 9 highlights
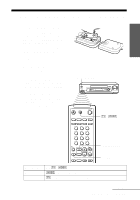
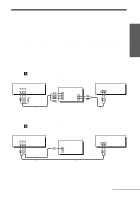
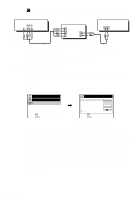
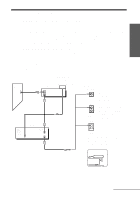
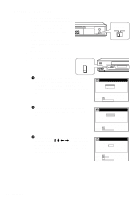
Getting Started Audio/video (A/V) hookup If your TV has audio/video (A/V) input jacks, you will get a better picture and sound if you hook up your VCR using these connections. For a true "home theater" experience, you should connect the audio outputs of your VCR or TV to your stereo system. If your TV doesn't have A/V inputs, see the following pages for antenna or cable hookups. If your TV has the S-Link™ (A/V bus control) function, hook up your VCR (SLVN80 only) using the connection shown on page 10. Your TV will automatically switch to the A/V inputs for your VCR when you play back a tape or operate the VCR. If you're not planning to use your VCR to record programs, you're finished setting up the VCR after you've made the connections shown on pages 9 and 10. If you want to record regular or cable TV programs, complete these connections first, and then go to the following pages for antenna or cable hookups. S-Link™ is a trademark of Sony Corporation. A Use this hookup if your TV has stereo jacks VCR AUDIO VIDEO LINE-1 IN LINE OUT * TV IN VIDEO AUDIO AUDIO OUT * Stereo receiver AUX IN Audio/video cable (supplied) Audio cable (not supplied) * Do not connect the fourth miniplug for this hookup (SLV-N80 only). B Use this hookup if your TV doesn't have stereo jacks VCR AUDIO VIDEO LINE-1 IN LINE OUT TV IN VIDEO AUDIO Stereo receiver AUX IN Video cable (not supplied) Audio cable (not supplied) continued Hookups 9
-
 1
1 -
2
-
3
-
 4
4 -
 5
5 -
 6
6 -
 7
7 -
 8
8 -
 9
9 -
 10
10 -
 11
11 -
 12
12 -
 13
13 -
 14
14 -
15
-
16
-
17
-
18
-
19
-
20
-
21
-
22
-
23
-
24
-
25
-
26
-
27
-
28
-
29
-
30
-
31
-
32
-
33
-
34
-
35
-
36
-
37
-
38
-
39
-
40
-
41
-
42
-
43
-
44
-
45
-
46
-
47
-
48
-
49
-
50
-
51
-
52
-
53
-
54
-
55
-
56
-
57
-
58
-
59
-
60
-
61
-
62
-
63
-
64
-
65
-
66
-
67
-
68
-
69
-
70
-
71
-
72
-
73
-
74
-
75
-
76
-
77
-
78
-
79
-
80
-
81
-
82
-
83
-
84
-
85
-
86
-
87
-
88
-
89
-
90
-
91
-
92
-
93
-
94
-
95
-
96
-
97
-
98
-
99
-
100
-
101
-
102
-
103
-
104
-
105
-
106
-
107
-
108
-
109
-
110
-
111
-
112
 |
 |
