Sony SPP-A9276 Operating Instructions - Page 6
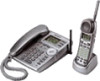
Table of contents, Getting Started, Basics - handset
 |
View all Sony SPP-A9276 manuals
Add to My Manuals
Save this manual to your list of manuals |
Page 6 highlights
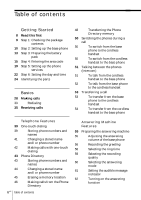
Table of contents Getting Started 8 Read this first 9 Step 1: Checking the package contents 10 Step 2: Setting up the base phone 13 Step 3: Preparing the battery pack 15 Step 4: Entering the area code 19 Step 5: Setting up the phone services 22 Step 6: Setting the day and time 24 Identifying the parts Basics 28 Making calls 33 Redialing 35 Receiving calls Telephone Features 39 One-touch dialing 39 Storing phone numbers and names 41 Changing a stored name and/or phone number 42 Making calls with one-touch dialing 43 Phone Directory 43 Storing phone numbers and names 44 Changing a stored name and/or phone number 45 Erasing a memory location 46 Making calls from the Phone Directory 6US Table of contents 48 Transferring the Phone Directory memory 50 Switching the phones during a call 50 To switch from the base phone to the cordless handset 50 To switch from the cordless handset to the base phone 51 Talking between the phones (Intercom) 51 To talk from the cordless handset to the base phone 52 To talk from the base phone to the cordless handset 53 Transferring a call 53 To transfer from the base phone to the cordless handset 54 To transfer from the cordless handset to the base phone Answering Machine Features 55 Preparing the answering machine 55 Adjusting the answering volume of the base phone 56 Recording the greeting 58 Selecting the ring time 59 Selecting the recording quality 60 Selecting the answering mode 61 Setting the audible message indicator 62 Turning on the answering function
-
 1
1 -
 2
2 -
 3
3 -
 4
4 -
 5
5 -
 6
6 -
 7
7 -
 8
8 -
 9
9 -
 10
10 -
 11
11 -
 12
12 -
13
-
14
-
15
-
16
-
17
-
18
-
19
-
20
-
21
-
22
-
23
-
24
-
25
-
26
-
27
-
28
-
29
-
30
-
31
-
32
-
33
-
34
-
35
-
36
-
37
-
38
-
39
-
40
-
41
-
42
-
43
-
44
-
45
-
46
-
47
-
48
-
49
-
50
-
51
-
52
-
53
-
54
-
55
-
56
-
57
-
58
-
59
-
60
-
61
-
62
-
63
-
64
-
65
-
66
-
67
-
68
-
69
-
70
-
71
-
72
-
73
-
74
-
75
-
76
-
77
-
78
-
79
-
80
-
81
-
82
-
83
-
84
-
85
-
86
-
87
-
88
-
89
-
90
-
91
-
92
-
93
-
94
-
95
-
96
 |
 |
