Sony WAHTSA1 Operating Instructions - Page 6
Hooking Up - s air kit
 |
View all Sony WAHTSA1 manuals
Add to My Manuals
Save this manual to your list of manuals |
Page 6 highlights
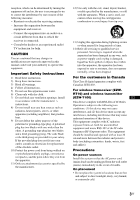
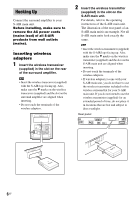
Hooking Up Connect the surround amplifier to your S-AIR main unit. Before installing, make sure to remove the AC power cords (mains lead) of all S-AIR products from wall outlets (mains). Inserting wireless adapters 1 Insert the wireless transceiver (supplied) in the slot on the rear of the surround amplifier. Note • Insert the wireless transceiver (supplied) with the S-AIR logo facing up. Also, make sure the V marks on the wireless transceiver (supplied) and the slot on the surround amplifier are aligned when inserting. • Do not touch the terminals of the wireless adapters. EZW-RT10 S-AIR ID A B C PAIRING SPEAKER L SURROUND SELECTOR R SURROUND SURROUND BACK 2 Insert the wireless transmitter (supplied) in the slot on the S-AIR main unit. For details, refer to the operating instructions of the S-AIR main unit. The illustration of the rear panel of an S-AIR main unit is an example. Not all S-AIR main units look exactly the same. Note • Insert the wireless transmitter (supplied) with the S-AIR logo facing up. Also, make sure the V marks on the wireless transmitter (supplied) and the slot on the S-AIR main unit are aligned when inserting. • Do not touch the terminals of the wireless adapters. • If wireless adapter(s) come with your S-AIR main unit, you do not have to use the wireless transmitter included in this wireless surround kit for your S-AIR main unit. If you do not intend to use the wireless transmitter (supplied) for an extended period of time, do not place it in locations that are hot and subject to direct sunlight. Rear panel SPEAKER CENTER SUBWOOFER DIGITAL IN COAXIAL OPTICAL TV/VIDEO SPEAKER FRONT R FRONT L SUR R SUR L HDMI OUT DMPORT EZW-T100 ANTENNA COAXIAL 75 FM AM EURO AV OUTPUT(TO TV) EZW-T100 EZW-RT10 6US
-
 1
1 -
 2
2 -
 3
3 -
 4
4 -
 5
5 -
 6
6 -
 7
7 -
 8
8 -
 9
9 -
 10
10 -
 11
11 -
 12
12 -
13
-
14
-
15
-
16
-
17
-
18
-
19
-
20
-
21
-
22
-
23
-
24
-
25
-
26
-
27
-
28
-
29
-
30
-
31
-
32
-
33
-
34
-
35
-
36
-
37
-
38
-
39
-
40
-
41
-
42
-
43
-
44
-
45
-
46
-
47
-
48
 |
 |