TEAC DM-3200 DM-3200 Automation Manual - Page 6
Starting out with the timecode - cover
 |
View all TEAC DM-3200 manuals
Add to My Manuals
Save this manual to your list of manuals |
Page 6 highlights
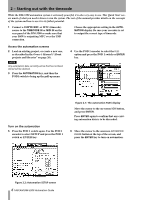
2 - Starting out with the timecode While the DM-3200 automation system is extremely powerful, it is also very easy to use. This Quick Start covers much of what you need to know to run the system. The rest of the manual provides details on the concepts of the system and how to use it to its fullest potential. 1 Connect a SMPTE/EBU or MTC (timecode) source to the TIMECODE IN or MIDI IN on the rear panel of the DM-3200 or make sure that your DAW is outputting MTC over the USB connection. Choose the appropriate setting in the AUTOMATION display. Be sure your recorder is set to output the correct type of timecode. Access the automation screens 2 Load an existing project, or create a new one, as described in the Owner's Manual ("About projects and libraries" on page 26). NOTE Any automation data currently active that has not been stored will be deleted. 3 Press the AUTOMATION key, and then the POD1 switch to bring up the pull-up menu. 4 Use the POD 1 encoder to select the FILES option and press the POD 1 switch or ENTER key. Turn on the automation 5 Press the POD 1 switch again. Use the POD 1 encoder to select SETUP and press the POD 1 switch or ENTER key: Figure 2.1: The automation FILES display Move the cursor to the on-screen NEW button, and press ENTER. Press ENTER again to confirm that any existing automation data is to be discarded. 6 Move the cursor to the onscreen AUTOMATION ENGINE button at the top of the screen, and press the ENTER key to turn on automation. Figure 2.2: Automation SETUP screen 6 TASCAM DM-3200 Automation Guide
-
 1
1 -
 2
2 -
 3
3 -
 4
4 -
 5
5 -
 6
6 -
 7
7 -
 8
8 -
 9
9 -
 10
10 -
 11
11 -
 12
12 -
13
-
14
-
15
-
16
-
17
-
18
-
19
-
20
-
21
-
22
-
23
-
24
-
25
-
26
-
27
-
28
-
29
-
30
-
31
-
32
-
33
-
34
-
35
-
36
 |
 |
