TP-Link TL-SG108E TL-SG108E V1 User Guide Easy Smart Configuration Utility 191 - Page 27
Cable Test, Easy Smart Configuration Utility, Monitoring - vlan trunk
 |
View all TP-Link TL-SG108E manuals
Add to My Manuals
Save this manual to your list of manuals |
Page 27 highlights
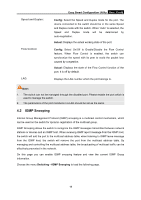
Easy Smart Configuration Utility User Guide Note: 1. The trunk member cannot be selected as the mirroring port. 2. A port cannot be set as the mirrored port and the mirroring port simultaneously. 3. For TL-SG108E, you can select only one port as the mirrored port. 4. The port mirror function can take effect span the multiple VLANs. 5.3 Cable Test This switch provides cable test to diagnose the connection status of the cable connected to the switch and the distance to the problem location, which facilitates you to locate and diagnose the trouble spot of the network. Choose the menu Monitoring→Cable Test to load the following page. Figure 5-3 Cable Test The following entries are displayed on this screen: Cable Test Port: Displays the port number of the switch. Test Result: Displays the connection status of the cable connected to the port. The test results of the cable include "Open", "Short", "Open Short", "Normal" and "Crosstalk". Cable Fault Distance(m): Test: Displays the error length (in meters) of the cable. Click Test to diagnose the cable connected to this port. 24
-
 1
1 -
2
-
3
-
4
-
5
-
6
-
7
-
8
-
9
-
10
-
11
-
12
-
13
-
14
-
15
-
16
-
17
-
18
-
19
-
20
-
21
-
 22
22 -
 23
23 -
 24
24 -
 25
25 -
 26
26 -
 27
27 -
 28
28 -
 29
29 -
 30
30 -
 31
31 -
 32
32 -
33
-
34
-
35
-
36
-
37
-
38
-
39
-
40
-
41
-
42
 |
 |
