TP-Link TL-WR842ND TL-WR842ND FTP Server Application Guide for USB function
TP-Link TL-WR842ND Manual
 |
View all TP-Link TL-WR842ND manuals
Add to My Manuals
Save this manual to your list of manuals |
TP-Link TL-WR842ND manual content summary:
- TP-Link TL-WR842ND | TL-WR842ND FTP Server Application Guide for USB function - Page 1
Configuration and Access of FTP Server TL-WR1042ND TL-WR1043ND TL-WR2543ND This guide applies to all the models above. TL-WR842ND Rev: 1.0.0 1910010521 - TP-Link TL-WR842ND | TL-WR842ND FTP Server Application Guide for USB function - Page 2
CONTENTS Chapter 1. Topology and USB Device 2 1.1 Typical Topology...2 1.2 Special Topology ...3 1.3 USB Device...3 Chapter 2. Configuration of the Wireless Router 4 Chapter 3. Access via Web Browser 8 3.1 WAN Access...8 3.2 LAN Access...12 Chapter 4. Access via PC Client Software 17 4.1 WAN - TP-Link TL-WR842ND | TL-WR842ND FTP Server Application Guide for USB function - Page 3
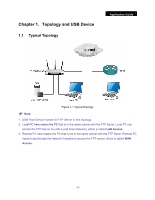
Topology and USB Device 1.1 Typical Topology Application Guide Figure 1-1 Typical Topology ) Note: 1. USB Flash Device stands for FTP Server in this topology. 2. Local PC here means the PC that is in the same subnet with the FTP Sever. Local PC can access the FTP Server by LAN (Local Area Network - TP-Link TL-WR842ND | TL-WR842ND FTP Server Application Guide for USB function - Page 4
The WAN port of TL-WR1043ND is linked to the LAN port of an xDSL modem. If the modem has already obtained a public IP by dialing to the Internet with the username and password provided from your ISP and TL-WR1043ND obtains its IP through Dynamic IP service provided by the modem, the remote PC - TP-Link TL-WR842ND | TL-WR842ND FTP Server Application Guide for USB function - Page 5
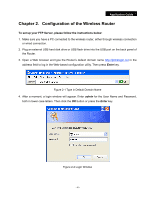
and type the Router's default domain name http://tplinklogin.net in the address field to log in the Web-based configuration utility. Then press Enter key. Figure 2-1 Type in Default Domain Name 4. After a moment, a login window will appear. Enter admin for the User Name and Password, both in lower - TP-Link TL-WR842ND | TL-WR842ND FTP Server Application Guide for USB function - Page 6
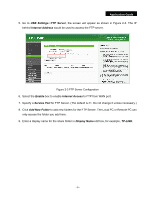
FTP Server. (The default is 21. Do not change it unless necessary.) 8. Click Add New Folder to add new folders for the FTP Server. The Local PC or Remote PC can only access the folder you add here. 9. Enter a display name for the share folder in Display Name edit box, for example, TP-LINK. - 5 - - TP-Link TL-WR842ND | TL-WR842ND FTP Server Application Guide for USB function - Page 7
Application Guide 10. Select the Share entire partition or a specific folder option. If you select Share entire partition, the folders contained in this partition will all be - TP-Link TL-WR842ND | TL-WR842ND FTP Server Application Guide for USB function - Page 8
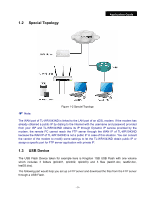
at the same time, and TL-WR2543ND, TL-WR1042ND, TL-WR842ND supports 4 users at the same time. Therefore, if you want to log in, make sure that the number of login-user is less than the maximum quantity. Once the number of users had reached the maximum quantity, the following users would - TP-Link TL-WR842ND | TL-WR842ND FTP Server Application Guide for USB function - Page 9
Application Guide Chapter 3. Access via Web Browser Here we take the Web browser Internet Explorer for example. 3.1 WAN Access 1. Input key and a login window will pop up as shown below. Enter the User name and Password of the wireless router (default username: admin, default password: admin, both - TP-Link TL-WR842ND | TL-WR842ND FTP Server Application Guide for USB function - Page 10
Application Guide Figure 3-3 Log On 3. Now you can see the IE as Figure 3-4. Double-click the folder TP-LINK. Figure 3-4 - 9 - - TP-Link TL-WR842ND | TL-WR842ND FTP Server Application Guide for USB function - Page 11
4. You will see the files contained in TP-LINK as below. Application Guide Figure 3-5 5. To open a folder, right click the folder, for example tplink02, and select Open option. To download a file, right click the file, for example test03.doc, and select Copy option. Figure 3-6 - 10 - - TP-Link TL-WR842ND | TL-WR842ND FTP Server Application Guide for USB function - Page 12
Application Guide Figure 3-7 ) Note: When trying to open a file by double-clicking the file, an error will occur as shown in Figure 3-8. We recommend that you use Copy and Paste method to download the file on FTP Server. Figure 3-8 - 11 - - TP-Link TL-WR842ND | TL-WR842ND FTP Server Application Guide for USB function - Page 13
Application Guide 3.2 LAN Access 1. Go to Start->Run, input cmd as below, then click OK or press Enter key. 2. You will see the interface as below. Figure 3-9 Figure 3-10 3. Input ipconfig, and press Enter key. Write down the IP address behind Default Gateway as shown in Figure 3-11. (Here is 192 - TP-Link TL-WR842ND | TL-WR842ND FTP Server Application Guide for USB function - Page 14
Application Guide Figure 3-11 4. Input the address (The address written down in Step 3. Here is192.168.0.1) in IE address field in format of ftp://192.168.0.1 and then press Enter key, Figure 3-12 A login window will pop up as below. Enter the User name and Password of the wireless router (default - TP-Link TL-WR842ND | TL-WR842ND FTP Server Application Guide for USB function - Page 15
Application Guide Figure 3-13 5. Now you can see the IE as below, double-click the folder TP-LINK. Figure 3-14 - 14 - - TP-Link TL-WR842ND | TL-WR842ND FTP Server Application Guide for USB function - Page 16
6. You will see the files contained in TP-LINK as below: Application Guide Figure 3-15 7. To open a folder, right click the folder, for example tplink02, and select Open option. To download a file, right click the file, for example test03.doc, and select Copy option. Figure 3-16 - 15 - - TP-Link TL-WR842ND | TL-WR842ND FTP Server Application Guide for USB function - Page 17
Application Guide Figure 3-17 ) Note: When trying to open the file by double-clicking the file, an error will occur as shown in Figure 3-18. We recommend that you use Copy and Paste method to download the file on FTP Server. Figure 3-18 - 16 - - TP-Link TL-WR842ND | TL-WR842ND FTP Server Application Guide for USB function - Page 18
Application Guide Chapter 4. Access via PC Client Software Here we take CuteFTP Professional 8 for example. 4.1 WAN Access 1. Open the CuteFTP and it will show as below. Figure 4-1 - 17 - - TP-Link TL-WR842ND | TL-WR842ND FTP Server Application Guide for USB function - Page 19
Application Guide 2. Go to File->New->FTP Site or press Ctrl+N to open a new Site properties. Figure 4-2 3. Set the dialog box as below and click Connect. Label: Name of the site. Host address: The Internet Address of FTP Server configuration page (Here is 218.18.0.163). Figure 4-3 - 18 - - TP-Link TL-WR842ND | TL-WR842ND FTP Server Application Guide for USB function - Page 20
Application Guide Username: Default setting of the wireless router is admin in lower case letters. Password: Default setting of the wireless router is admin in lower case letters. Comments: The information that you want to record for the specific site. Login method: select Normal ¾ Normal - The user - TP-Link TL-WR842ND | TL-WR842ND FTP Server Application Guide for USB function - Page 21
Application Guide 4. Now you can see the folder TP-LINK in the panel. Double-click the folder. Figure 4-5 5. You will see three subfolders and three files in the TP-LINK folder. Figure 4-6 - 20 - - TP-Link TL-WR842ND | TL-WR842ND FTP Server Application Guide for USB function - Page 22
6. Double-click a file and it will be downloaded automatically. Application Guide ) Note: Figure 4-7 When you connect to a site, your My Documents folder is the default local folder to save your downloaded files, and the default remote folder is the folder specified when you configured the site. - TP-Link TL-WR842ND | TL-WR842ND FTP Server Application Guide for USB function - Page 23
2. You will see the interface as below. Application Guide Figure 4-9 3. Follow the cursor, input ipconfig and press Enter key. Write down the IP address of Default Gateway as shown in Figure 4-10. (Here is 192.168.0.1). Figure 4-10 - 22 - - TP-Link TL-WR842ND | TL-WR842ND FTP Server Application Guide for USB function - Page 24
4. Open the CuteFTP and it will show as below. Application Guide Figure 4-11 5. Go to File->New->FTP Site or press Ctrl+N to open a new Site properties. Figure 4-12 - 23 - - TP-Link TL-WR842ND | TL-WR842ND FTP Server Application Guide for USB function - Page 25
Guide 6. Set the dialog box as below and click Connect. Label: Name of the site. Host address: The IP of the Default Gateway written down in Step 3 (here is 192.168.0.1). Username: Default setting of the wireless router is admin in lower case letters. Password: Default setting of the wireless router - TP-Link TL-WR842ND | TL-WR842ND FTP Server Application Guide for USB function - Page 26
Application Guide 7. Now you can see the folder TP-LINK in the panel. Double-click the folder. Figure 4-14 8. You can see three subfolders and three files in the TP-LINK folder. Figure 4-15 - 25 - - TP-Link TL-WR842ND | TL-WR842ND FTP Server Application Guide for USB function - Page 27
9. Double-click a file and it will be downloaded automatically. Application Guide ) Note: Figure 4-16 When you connect to a site, your My Documents folder is the default local folder to save your downloaded files, and the default remote folder is the folder specified when you configured the site
-
 1
1 -
 2
2 -
 3
3 -
 4
4 -
 5
5 -
 6
6 -
 7
7 -
8
-
9
-
10
-
11
-
12
-
13
-
14
-
15
-
16
-
17
-
18
-
19
-
20
-
21
-
22
-
23
-
24
-
25
-
26
-
27
 |
 |

Configuration and Access of FTP Server
TL-WR1042ND
TL-WR1043ND
TL-WR2543ND
TL-WR842ND
This guide applies to all the models above.
Rev: 1.0.0
1910010521