TP-Link TL-WR842ND TL-WR842ND FTP Server Application Guide for USB function - Page 6
USB Settings, FTP Server, Internet Address, Enable, Internet Access, Service Port, Add New Folder,
 |
View all TP-Link TL-WR842ND manuals
Add to My Manuals
Save this manual to your list of manuals |
Page 6 highlights
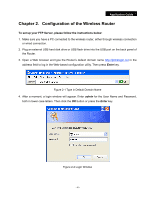
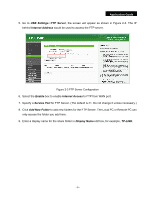
Application Guide 5. Go to USB Settings->FTP Server, the screen will appear as shown in Figure 2-3. The IP behind Internet Address would be used to access the FTP server. Figure 2-3 FTP Server Configuration 6. Select the Enable box to enable Internet Access to FTP from WAN port. 7. Specify a Service Port for FTP Server. (The default is 21. Do not change it unless necessary.) 8. Click Add New Folder to add new folders for the FTP Server. The Local PC or Remote PC can only access the folder you add here. 9. Enter a display name for the share folder in Display Name edit box, for example, TP-LINK. - 5 -
-
 1
1 -
 2
2 -
 3
3 -
 4
4 -
 5
5 -
 6
6 -
 7
7 -
 8
8 -
 9
9 -
 10
10 -
 11
11 -
 12
12 -
13
-
14
-
15
-
16
-
17
-
18
-
19
-
20
-
21
-
22
-
23
-
24
-
25
-
26
-
27
 |
 |

Application Guide
- 5 -
5. Go to
USB Settings
->
FTP Server
, the screen will appear as shown in Figure 2-3. The IP
behind
Internet Address
would be used to access the FTP server.
Figure 2-3 FTP Server Configuration
6. Select the
Enable
box to enable
Internet Access
to FTP from WAN port.
7. Specify
a
Service Port
for FTP Server. (The default is 21. Do not change it unless necessary.)
8. Click
Add New Folder
to add new folders for the FTP Server. The Local PC or Remote PC can
only access the folder you add here.
9. Enter a display name for the share folder in
Display Name
edit box, for example,
TP-LINK
.