Thermador HMCN42FS User Manual - Page 9
Replacing The Bulbs
 |
View all Thermador HMCN42FS manuals
Add to My Manuals
Save this manual to your list of manuals |
Page 9 highlights
REPLACING THE BULBS ṇ CAUTION. Avoid risk of electric shock. 1. Switch off the hood and pull out the mains plug or switch off the electricity supply at the fuse box. ṇ CAUTION. Avoid risk of burns. Halogen bulbs become very hot and remain hot for some time after being switched off. 2. Remove the bulb ring with a screwdriver or similar tool. 3. Replace the halogen light bulb (conventional halogen bulb, 12 Volt, max. 20 Watt, G4 bulbholder). IMPORTANT: Plug-in bulbholder. Take hold of the bulb with a clean cloth. Finger prints can shorten bulb life. 4. Re-insert the bulb ring. 5. Restore the power by inserting the mains plug or switching on the fuse. Note: If the light does not function, check that the bulbs have been inserted correctly. 9
-
 1
1 -
2
-
3
-
 4
4 -
 5
5 -
 6
6 -
 7
7 -
 8
8 -
 9
9 -
 10
10 -
 11
11 -
 12
12 -
 13
13 -
 14
14 -
15
-
16
-
17
-
18
-
19
-
20
-
21
-
22
-
23
-
24
-
25
-
26
-
27
-
28
-
29
-
30
-
31
-
32
 |
 |

9
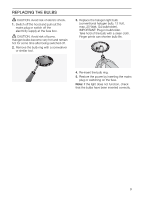
REPLACING THE BULBS
±
CAUTION. Avoid risk of electric shock.
1.
Switch off the hood and pull out the
mains plug or switch off the
electricity supply at the fuse box.
±
CAUTION. Avoid risk of burns.
Halogen bulbs become very hot and remain
hot for some time after being switched off.
2.
Remove the bulb ring with a screwdriver
or similar tool.
3.
Replace the halogen light bulb
(conventional halogen bulb, 12 Volt,
max. 20 Watt, G4 bulbholder).
IMPORTANT: Plug-in bulbholder.
Take hold of the bulb with a clean cloth.
Finger prints can shorten bulb life.
4.
Re-insert the bulb ring.
5.
Restore the power by inserting the mains
plug or switching on the fuse.
Note:
If the light does not function, check
that the bulbs have been inserted correctly.