Toshiba 19LV61K Owner's Manual - English - Page 40
Picture control adjustment in the PC mode
 |
UPC - 022265002681
View all Toshiba 19LV61K manuals
Add to My Manuals
Save this manual to your list of manuals |
Page 40 highlights
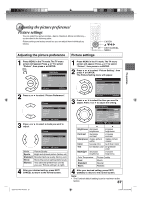
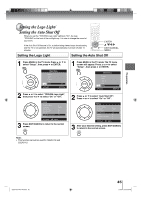
TV operation Picture control adjustment in the PC mode You can adjust to optimize the performance of the TV/DVD in the PC mode. Picture control adjustment in the PC mode INPUT ENTER / / / EXIT/CANCEL MENU 1 Press INPUT, then select the PC mode. 2 Press MENU. Then press ▲ or ▼ to select "Picture", then press ▶ or ENTER. Main Menu Picture Audio Channel Lock Setup : Select ENTER:Set 3 Press ▲ or ▼ to select "PC Setting", then press ▶ or ENTER. Picture Picture Setting Picture Preference Picture Size Film Mode PC Setting DNR >> Sports >> Off >> Off : Select ENTER:Set 4 Press ▲ or ▼ to select the desired item you want to adjust. PC Setting Hor Position 25 Ver Position 25 Clock 0 Phase 25 Auto Adjust >> : Select : Adjust ENTER:Set 5 Press ◀ or ▶ to adjust the setting. Hor Position: To adjust the horizontal position of the image on the PC mode. Ver Position: To adjust the vertical position of the image on the PC mode. Clock: Phase: Auto Adjust: To minimize any vertical bars or stripes visible on the screen background. This must be adjusted after the frequency of the PC mode has been set to 60Hz to optimize picture quality 20 . To adjust the all PC settings automatically. 6 After adjusting, press ENTER to return to the PC Setting menu. Then continue to adjust the other items. 7 Press EXIT/CANCEL to return to the normal screen. Note: • When you connect the PC via HDMI input, select the input source "HDMI". • When you connect the PC via HDMI input, you can setting "Hor Position" and "Ver Position" only. • Whenever you change the PC display resolution settings and find that the characters of the PC input has rough edges or has some flickerings, please go to PC Setting and do an "Auto Adjust" to improve the display of the PC input. 40 52G0101A P37-46.indd 40 1/5/09 3:04:48 PM
-
 1
1 -
2
-
3
-
4
-
5
-
6
-
7
-
8
-
9
-
10
-
11
-
12
-
13
-
14
-
15
-
16
-
17
-
18
-
19
-
20
-
21
-
22
-
23
-
24
-
25
-
26
-
27
-
28
-
29
-
30
-
31
-
32
-
33
-
34
-
 35
35 -
 36
36 -
 37
37 -
 38
38 -
 39
39 -
 40
40 -
 41
41 -
 42
42 -
 43
43 -
 44
44 -
 45
45 -
46
-
47
-
48
-
49
-
50
-
51
-
52
-
53
-
54
-
55
-
56
-
57
-
58
-
59
-
60
-
61
-
62
-
63
-
64
-
65
-
66
-
67
-
68
-
69
-
70
-
71
-
72
-
73
-
74
-
75
-
76
 |
 |
