Toshiba 55A10 Owners Manual
Toshiba 55A10 Manual
 |
View all Toshiba 55A10 manuals
Add to My Manuals
Save this manual to your list of manuals |
Toshiba 55A10 manual content summary:
- Toshiba 55A10 | Owners Manual - Page 1
Introduction Connecting your TV OWNER'S MANUAL Projection Television ® Using the Remote Control Setting up your TV Using the TV's Features Appendix Index 55A10 55A10A © 2000 TOSHIBA CORPORATION All Rights Reserved Owner's Record The model number and serial number are on the back of your TV. - Toshiba 55A10 | Owners Manual - Page 2
NOT TRY TO SERVICE THIS PRODUCT YOURSELF. The exclamation mark in the triangle tells you that important operating and maintenance instructions follow this symbol the TV. Sitting too far to the left or right of the screen will cause the picture to appear dull as will direct sunlight and room lights. - Toshiba 55A10 | Owners Manual - Page 3
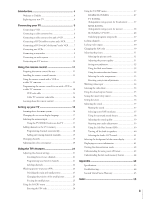
Welcome to Toshiba 4 Exploring your 18 Adding and erasing channels manually 19 Changing channels 19 screen information 41 Viewing the demonstration mode 42 Understanding the auto power off feature 42 Understanding the last mode memory feature 42 Appendix 43 Specifications 43 Troubleshooting - Toshiba 55A10 | Owners Manual - Page 4
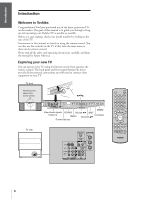
manual is to guide you through setting up and operating your Toshiba TV as quickly as possible. Before you start reading, check your model number by looking at the rear of the TV. Instructions in this manual to your TV. TV front Remote sensor (Behind the screen panel) x •zy CH MENU VOL VOL TV/ - Toshiba 55A10 | Owners Manual - Page 5
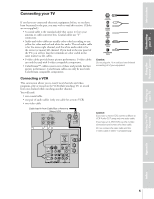
Introduction Connecting your TV Using the Remote Control Connecting your TV If you have not connected electronic equipment before, or you have been frustrated in the past, you may wish to read this section. (Cables are not supplied.) • A coaxial cable is the standard cable that comes in from your - Toshiba 55A10 | Owners Manual - Page 6
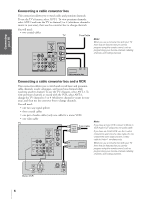
Introduction Connecting your TV Using the Remote Control Setting up your TV Connecting a cable converter box This connection allows you to watch cable and premium channels. To use the TV's features, select ANT-1. To view premium channels, select ANT-2 and tune the TV to channel 3 or 4 ( - Toshiba 55A10 | Owners Manual - Page 7
a program from another source. Your TV is capable of using ColorStream (component video). Connecting your TV to a ColorStream compatible DVD, such as a Toshiba DVD, can greatly enhance picture quality and performance. You will need: • one coaxial cable • three pairs of audio cables (two single and - Toshiba 55A10 | Owners Manual - Page 8
Introduction From Antenna Stereo VCR IN from ANT OUT to TV VIDEO CH 3 CH 4 AUDIO L R IN OUT TV Connecting your TV AUDIO CENTER CHANNEL IN ANT( 75 ) ANT-1 S-VIDEO VIDEO L/ MONO ON R Y OFF OUT OUT L VAR AUDIO ANT-2 VIDEO CB L L/ MONO AUDIO AUDIO CR R R COLOR VIDEO 1 VIDEO 2 - Toshiba 55A10 | Owners Manual - Page 9
Introduction Connecting your TV Connecting a camcorder This connection allows you to watch video materials recorded on a camcorder. You will need: • one pair of audio cables • one video cable Camcorder VIDEO AUDIO OUT L R Caution: If you are using an S-VHS camcorder with an S-video output, - Toshiba 55A10 | Owners Manual - Page 10
: To avoid damaging the speakers, turn the TV off before connecting or disconnecting the Audio Center Channel IN audio cable. Note: Refer to the instructions provided with your external A/V receiver for surround sound system details. When the Audio Center Channel ON/OFF switch is in the ON position - Toshiba 55A10 | Owners Manual - Page 11
operate your VCR or cable TV converter. Refer to the owner's manuals supplied with the equipment to see which features are available. In addition Using the remote control with a VCR or a cable TV converter To control a Toshiba VCR: Press the VCR button until it blinks. The shaded buttons in the - Toshiba 55A10 | Owners Manual - Page 12
TV converter The remote control provided with your TV is preprogrammed to operate Toshiba brand VCRs. You can program your TV remote control to operate other TV converters as well. To program your TV remote control to operate non-Toshiba VCRs and cable TV converters: 1. Refer to the VCR and cable - Toshiba 55A10 | Owners Manual - Page 13
, 009, 031 031, 054, 053 024 056, 057, 058, 003, 052, 031 034 STS SYLVANIA SYMPHONIC TANDY TATUNG TEAC TECHNICS TEKNIKA TELEFUNKEN THOMAS TMK TOSHIBA TOTEVISION UNITECH VECTOR RESEARCH VIDEO CONCEPTS VIDEOSONIC WARDS YAMAHA ZENITH 013 031, 034, 067 034 010, 034 043 034, 043 031, 070 031, 019, 034 - Toshiba 55A10 | Owners Manual - Page 14
203 STARCOM 002, 004, 008, 009 STARGATE 008, 030 SYLVANIA 067 TADIRAN 030 TANDY 017 TELECAPATION 021 TEXSCAN 029, 067 TOCOM 039, 040, 056 TOSHIBA 052 UNIKA 007, 014, 024 UNITED CABLE 004, 053 UNIVERSAL 007, 024, 027, 035, 005, 014, 026, 032 VIEWSTAR 086, 087, 088, 089, 012 - Toshiba 55A10 | Owners Manual - Page 15
(page 16) FAV zy Buttons cycle through favorite channels (page 21) ADV MUTE RECALL TV/VIDEO SURROUND MUTE mutes the sound (page 37) RECALL displays screen information (page 41) TV/VIDEO selects video input source (page 34) STOP SOURCE PLAY PIP REC TV/VCR REW FF SURROUND turns the surround sound - Toshiba 55A10 | Owners Manual - Page 16
displays will disappear automatically within 6 seconds (except the Convergence menus, which will remain until a button is pressed). • If you want to close all the on-screen displays instantly, press EXIT. 16 Appendix Index - Toshiba 55A10 | Owners Manual - Page 17
Connecting your TV Using the Remote Control Setting up your TV Changing the on-screen display language You can choose from three different languages (English, French and Spanish) for the on-screen displays. Adjustment menus and messages will appear in the language of your choice. To - Toshiba 55A10 | Owners Manual - Page 18
automatically Your TV can automatically detect all active channels and store them in its memory. After the channels are stored automatically, you can manually add or erase individual channels. If you use both ANT-1 and ANT-2 terminals, you must program channels for each input source. To program - Toshiba 55A10 | Owners Manual - Page 19
your TV Adding and erasing channels manually After you have programmed the channels automatically, you can manually add or erase specific channels. To blue. The separate red, green, and blue images are projected onto the screen where they converge to form a full-color picture. The picture will be - Toshiba 55A10 | Owners Manual - Page 20
become completely white when correctly adjusted. 6. Press EXIT to display the circumference CONVERGENCE menu. 7. Press the corresponding Number button (1-9) to select the area of the screen you want to adjust. 1 2 3 4 5 6 7 8 9 10 11 12 13 14 15 16 17 18 19 20 21 22 23 24 25 26 27 28 29 30 - Toshiba 55A10 | Owners Manual - Page 21
CH RTN MENU/ENTER yzx • FAV zy Notes: • The FAV zy buttons will operate as the menu x • buttons while the menu display is on the screen. • The favorite channel feature is not available for the ANT2 input. To select your favorite channels: Press FAV z or y . The FAV z y buttons will not operate - Toshiba 55A10 | Owners Manual - Page 22
Introduction Connecting your TV Using the Remote Control Setting up your TV To clear your favorite channels: 1. Press MENU, then press x or • until the CUSTOM menu appears. 2. Press y or z to highlight FAVORITE CH2 for example. 3. Press x or • to display the FAVORITE CH2 menu. 1 2 3 4 5 6 7 8 9 - Toshiba 55A10 | Owners Manual - Page 23
label to the channel. Press x or • to enter a character in the first space. Press the button repeatedly until the character you want appears on the screen. Press ENTER. 1 2 3 4 5 6 7 8 9 10 11 12 13 14 15 16 17 18 19 20 21 22 23 24 25 26 27 28 29 30 31 32 - Toshiba 55A10 | Owners Manual - Page 24
picture: 1. Turn on the TV and select the program you want to watch. 2. Press PIP once to display a small picture. A window 1/9 the size of the screen will appear. Press PIP a second time to display a 1/16-size window. PI P PI P 6 6 3. Press ADV yz to choose the program you want to display as - Toshiba 55A10 | Owners Manual - Page 25
Introduction Connecting your TV Using the Remote Control Switching the main and small pictures Press SWAP while you are using the PIP feature to switch the main and small pictures. The main and small pictures will switch each time you press the SWAP button. Changing the position of the small - Toshiba 55A10 | Owners Manual - Page 26
Introduction Connecting your TV Using the Remote Control Using the LOCKS menu The LOCKS menu includes the V-CHIP, CH LOCK, VIDEO LOCK, and NEW PIN CODE functions. You can use these functions after entering the correct PIN code. Entering the PIN code 1. Press MENU, then press x or • until the - Toshiba 55A10 | Owners Manual - Page 27
Introduction Connecting your TV Using the Remote Control Setting up your TV Using the V-CHIP menu Some TV programs and movies include signals that classify the content of the program (violence, sex, dialog, language). The V-CHIP control feature in this TV detects the signals and blocks the - Toshiba 55A10 | Owners Manual - Page 28
Introduction Connecting your TV Using the Remote Control Setting up your TV MPAA RATING (Independent rating system for movies) 1. From the LOCKS menu, select MPAA RATING. 2. Press x or • to display the MPAA RATING menu, then press z or y to highlight MPAA RATING. 3. Press x or • to display the - Toshiba 55A10 | Owners Manual - Page 29
Introduction Connecting your TV Using the Remote Control Setting up your TV Unlocking programs temporarily 1. If you try to watch a TV program that exceeds the rating limits you set, the TV will enter into the program lock mode. TH I S PROGRAM HAS BEEN BLOCKED ! TV -PG L V EXCEEDS SET L I M I - Toshiba 55A10 | Owners Manual - Page 30
Introduction Connecting your TV Using the Remote Control Setting up your TV To unlock channels: 1. From the LOCKS menu, select CH LOCK. 2. Press x or • to display the CH LOCK menu. 3. Press y or z to highlight CLEAR. 4. Press x or • until "0" replaces the channel numbers you have locked. Note: - Toshiba 55A10 | Owners Manual - Page 31
Adjusting the picture Selecting the picture mode You can select your desired picture type from four picture modes- sports, standard, movie, and preference-as described in the following table: Mode sports standard movie preference Picture Quality bright and dynamic picture (factory setting) - Toshiba 55A10 | Owners Manual - Page 32
Index Appendix Using the TV's Features Setting up your TV Using the Remote Control Connecting your TV Introduction Saving new preference You can save the PICTURE qualities (contrast, brightness, color, tint, and sharpness) you have adjusted in the picture preference mode. To save your new - Toshiba 55A10 | Owners Manual - Page 33
Introduction Connecting your TV Using the Remote Control Setting up your TV Selecting the color temperature You can change the quality of the picture by selecting from three preset color temperatures: cool, medium, and warm. Mode cool medium warm Picture Quality blueish neutral reddish To - Toshiba 55A10 | Owners Manual - Page 34
VIDEO 1, VIDEO 2, VIDEO 3, or ColorStream, depending on which input jacks are used for connecting the devices. (See "Connecting your TV" on page 5.) The following on-screen display appears if you press the TV/VIDEO button on the remote control, but if you press the TV/VIDEO button on the TV set - Toshiba 55A10 | Owners Manual - Page 35
video you selected is not closed-captioned, no captions will display on the screen. Giant pandas eat leaves. • To view text, select T1, T2, text is not available in your area, a black rectangle may appear on your screen. If this occurs, turn the Closed Caption feature OFF. POWER MTS TIMER TV - Toshiba 55A10 | Owners Manual - Page 36
22 23 24 25 26 27 28 29 30 31 32 33 34 35 4. Press ENTER to start the clock. To display the time on-screen: Press RECALL. Note : If you want to see how much time remains before the shut-off time, press TIMER once. The remaining time will be - Toshiba 55A10 | Owners Manual - Page 37
, music, or other audio information (when provided by individual stations). When the TV receives a stereo or SAP broadcast, the word STEREO or SAP appears on-screen every time the TV is turned on, the channel is changed, or the RECALL button is pressed. The MTS feature is not available in VIDEO - Toshiba 55A10 | Owners Manual - Page 38
Introduction Connecting your TV Using the surround sound feature The surround sound feature expands the audio listening field wider and deeper to create exceptional sound quality from the TV's speakers. The feature uses stereo signals from a TV broadcast or video input. To turn on the surround - Toshiba 55A10 | Owners Manual - Page 39
Introduction Connecting your TV Using the Remote Control Adjusting the sound quality You can change the quality of your TV's sound by adjusting the bass, treble, and balance. To adjust the sound quality: 1. Press MENU, then press x or • until the AUDIO menu appears. 2. Press y or z to highlight - Toshiba 55A10 | Owners Manual - Page 40
Introduction Connecting your TV Using the Remote Control Using the Sub-Bass System (SBS) The Sub-Bass System allows you to enhance bass performance, even when the volume is low. To turn on the Sub-Bass System: 1. Press MENU, then press x or • until the AUDIO menu appears. 2. Press y or z to - Toshiba 55A10 | Owners Manual - Page 41
17 18 19 20 21 22 23 24 25 26 27 28 29 30 31 32 33 34 35 Displaying on-screen information Press RECALL to display the following information on-screen: • Antenna mode (when in TV mode) • Channel number or VIDEO mode selected • Time (if set) • Channel label (if set) • Stereo - Toshiba 55A10 | Owners Manual - Page 42
Setting up your TV Viewing the demonstration mode When you press DEMO on the TV, the TV automatically displays a variety of its on-screen menus and special features. This function is provided for demonstration purposes only. To stop the demonstration mode: Press DEMO again. Understanding the auto - Toshiba 55A10 | Owners Manual - Page 43
Introduction Connecting your TV Using the Remote Control Appendix Specifications Television System NTSC standard Channel Coverage VHF: 2 through 13 UHF: 14 through 69 Cable TV: Mid band (A-8 through A-1, A through I) Super band (J through W) Hyper band (AA through ZZ, AAA, BBB) Ultra band (65 - Toshiba 55A10 | Owners Manual - Page 44
Troubleshooting Before calling a service technician, please check the following table for a possible cause of the problem and some solutions. Problem TV to the signal source type (cable or antenna). Black box appears on the screen • The Closed Caption feature may be set to one of the text modes - Toshiba 55A10 | Owners Manual - Page 45
in this manual and checking the section "BEFORE CALLING SERVICE PERSONNEL," you find that service is needed;. In the Continental United States call: Using the TV's Features (1) Call the TACP toll free number 1-800-631-3811 after you find a defective product or part to find the nearest TOSHIBA - Toshiba 55A10 | Owners Manual - Page 46
Sound quality adjustments 39 SPEAKERS on/off 40 Specifications 43 Stereo sound 37 Sub-Bass System 40 Surround sound 38 S-video cables 5 T TIMER 36 Troubleshooting 44 TV/VIDEO button on remote 34 TV/VIDEO button on TV 17 V V-CHIP BLOCKING OPTION 28 ENABLE BLOCKING 27 MPAA RATING 28 NEW - Toshiba 55A10 | Owners Manual - Page 47
WAYNE, NEW JERSEY 07470 NATIONAL SERVICE DIVISION:1420B TOSHIBA DRIVE, LEBANON, TN. 37087 HEAD OFFICE/327 KAMAKEE STREET, HONOLULU, HAWAII 96814, U.S.A. TEL: (808) 591-8377 HEAD OFFICE/191 McNABB STREET MARKHAM, ONTARIO L3R 8H2, CANADA TEL: (905) 470-5400 SERVICE CENTERS/TORONTO: 191 McNABB STREET
-
 1
1 -
 2
2 -
 3
3 -
 4
4 -
 5
5 -
 6
6 -
 7
7 -
8
-
9
-
10
-
11
-
12
-
13
-
14
-
15
-
16
-
17
-
18
-
19
-
20
-
21
-
22
-
23
-
24
-
25
-
26
-
27
-
28
-
29
-
30
-
31
-
32
-
33
-
34
-
35
-
36
-
37
-
38
-
39
-
40
-
41
-
42
-
43
-
44
-
45
-
46
-
47
 |
 |
Projection Television
© 2000 TOSHIBA CORPORATION
All Rights Reserved
55A10
55A10A
O
WNER'S
M
ANUAL
®
Owner's Record
The model number and serial number are on the back
of your TV. Record these numbers in the spaces below.
Refer to these numbers whenever you communicate
with your Toshiba dealer about this TV.
Model number:
Serial number:
Introduction
Connecting
your TV
Using the
Remote Control
Setting up
your TV
Using the TV’s
Features
Appendix
Index