Toshiba BDX1400KU User Guide - Page 22
Customizing, Audio Setting
 |
View all Toshiba BDX1400KU manuals
Add to My Manuals
Save this manual to your list of manuals |
Page 22 highlights
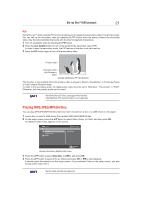
22 Customizing Customizing This section describes the various setting options of this Toshiba Blu-ray Disc™/DVD Player. If the setup option is greyed out, it means the setting cannot be changed at the current state. 1 Press the SETTING button in stop mode to display the setup screen. 2 Press OK to enter the Setting menu. 3 Use the / button to select an option and press OK. 4 Press the button or the RETURN button to return to the previous menu. (Sample Illustration) General operations settings Audio Setting 1 In the Setting menu, use the / button to select Audio and press OK. 2 Press the / button to select an option and press OK. 3 Use the / button to select the desired audio setting and press OK. 4 Press the button or the RETURN button to return to the previous menu. SPDIF When you connect an audio system to the COAXIAL DIGITAL output jack, the options are: Bitstream: Selects Bitstream output if your receiver SPDIF (Coaxial) IN supports Dolby® or DTS® or PCM audio signal. PCM: Selects PCM output if your receiver SPDIF (Coaxial) IN only supports PCM stereo audio signal. Re-encode: Selects Re-encode output if your receiver SPDIF (Coaxial) IN supports Dolby® or DTS® and you want to hear both PIP audio and the movie audio on Blu-ray™ video. Off: No audio will be output via COAXIAL DIGITAL output jack. HDMI When you connect an HDMITM device to the HDMI OUT jack, the available options are: Bitstream: Selects Bitstream output if your receiver HDMI IN supports Dolby® or DTS® or PCM audio signal. PCM: Selects PCM output if your receiver HDMI IN only supports PCM audio signal. Re-encode: Selects Re-encode if your receiver's HDMI IN supports Dolby® or DTS® and you want to hear both PIP audio and movie audio on Blu-ray™ video. Off: No audio will be output via HDMI OUT jack.
-
 1
1 -
2
-
3
-
4
-
5
-
6
-
7
-
8
-
9
-
10
-
11
-
12
-
13
-
14
-
15
-
16
-
 17
17 -
 18
18 -
 19
19 -
 20
20 -
 21
21 -
 22
22 -
 23
23 -
 24
24 -
 25
25 -
 26
26 -
 27
27 -
28
-
29
-
30
-
31
-
32
-
33
-
34
-
35
-
36
-
37
 |
 |
