Toshiba MW24F52 User Manual - Page 15
Connecting to optional equipment - model
 |
View all Toshiba MW24F52 manuals
Add to My Manuals
Save this manual to your list of manuals |
Page 15 highlights
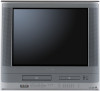
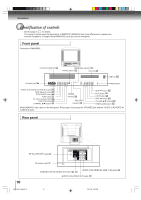
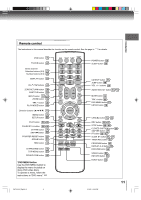
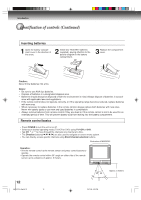
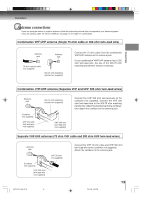
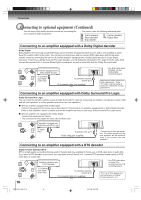
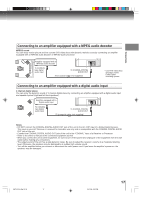
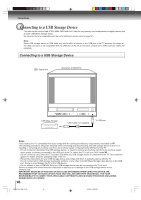
Connections Connecting to optional equipment Before connecting the unit to other equipment, be sure to turn off the power and unplug all of the equipment from the wall outlet before making any connections. You can enjoy the camcorder or high quality dynamic sounds of DVD video discs or audio CDs by connecting the unit to optional audio equipment. Using the audio/video inputs Press INPUT repeatedly to select the desired mode. "LINE1", "LINE2" or TV channel will display on the screen for 4 seconds. TV Channel LINE1 LINE2 LINE 1 (Back) (Front) Note: This key will not operate in DVD mode. Connecting to a camcorder To playback from the camcorder, connect the camcorder to the unit as shown. Signal flow Illustration of MW20F52 INPUT To AUDIO (L/R)/VIDEO OUT Audio/Video cable (not supplied) Camcorder (yellow) (white) (red) To AUDIO (L/R)/VIDEO IN (LINE IN 2) (yellow) (white) (red) Model MW24F51 has a door on the front panel. Please open it to access the PHONES jack and the AUDIO (L/R)/VIDEO IN (LINE IN 2) jacks. Connecting to an audio system Connect the unit to your audio system. 5W70101A [E]p13-18 VHF/UHF OUT PUT VIDEO DIGITAL AUDIO L COAXIAL AUDIO R LINE 1 IN VIDEO L(MONO) AUDIO R 15 To ANALOG AUDIO OUT (white) Audio system (white) Audio cable (not supplied) (red) (red) To audio inputs of the amplifier 31`01`06, 11:10 15
-
 1
1 -
2
-
3
-
4
-
5
-
6
-
7
-
8
-
9
-
 10
10 -
 11
11 -
 12
12 -
 13
13 -
 14
14 -
 15
15 -
 16
16 -
 17
17 -
 18
18 -
 19
19 -
 20
20 -
21
-
22
-
23
-
24
-
25
-
26
-
27
-
28
-
29
-
30
-
31
-
32
-
33
-
34
-
35
-
36
-
37
-
38
-
39
-
40
-
41
-
42
-
43
-
44
-
45
-
46
-
47
-
48
-
49
-
50
-
51
-
52
-
53
-
54
-
55
-
56
-
57
-
58
-
59
-
60
-
61
-
62
-
63
-
64
-
65
-
66
-
67
-
68
-
69
-
70
-
71
-
72
 |
 |