Toshiba SD-3755U Owners Manual - Page 39
Selecting Progressive Scan, INITIAL SETTINGS
 |
View all Toshiba SD-3755U manuals
Add to My Manuals
Save this manual to your list of manuals |
Page 39 highlights
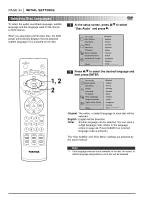
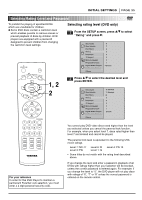
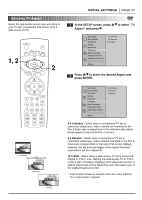
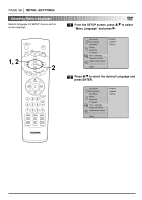
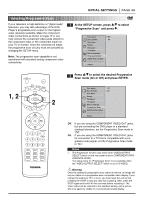
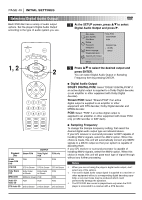
INITIAL SETTINGS PAGE 39 Selecting Progressive Scan If your television is high-definition or "digital ready" television, you may take advantage of the DVD Player's progressive scan output for the highest video resolution possible. Make the component video connections as shown on page 13 or you may connect the component video jacks directly to the component video or HD component inputs on your TV or monitor. Once the connection is made, the progressive scan circuitry must be activated by changing the SETUP menu. Note: The progressive scan capability is not operational with standard analog component video connections. 1 At the SETUP screen, press D/E to select "Progressive Scan" and press G. Disc Audio Off Disc Subtitle On Disc Menu Rating Password TV Aspect Menu Language Progressive Scan Digital Audio Output 5.1 Speaker Setup Others 2 Press D/E to select the desired Progressive Scan mode (On or Off) and press ENTER. 1, 2 Disc Audio Off Disc Subtitle On Disc Menu Rating Password 2 TV Aspect Menu Language Progressive Scan Digital Audio Output 5.1 Speaker Setup Others Off: If you are using the COMPONENT VIDEO OUT jacks, but are connecting the DVD player to a standard (analog) television, set the Progressive Scan mode to "Off". On: If you are using the COMPONENT VIDEO OUT jacks for connection to a TV that is compatible with a progressive scan signal, set the Progressive Scan mode to "On". Notes ❍ The Progressive function only works when VIDEO OUTPUT SELECT switch on the rear panel is set to COMPONENT (PROGRESSIVE SCAN). The setup menu for "Progressive Scan" is not available when the "VIDEO OUTPUT SELECT" switch is set to S-VIDEO. Warning Once the setting for progressive scan output is entered, an image will only be visible on a progressive scan compatible video display. If you change the setting to "On" in error, you must reset the unit by first pressing the STOP to stop any disc that is playing. Next, press the STOP again and hold it for five seconds before releasing it. The video output will be restored to the standard setting, and a picture will once again be visible on a conventional analog display.
-
 1
1 -
2
-
3
-
4
-
5
-
6
-
7
-
8
-
9
-
10
-
11
-
12
-
13
-
14
-
15
-
16
-
17
-
18
-
19
-
20
-
21
-
22
-
23
-
24
-
25
-
26
-
27
-
28
-
29
-
30
-
31
-
32
-
33
-
 34
34 -
 35
35 -
 36
36 -
 37
37 -
 38
38 -
 39
39 -
 40
40 -
 41
41 -
 42
42 -
 43
43 -
 44
44 -
45
-
46
-
47
-
48
 |
 |
