Toshiba SD7300KU Owners Manual - Page 20
Using a SD/SDHC card
 |
View all Toshiba SD7300KU manuals
Add to My Manuals
Save this manual to your list of manuals |
Page 20 highlights
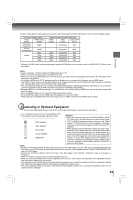
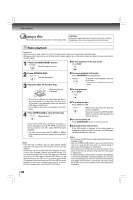
Basic playback Zooming in an image Press ZOOM repeatedly to toggle through Q1, Q2 and Q3. To return to normal playback, press ZOOM until the Q:Off appears. Press the / / / buttons to view a different part of the image. You may move the image from the centre position to up, down, left and right direction. When you reach the edge of the image, the display will not shift anymore in that direction. Rotating an image Press the ANGLE button repeatedly. The image will rotate in the clockwise direction as follows: Viewing a thumbnail view Press MENU in the photo list screen 19 . e.g. C0001 [784k] C0002 [704k] C0003 [684k] C0004 [584k] C0005 [804k] C0006 [484k] 1. Press the / / / to select an image, press the ENTER button to view one image in full-screen. 2. Press SKIP / to view other thumbnail screen. Slide Show playback The Slide Show enables you to view picture (files) one after another automatically. • Set "JPEG Interval" setting to "5 seconds", "10 seconds" or "15 seconds" 22 . Using a SD/SDHC card This unit supports the use of a Secure Digital (SD)/High Capacity SD (SDHC) Memory Card (not included). You can enjoy playing back MP3/JPEG files stored in the card. Inserting a SD/SDHC card 1 Inserting a SD/SDHC card fully into the slot on the front of DVD player until it clicks as illustrated. To pause playback Press PAUSE/STEP during playback To resume normal playback, press PLAY. To stop playback Press STOP. SD/SDHC card 2 Press the SD button on the remote control to select SD mode. A selection menu will appear on the screen if it contains music and picture files in the SD/SDHC card. ENTER 3 Press / to select the Music or Picture icon, and then press ENTER. (please see 19 for details.) To return to DVD mode DVD • Pressing the DVD button on the remote control to resume DVD playback during SD/SDHC stop. Removing the SD/SDHC card In stop mode, gently push the SD/SDHC card into the slot and then pull it out slowly. Notes • If you cannot easily insert the memory card, you may have inserted it incorrectly. Try to turnover the card and then insert again. Do not force the memory card into the memory card slot. • Do not remove the SD/SDHC card during playback. • The connection may not be available depending on the type of your SD/SDHC card. This unit is compatible with the following Memory Devices: • Secure Digital™ (SD) Memory Card (16MB - 2GB, FAT16) • SDHC Memory Card (4GB - 32GB, FAT32) - This unit does not support NTFS file system. - Supported JPEG file size: less than 16M bytes 20
-
 1
1 -
2
-
3
-
4
-
5
-
6
-
7
-
8
-
9
-
10
-
11
-
12
-
13
-
14
-
 15
15 -
 16
16 -
 17
17 -
 18
18 -
 19
19 -
 20
20 -
 21
21 -
 22
22 -
 23
23 -
 24
24 -
 25
25 -
26
-
27
-
28
 |
 |
