Toshiba TDP-P3-US User Guide - Page 15
Heading2 - Powering up the Projector and Adjusting the Image, The fans start to run
 |
View all Toshiba TDP-P3-US manuals
Add to My Manuals
Save this manual to your list of manuals |
Page 15 highlights
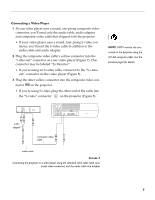
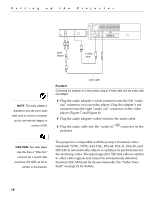
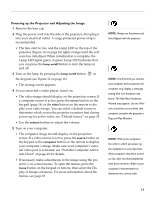
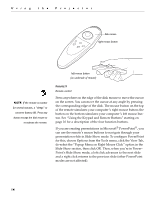
Powering up the Projector and Adjusting the Image 1 Remove the lens cap. 2 Plug the power cord into the side of the projector, then plug it into your electrical outlet. A surge-protected power strip is recommended. • The fans start to run, and the Lamp LED on the top of the projector (Figure 12 on page 16) lights orange until the software has initialized. When initialization is complete, the Lamp LED lights green. A green Lamp LED indicates that you can press the lamp on/off button to turn the lamp on and off. 3 Turn on the lamp by pressing the lamp on/off button on the keypad (see Figure 12 on page 16). • The startup screen appears. 4 If you connected a video player, turn it on. • The video image should display on the projection screen. If a computer source is active, press the source button on the keypad (page 16) or the video button on the remote to display your video image. You can select a default source to determine which source the projector examines first during power-up for active video; see "Default Source" on page 25. • Use the volume buttons to adjust the volume. 5 Turn on your computer. • The computer image should display on the projection screen. If a video source is active, press the source button on the keypad or the computer button on the remote to display your computer's image. Make sure your computer's external video port is activated; see "Portable Computer Activation Chart" on page 40 for details. • If necessary, make adjustments to the image using the projector's on-screen menus. To open the menus, press the menu button on the keypad or remote, then select the Display or Image sub-menu. For more information about the menus, see page 18. NOTE: Always use the power cord that shipped with the projector. NOTE: The first time you connect your computer to the projector, the computer may display a message stating that new hardware was found. The Add New Hardware Wizard may appear. Use the Wizard to load the correct driver (the computer considers the projector a Plug and Play Monitor). NOTE: With some computers, the order in which you power up the equipment is very important. Most computers should be turned on last, after all other peripherals have been turned on. Refer to your computer's documentation to determine the correct order. 11
-
 1
1 -
2
-
3
-
4
-
5
-
6
-
7
-
8
-
9
-
 10
10 -
 11
11 -
 12
12 -
 13
13 -
 14
14 -
 15
15 -
 16
16 -
 17
17 -
 18
18 -
 19
19 -
 20
20 -
21
-
22
-
23
-
24
-
25
-
26
-
27
-
28
-
29
-
30
-
31
-
32
-
33
-
34
-
35
-
36
-
37
-
38
-
39
-
40
-
41
-
42
-
43
-
44
-
45
-
46
-
47
-
48
-
49
-
50
-
51
-
52
-
53
-
54
-
55
-
56
-
57
-
58
 |
 |
