Toshiba TDP-P3-US User Guide - Page 27
Follow these steps to manually adjust the vertical position., Highlight Vertical position
 |
View all Toshiba TDP-P3-US manuals
Add to My Manuals
Save this manual to your list of manuals |
Page 27 highlights
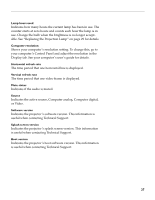
Horizontal position Follow these steps to manually adjust the horizontal position: 1 Turn Auto Image off. 2 Highlight Horizontal position, then press the left navigation button to move the image right or press the right navigation button to move the image left. Positioning adjustments are saved when you power off the projector. Vertical position Follow these steps to manually adjust the vertical position. 1 Turn Auto Image off. 2 Highlight Vertical position, then press the left navigation button to move the image down or press the right navigation button to move the image up. Positioning adjustments are saved when you power off the projector. 23
-
 1
1 -
2
-
3
-
4
-
5
-
6
-
7
-
8
-
9
-
10
-
11
-
12
-
13
-
14
-
15
-
16
-
17
-
18
-
19
-
20
-
21
-
 22
22 -
 23
23 -
 24
24 -
 25
25 -
 26
26 -
 27
27 -
 28
28 -
 29
29 -
 30
30 -
 31
31 -
 32
32 -
33
-
34
-
35
-
36
-
37
-
38
-
39
-
40
-
41
-
42
-
43
-
44
-
45
-
46
-
47
-
48
-
49
-
50
-
51
-
52
-
53
-
54
-
55
-
56
-
57
-
58
 |
 |

23
Horizontal position
Follow these steps to manually adjust the horizontal position:
1
Turn Auto Image off.
2
Highlight Horizontal position, then press the left navigation
button to move the image right or press the right navigation
button to move the image left.
Positioning adjustments are saved when you power off the pro-
jector.
Vertical position
Follow these steps to manually adjust the vertical position.
1
Turn Auto Image off.
2
Highlight Vertical position, then press the left navigation but-
ton to move the image down or press the right navigation but-
ton to move the image up.
Positioning adjustments are saved when you power off the pro-
jector.