Toshiba Tecra A8 PTA83C-KF201F Users Manual Canada; English - Page 163
SD card care, Creation of a boot disk, Within the TOSHIBA SD Memory Boot Utility
 |
View all Toshiba Tecra A8 PTA83C-KF201F manuals
Add to My Manuals
Save this manual to your list of manuals |
Page 163 highlights
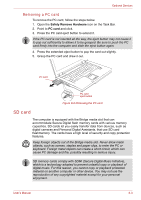
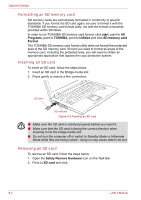
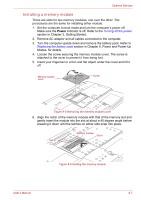
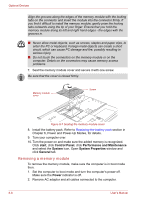
Optional Devices 3. Push in the SD card and release it to pop the card out slightly. 4. Grasp the SD card and remove it. SD card Figure 8-4 Removing an SD card ■ Make sure the SD card indicator is out before you remove the SD card or turn off the computer's power. If you remove the SD card or turn off the power while the computer is accessing the SD card you may lose data or damage the card. ■ Do not remove an SD card while the computer is in Standby or Hibernation Mode. The computer could become unstable or data in the SD card could be lost. SD card care Set the write-protect switch to the lock position, if you do not want to record data. ■ Do not write to an SD card if the battery power is low. Low power could affect writing accuracy. ■ Do not remove an SD card while read/write is in progress. ■ The SD card is designed so that it can be inserted only one way. Do not try to force the SD card into the Bridge media slot. ■ Do not leave an SD card partially inserted in the slot. Press the SD card until you hear it click into place. ■ Do not twist or bend SD cards. ■ Do not expose SD cards to liquids or store in humid areas or lay media close to containers of liquid. ■ After using an SD card, return it to its case. ■ Do not touch the metal part or expose it to liquids or let it get dirty. Creation of a boot disk Within the TOSHIBA SD Memory Boot Utility, a bootable SD memory card can be created if required. Refer to the Utilities of Chapter 1, Introduction for details. User's Manual 8-5
-
 1
1 -
2
-
3
-
4
-
5
-
6
-
7
-
8
-
9
-
10
-
11
-
12
-
13
-
14
-
15
-
16
-
17
-
18
-
19
-
20
-
21
-
22
-
23
-
24
-
25
-
26
-
27
-
28
-
29
-
30
-
31
-
32
-
33
-
34
-
35
-
36
-
37
-
38
-
39
-
40
-
41
-
42
-
43
-
44
-
45
-
46
-
47
-
48
-
49
-
50
-
51
-
52
-
53
-
54
-
55
-
56
-
57
-
58
-
59
-
60
-
61
-
62
-
63
-
64
-
65
-
66
-
67
-
68
-
69
-
70
-
71
-
72
-
73
-
74
-
75
-
76
-
77
-
78
-
79
-
80
-
81
-
82
-
83
-
84
-
85
-
86
-
87
-
88
-
89
-
90
-
91
-
92
-
93
-
94
-
95
-
96
-
97
-
98
-
99
-
100
-
101
-
102
-
103
-
104
-
105
-
106
-
107
-
108
-
109
-
110
-
111
-
112
-
113
-
114
-
115
-
116
-
117
-
118
-
119
-
120
-
121
-
122
-
123
-
124
-
125
-
126
-
127
-
128
-
129
-
130
-
131
-
132
-
133
-
134
-
135
-
136
-
137
-
138
-
139
-
140
-
141
-
142
-
143
-
144
-
145
-
146
-
147
-
148
-
149
-
150
-
151
-
152
-
153
-
154
-
155
-
156
-
157
-
 158
158 -
 159
159 -
 160
160 -
 161
161 -
 162
162 -
 163
163 -
 164
164 -
 165
165 -
 166
166 -
 167
167 -
 168
168 -
169
-
170
-
171
-
172
-
173
-
174
-
175
-
176
-
177
-
178
-
179
-
180
-
181
-
182
-
183
-
184
-
185
-
186
-
187
-
188
-
189
-
190
-
191
-
192
-
193
-
194
-
195
-
196
-
197
-
198
-
199
-
200
-
201
-
202
-
203
-
204
-
205
-
206
-
207
-
208
-
209
-
210
-
211
-
212
-
213
-
214
-
215
-
216
-
217
-
218
-
219
-
220
-
221
-
222
-
223
-
224
-
225
-
226
-
227
-
228
-
229
-
230
-
231
-
232
-
233
-
234
-
235
-
236
-
237
-
238
-
239
-
240
-
241
-
242
-
243
-
244
-
245
-
246
-
247
-
248
-
249
-
250
-
251
-
252
-
253
-
254
-
255
-
256
-
257
-
258
-
259
-
260
-
261
-
262
-
263
-
264
-
265
-
266
-
267
-
268
-
269
-
270
-
271
-
272
-
273
-
274
-
275
-
276
 |
 |
