Uniden 420 English Owners Manual - Page 7
Programming Options
 |
View all Uniden 420 manuals
Add to My Manuals
Save this manual to your list of manuals |
Page 7 highlights
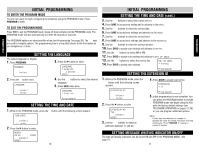
PROGRAMMING PROGRAMMING ▲ ▲ ▲ PROGRAMMING OPTIONS TURNING THE RINGERS ON OR OFF The ringer for each of the 4 lines can be turned ON or OFF. The default setting is ON. ▲ 1 . While in the PROGRAM mode, press the ▼ button until the following screen appears: RINGER ON/OFF ▲▼: select : enter 2 . Press the button to enter. L1 RINGER ON/OFF 5 . Use the ▲▼ buttons to change the setting to OFF. L1 RINGER ON/OFF = Off ▲▼: select SAVE? 6 . Press SAVE to accept the setting. L1 RINGER ON/OFF = Off ▲ ▲▼: select : enter 3 . Use the ▲▼ buttons to select the desired ringer, 1-4. 4 . Press the button to enter. Programmed! 7 . Repeat for the other lines, or select ALL RINGER ON/OFF to determine setting for all 4 lines. L1 RINGER ON/OFF = On ▲▼: select SAVE? CHANGE THE RINGER TYPES There are 4 ringer tones, or types, that can be selected. The default is 1. Changing the ringer types by line is useful if you want to distinguish which line is ringing audibly without having to see the LINE indicators on the telephone itself. 1 . While in the PROGRAM mode, press the ▼ button until the following screen appears: RINGER TYPE ▲▼: select : enter 2 . Press the button to enter. L1 RINGER TYPE ▲▼: select : enter 3 . Use the ▲▼ buttons to select the desired line, 1-4. PROGRAMMING OPTIONS CHANGE THE RINGER TYPES (cont.) ▲ 4 . Press the button to enter. 6 . Press SAVE to accept the setting. L1 RINGER TYPE = Type 1 ▲▼: select SAVE? 5 . Use the ▲▼ buttons to select the ringer type. As you scroll through the types, a sample of the actual ringer will be heard. L1 RINGER TYPE = Type 2 Programmed! 7 . Repeat for the other lines. L1 RINGER TYPE = Type 2 ▲▼: select SAVE? SETTING THE DELAY RING The DELAY RING is useful in installations where all 4 lines are common (square) and a receptionist is answering all calls. Each extension would activate the DELAY RING for the desired period of time except for the receptionist. Incoming calls would ring at the receptionist extension ONLY for the DELAY RING time. If the receptionist doesn't answer, after that time other extensions would begin to ring. By varying the delay ring time, a hierarchy of back-up for the receptionist can be defined. Most ring cycles are 6 seconds per ring. So to delay for two rings, program 12 seconds. For three rings, program 18 seconds, and so on. Programming is in two second increments. The default is DELAY RING OFF. NOTE TO VOICE MAIL SUBSCRIBERS: ■ If you set the DELAY RING for LONGER than the number of rings that the voice mail waits before answering, the phone will never ring. 1 . While in the PROGRAM mode, press the ▼ button until the following screen appears: DELAY RING ▲▼: select : enter 2 . Use the ▲▼ buttons to change the desired ring delay. DELAY RING = 12 sec ▲▼: select SAVE? 3 . Press SAVE to accept the setting. 12 13
-
 1
1 -
 2
2 -
 3
3 -
 4
4 -
 5
5 -
 6
6 -
 7
7 -
 8
8 -
 9
9 -
 10
10 -
 11
11 -
 12
12 -
13
-
14
-
15
-
16
-
17
-
18
-
19
-
20
-
21
-
22
-
23
-
24
-
25
 |
 |
