Uniden UM415 English Owners Manual - Page 37
Maintenance And Troubleshooting
 |
UPC - 050633501290
View all Uniden UM415 manuals
Add to My Manuals
Save this manual to your list of manuals |
Page 37 highlights
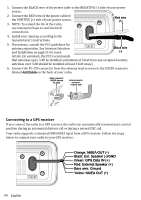
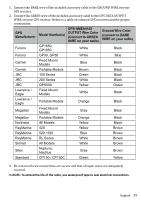
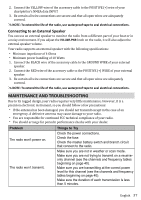
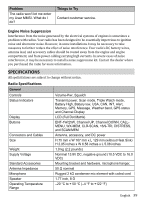
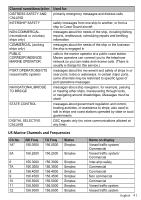
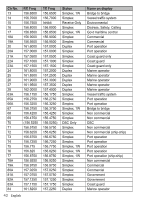
2. Connect the YELLOW wire of the accessory cable to the POSITIVE (+) wire of your chartplotter's NMEA data INPUT 3. Be certain all wire connections are secure and that all open wires are adequately covered. NOTE: To extend the life of the radio, use waterproof tape to seal electrical connections. Connecting to an External Speaker You can use an external speaker to monitor the radio from a different part of your boat or in a noisy environment. If you adjust the VOLUME-PWR knob on the radio, it will also adjust the external speaker volume. Your radio supports an external speaker with the following specifications: Minimum impedance of 4 Ohms Minimum power handling of 10 Watts 1. Connect the BLACK wire of the accessory cable to the GROUND WIRE of your external speaker. 2. Connect the RED wire of the accessory cable to the POSITIVE (+) WIRE of your external speaker. 3. Be certain all wire connections are secure and that all open wires are adequately covered. NOTE: To extend the life of the radio, use waterproof tape to seal electrical connections. Maintenance and Troubleshooting Due to its rugged design, your radio requires very little maintenance. However, it is a precision electronic instrument, so you should follow a few precautions: If the antenna has been damaged, you should not transmit except in the case of an emergency. A defective antenna may cause damage to your radio. You are responsible for continued FCC technical compliance of your radio. You should arrange for periodic performance checks with your dealer. Problem The radio won't power on. The radio won't transmit. Things to Try Check the power connections. Check the fuse. Check the master battery switch and branch circuit that connect to the radio. Make sure you are not in weather or scan mode. Make sure you are not trying to transmit on a receiveonly channel (see the channels and frequency tables beginning on page 40). Make sure you are transmitting at the correct power level for this channel (see the channels and frequency tables beginning on page 40). Make sure the duration of each transmission is less than 5 minutes. English 37
-
 1
1 -
2
-
3
-
4
-
5
-
6
-
7
-
8
-
9
-
10
-
11
-
12
-
13
-
14
-
15
-
16
-
17
-
18
-
19
-
20
-
21
-
22
-
23
-
24
-
25
-
26
-
27
-
28
-
29
-
30
-
31
-
 32
32 -
 33
33 -
 34
34 -
 35
35 -
 36
36 -
 37
37 -
 38
38 -
 39
39 -
 40
40 -
 41
41 -
 42
42 -
43
-
44
-
45
-
46
-
47
-
48
-
49
-
50
-
51
-
52
-
53
 |
 |
