ViewSonic SD-T225 SD-T225 User Guide English - Page 11
Wall Mounting Optional
 |
View all ViewSonic SD-T225 manuals
Add to My Manuals
Save this manual to your list of manuals |
Page 11 highlights
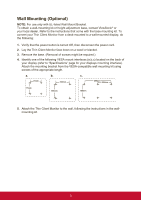
Wall Mounting (Optional) NOTE: For use only with UL-listed Wall Mount Bracket. To obtain a wall-mounting kit or height adjustment base, contact ViewSonic® or your local dealer. Refer to the instructions that come with the base mounting kit. To convert your Thin Client Monitor from a desk-mounted to a wall-mounted display, do the following: 1. Verify that the power button is turned Off, then disconnect the power cord. 2. Lay the Thin Client Monitor face down on a towel or blanket. 3. Remove the base. (Removal of screws might be required.) 4. Identify one of the following VESA mount interfaces (a,b,c) located on the back of your display (refer to "Specifications" page for your displays mounting interface). Attach the mounting bracket from the VESA-compatible wall mounting kit using screws of the appropriate length. a. b. c. 75mm 100mm 200mm 100mm 75mm 100mm 100mm 5. Attach the Thin Client Monitor to the wall, following the instructions in the wallmounting kit. 5
-
 1
1 -
2
-
3
-
4
-
5
-
 6
6 -
 7
7 -
 8
8 -
 9
9 -
 10
10 -
 11
11 -
 12
12 -
 13
13 -
 14
14 -
 15
15 -
 16
16 -
17
-
18
-
19
-
20
-
21
-
22
-
23
-
24
-
25
-
26
-
27
-
28
-
29
-
30
-
31
-
32
-
33
-
34
-
35
-
36
-
37
-
38
-
39
-
40
-
41
-
42
 |
 |
