Viper 5101 Owner Manual - Page 10
System maintenance, Low battery indicator, Battery replacement - remote
 |
View all Viper 5101 manuals
Add to My Manuals
Save this manual to your list of manuals |
Page 10 highlights
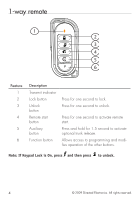
➢ System maintenance The system requires no specific maintenance. Your remote is powered by a small coin cell lightweight 3-volt lithium battery that lasts approximately one year under normal use. The remote uses one CR2032 cell battery. When the battery begins to weaken, the operating range is reduced. ➢ Low battery indicator When the battery is low on the remote the vehicle system emits an additional honk when unlocking to let you know it is time to change the battery. Note: The optional horn honk should be installed for the system to emit any additional honks during unlocking. Ask your authorized dealer if you have any questions. ➢ Battery replacement 1. Using a small slotted screwdriver, insert into slot located as shown and carefully pry the front of the unit open until front is completely separated from housing. 2 © 2009 Directed Electronics. All rights reserved.
-
 1
1 -
2
-
3
-
4
-
 5
5 -
 6
6 -
 7
7 -
 8
8 -
 9
9 -
 10
10 -
 11
11 -
 12
12 -
 13
13 -
 14
14 -
 15
15 -
16
-
17
-
18
-
19
-
20
-
21
-
22
-
23
-
24
-
25
-
26
-
27
-
28
-
29
-
30
-
31
-
32
-
33
-
34
-
35
-
36
-
37
-
38
-
39
-
40
-
41
-
42
-
43
-
44
 |
 |
