Vizio E260VA E190VA User Manual
Vizio E260VA Manual
 |
View all Vizio E260VA manuals
Add to My Manuals
Save this manual to your list of manuals |
Vizio E260VA manual content summary:
- Vizio E260VA | E190VA User Manual - Page 1
RAZOR LED™ LCD HDTV E190VA / E220VA / E260VA - user manual - Vizio E260VA | E190VA User Manual - Page 2
SRS TruSurround HD and SRS TruVolume are trademarks of SRS Labs, Inc. TruSurround HD and TruVolume technologies are incorporated under license from SRS Labs, Inc. This product qualifies for ENERGY STAR in the "factory default" setting and this is the setting in which power savings will be achieved. - Vizio E260VA | E190VA User Manual - Page 3
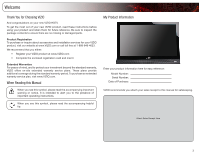
operating instructions. When you see this symbol, please read the accompanying helpful tip. My Product Information Enter your product information here for easy reference: Model Number Serial Number Date of Purchase VIZIO recommends you attach your sales receipt to this manual for safekeeping - Vizio E260VA | E190VA User Manual - Page 4
of electric shock or component damage, switch off the power before connecting other components to your TV. • Read these instructions. • Keep these instructions. • Heed all warnings. • Follow all instructions. • Do not use this apparatus near water. • Clean only with a dry cloth. • Do not block any - Vizio E260VA | E190VA User Manual - Page 5
TV will not be used for an extended period of time, unplug the power cord. • To reduce risk of electric shock, do not touch the connector with wet hands. • Insert batteries in accordance with instructions. Incorrect polarities may cause the batteries to leak which can damage the remote control - Vizio E260VA | E190VA User Manual - Page 6
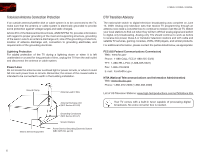
unattended or unused for long periods of time, unplug the TV from the wall outlet and disconnect the antenna or cable system. Power Lines -only TVs should continue to work as before to receive low power, Class A or translator television stations and with cable and satellite TV services, gaming - Vizio E260VA | E190VA User Manual - Page 7
of Contents Installing the TV 1 Inspecting the Package Contents 1 Installing the TV 1 Installing the TV Stand 1 Installing the TV on a Wall 2 Controls and Connections 3 Front Panel 3 Left Side Panel 3 Right Side Panel 3 Rear Panel 4 Remote Control 4 Replacing the Batteries 5 Completing - Vizio E260VA | E190VA User Manual - Page 8
Closed Captions 29 Troubleshooting & Technical Support 30 The TV displays "No Signal PARTS AND LABOR 34 Parts and Labor 34 Type of Service 34 Limitations and Exclusions 34 Personal Data 34 Zero Bright Pixel Defect Guarantee 34 8 E190VA / E220VA / E260VA Legal & Compliance 35 FCC Class - Vizio E260VA | E190VA User Manual - Page 9
moved • If an earthquake occurs and the TV is not properly secured VIZIO Razor LED LCD HDTV with Stand User Manual and Quick Start Guide Remote Control with Batteries Your TV comes in the box with the base already attached. Use the following instructions if you need to reattach the base. To - Vizio E260VA | E190VA User Manual - Page 10
TV. Installing the TV on a Wall To mount your TV on a wall, you will need a wall mount. Consult the information below to find the appropriate mount for your TV model: Screw Size: Screw Length: Screw Pitch: Hole Pattern: E190VA M4 10mm 0.7mm 75mm x 75mm E220VA M4 10mm 0.7mm 75mm x 75mm E260VA - Vizio E260VA | E190VA User Manual - Page 11
and Connections Front Panel Remote Control Sensor Front Panel Remote Control When using the remote, point it directly at this sensor. the brightness of the TV based on the light level in the room. (On E220VA and E260VA, the sensor is on the front of the TV.) Power: Turn the TV on or off. Menu - Vizio E260VA | E190VA User Manual - Page 12
Antenna: Connect coaxial cable for external antenna or cable TV. Input Wide Sleep Menu/OK Arrow Left Volume Up/Down Last Info 4 E190VA / E220VA / E260VA Power/Standby Input (Specific) Closed Caption (CC) Exit Arrow Up Arrow Right Arrow Down Channel Up/Down Mute Number Pad Dash VR10 Remote Control - Vizio E260VA | E190VA User Manual - Page 13
channel last viewed. Number Pad: Use the number pad to manually enter a channel. Info: Display the Info Window. Dash (-): Use to manually enter a sub-channel (18-1, 18-2, etc). Replacing the Batteries 1. Remove the battery cover. 2. Insert two AA batteries into the remote control. Make sure that - Vizio E260VA | E190VA User Manual - Page 14
connected to a cable service without a set-top box (cable is connected directly from the wall outlet) select Cable, then press Right Arrow Back and go to step 5. Select Next EXIT Exit If the TV is connected to a cable or satellite set-top box, press the EXIT button on the remote, then select the - Vizio E260VA | E190VA User Manual - Page 15
device, press the INPUT button on the remote and select the connection type (HDMI, RGB, etc) from the on-screen menu. Press OK. 6. Check the list of devices/connection types below for special instructions: Cable TV (without cable box/directly from wall) Perform a channel scan. RGB Make sure the - Vizio E260VA | E190VA User Manual - Page 16
4 Select one of the connection types. Use the cable(s) shown to connect the TV to your device. BEST BETTER HDMI RF/ COAXIAL RGB COMPONENT GOOD COMPOSITE AV 8 E190VA / E220VA / E260VA Select One: OR OR OR OR DIGITAL DIGITAL / ANALOG ANALOG ANALOG ANALOG Device Connection Chart - Vizio E260VA | E190VA User Manual - Page 17
correct input faster. Customizing Input Names To customize an input name: 1. Press the MENU button on the remote. The on-screen menu is displayed. 2. Use the Arrow buttons on the remote to highlight the TV icon and press MENU/OK. 3. Use the Arrow buttons to highlight Input and press MENU/OK. 4. Use - Vizio E260VA | E190VA User Manual - Page 18
go to the Input Naming screen and select Reset. E190VA / E220VA / E260VA Setting Up Channels From the channel menu you can: • Change the signal on the remote. The on-screen menu is displayed. 2. Use the Arrow buttons on the remote to highlight the TV icon and press MENU/OK. The TV Settings menu - Vizio E260VA | E190VA User Manual - Page 19
E190VA / E220VA / E260VA 5 Customizing the Master Channel List By customizing the master channel list, you can choose which channels can be displayed. 1. Press the MENU button on the remote. The on-screen menu is displayed. 2. Use the Arrow buttons on the remote to highlight the TV icon and press - Vizio E260VA | E190VA User Manual - Page 20
be renamed as Favorite. To customize a channel name: 1. Press the MENU button on the remote. The on-screen menu is displayed. 2. Use the Arrow buttons on the remote to highlight the TV icon and press MENU/OK. The TV Settings menu is displayed. 3. Use the Arrow buttons to highlight Channels and press - Vizio E260VA | E190VA User Manual - Page 21
/ E220VA / E260VA Changing the On-Screen Menu Language Your TV can display the on-screen menu in different languages. To change the on-screen menu language: 1. Press the MENU button on the remote. The on-screen menu is displayed. 2. Use the Arrow buttons on the remote to highlight the TV icon and - Vizio E260VA | E190VA User Manual - Page 22
to change the setting to Enable or Disable. 6. Press EXIT. Setting the Date and Time Using this menu option, you can manually set the TV's date and time. To manually set the date and time: 1. Press the MENU button on the remote. The on-screen menu is displayed. 2. Use the Arrow buttons on the - Vizio E260VA | E190VA User Manual - Page 23
E190VA / E220VA / E260VA 5 Adjusting the TV Settings for Use with A PC Your TV can be used to display output from a home computer using the RGB port. These settings are only available when viewing content from the RGB port. To adjust the PC settings: 1. Press the MENU button on the remote. The on- - Vizio E260VA | E190VA User Manual - Page 24
/OK button on the remote. Use the Arrow buttons to highlight a menu option, and press the MENU/OK button to select that option. Viewing a USB Photo Slideshow Your player features a USB port where you can connect and share a USB thumb drive containing your photos. The TV supports the following file - Vizio E260VA | E190VA User Manual - Page 25
E260VA Remember: • The USB thumb drive must be formatted as FAT32 • Files on the USB thumb drive must be a supported file type • The USB thumb drive must have a minimum 1GB memory • The TV From the photo screen, use the Arrow buttons on the remote to highlight an image, then press MENU/OK. The menu - Vizio E260VA | E190VA User Manual - Page 26
6 E190VA / E220VA / E260VA Setting the Screen Aspect Ratio The TV can display images in five different modes: Normal, Wide, aspect ratio for your content type. Areas in red will not be visible on your TV screen. Original Content Format 480p/480i (4:3) 720p (16:9) 1080p/1080i (16:9) RGB (4:3) - Vizio E260VA | E190VA User Manual - Page 27
original aspect ratio. Since the 4:3 aspect ratio is not large enough to fill the TV's screen, black bars are added to the left and right of the display image. • Wide stretches a 4:3 aspect ratio picture to the edges of the screen. Since the picture is being stretched, the display image may appear - Vizio E260VA | E190VA User Manual - Page 28
. These settings allow you to customize your TV's sound to match the type of programming you most often enjoy. The Equalizer Settings menu is not available when SRS TruSurroundHD is enabled. To adjust the equalizer settings: 1. Press the MENU/OK button on the remote. The on-screen menu is displayed - Vizio E260VA | E190VA User Manual - Page 29
treble levels for your TV's built-in speakers can be adjusted to your liking. To adjust the bass and treble levels, you must disable SRS TruSurroundHD and change the Equalizer Settings to Off. To adjust the bass and treble levels: 1. Press the MENU/OK button on the remote. The on-screen menu - Vizio E260VA | E190VA User Manual - Page 30
unfamiliar with audio formats, or your TV is not connected to an audio receiver, VIZIO recommends you set this option to Auto. This option only affects audio output from the coaxial or optical port. To select the digital output mode: 1. Press the MENU/OK button on the remote. The on-screen menu is - Vizio E260VA | E190VA User Manual - Page 31
E260VA 6 Changing the Audio Language Some digital free-to-air and cable channels broadcast programs in more than one language. The TV's settings to the factory default settings: 1. Press the MENU/OK button on the remote. The on-screen menu is displayed. 2. Use the Arrow buttons to highlight Audio - Vizio E260VA | E190VA User Manual - Page 32
the Picture Mode Your TV display can be /OK button on the remote. The on-screen menu 24 E190VA / E220VA / E260VA more vivid picture. • Photo - Allows you to manually change each of the . Sharpness - Adjusts the edge sharpness of picture elements. Backlight - Adjusts the LED brightness to affect the - Vizio E260VA | E190VA User Manual - Page 33
backlight. When the ambient light sensor is enabled, you will be unable to manually change the TV's brightness settings. To enable or disable the ambient light sensor: 1. Press the MENU/OK button on the remote. The on-screen menu is displayed. 2. Use the Arrow buttons to highlight Picture and press - Vizio E260VA | E190VA User Manual - Page 34
MENU/OK. 5. Press EXIT. 26 E190VA / E220VA / E260VA Setting the Parental Controls The TV's parental controls allow you to prevent the TV from displaying certain channels or programs without a password. To access the Parental Control menu: 1. Press the MENU button on the remote. The on-screen menu - Vizio E260VA | E190VA User Manual - Page 35
E260VA case, you can use the TV's Rating Block feature to block Number Pad on the remote to enter your new 4-digit parental control passcode. 3. In the Confirm Pin field, use the Number Pad on the remote to re-enter your new 4-digit parental control passcode. 4. Write down your new parental control - Vizio E260VA | E190VA User Manual - Page 36
When you are finished reviewing the system information, press the EXIT button on the remote. Restoring the TV to the Factory Default Settingss remote to highlight the Help icon and press OK. The Help menu is displayed. 3. Highlight System Reset and press MENU/OK. 28 E190VA / E220VA / E260VA The TV - Vizio E260VA | E190VA User Manual - Page 37
TV channels. • Digital Closed Caption for digital (ATSC) TV channels. 4. After highlighting the type of closed captions you wish to see, use the Arrow buttons on the remote background. • Window Color - Change the edge color. • Window Opacity - Change the edge type. • Reset Default - Restore closed - Vizio E260VA | E190VA User Manual - Page 38
a problem when using your TV, try to fix the issue using this troubleshooting guide. If, after using this troubleshooting guide, you are still experiencing an issue with your TV, contact VIZIO's Support Department. Quality customer support and service are integral parts of VIZIO's commitment - Vizio E260VA | E190VA User Manual - Page 39
on-screen menu are set correctly. • If you are using TV, AV1, or Component with 480i input, press the WIDE button on the remote to change the screen mode. The TV has pixels (dots) that are always dark or always lit. • Your HDTV is precision-manufactured using an extremely high level of technology - Vizio E260VA | E190VA User Manual - Page 40
, Spanish, French Optical Digital Audio Out, 3.5mm 2 3W SRS TruSurround HD SRS TruVolume Yes Specifications E260VA 26" Class 26.01" 25.35 x 17.00 x 5.86" 25.35 x 17.00 x 2.30" 13.1 lbs 11.8 lbs Edge Lit LED 60 Hz 1366 x 768 20,000:1 8 ms 350 nits 2 1 1 1 1 1 English, Spanish, French Optical Digital - Vizio E260VA | E190VA User Manual - Page 41
Power Consumption: Voltage Range: E190VA 22W 100~240 VAC @ 50/60Hz E220VA 26W 100~240 VAC @ 50/60Hz B E260VA 40W 100~240 VAC @ 50/60Hz 33 - Vizio E260VA | E190VA User Manual - Page 42
VIZIO Technical Support will provide instructions for packing and shipping the covered Product to the VIZIO service center. Limitations and Exclusions VIZIO DISCOVERABLE OR LATENT, SHALL IN NO EVENT EXCEED THE PURCHASE PRICE OF THE PRODUCT. VIZIO SHALL NOT BE RESPONSIBLE FOR LOSS OF USE, LOSS OF - Vizio E260VA | E190VA User Manual - Page 43
to comply with the limits for a Class B digital device, pursuant to Part 15 of the FCC Rules. These Control Act Open Source Software Notice Your VIA device may contain GPL executables and LGPL libraries that are subject to the PL2.0/LGPL2.1 License Agreements. VIZIO offers to provide source code - Vizio E260VA | E190VA User Manual - Page 44
Notes 36 - Vizio E260VA | E190VA User Manual - Page 45
E190VA / E220VA / E260VA 37 - Vizio E260VA | E190VA User Manual - Page 46
E190VA / E220VA / E260VA 38 - Vizio E260VA | E190VA User Manual - Page 47
- Vizio E260VA | E190VA User Manual - Page 48
SHOWN ARE THE PROPERTY OF THEIR RESPECTIVE OWNERS. IMAGES USED ARE FOR ILLUSTRATION PURPOSES ONLY. VIZIO, THE V LOGO, WHERE VISION MEETS VALUE, AND OTHER VIZIO TRADEMARKS ARE THE INTELLECTUAL PROPERTY OF VIZIO INC. PRODUCT FEATURES AND SPECIFICATIONS ARE SUBJECT TO CHANGE WITHOUT NOTICE. © 2011
-
 1
1 -
 2
2 -
 3
3 -
 4
4 -
 5
5 -
 6
6 -
 7
7 -
8
-
9
-
10
-
11
-
12
-
13
-
14
-
15
-
16
-
17
-
18
-
19
-
20
-
21
-
22
-
23
-
24
-
25
-
26
-
27
-
28
-
29
-
30
-
31
-
32
-
33
-
34
-
35
-
36
-
37
-
38
-
39
-
40
-
41
-
42
-
43
-
44
-
45
-
46
-
47
-
48
 |
 |

E190VA / E220VA / E260VA
–
USER MaNUaL
RAZOR LED
™
LCD HDTV