Vizio E260VA E190VA User Manual - Page 22
Arrow, MENU/OK, Date & Time, Daylight Saving., Enable, Disable, Auto Update., Current Tiime.,
 |
View all Vizio E260VA manuals
Add to My Manuals
Save this manual to your list of manuals |
Page 22 highlights
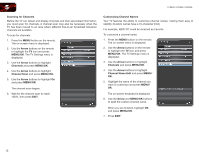
5 E190VA / E220VA / E260VA Adjusting the Time for Daylight Savings This setting will automatically adjust the time for zones which recognize daylight savings time. To enable or disable the daylight savings adjustment: 1. Press the MENU button on the remote. The on-screen menu is displayed. 2. Use the Arrow buttons on the remote to highlight the TV icon and press MENU/OK. The TV Settings menu is displayed. 3. Use the Arrow buttons to highlight Date & Time and press MENU/OK. 4. Use the Arrow buttons to highlight Daylight Saving. 5. Use the Arrow buttons to change the setting to Enable or Disable. 6. Press EXIT. Enabling or Disabling Automatic Date and Time Updates The current date and time is broadcast digitally in many areas. Your TV can automatically set the time and date using this information. When this setting is enabled, you cannot manually set the date and time. To enable or disable automatic updates: 1. Press the MENU button on the remote. The on-screen menu is displayed. 2. Use the Arrow buttons on the remote to highlight the TV icon and press MENU/OK. The TV Settings menu is displayed. 3. Use the Arrow buttons to highlight Date & Time and press MENU/OK. 4. Use the Arrow buttons to highlight Auto Update. 5. Use the Arrow buttons to change the setting to Enable or Disable. 6. Press EXIT. Setting the Date and Time Using this menu option, you can manually set the TV's date and time. To manually set the date and time: 1. Press the MENU button on the remote. The on-screen menu is displayed. 2. Use the Arrow buttons on the remote to highlight the TV icon and press MENU/OK. The TV Settings menu is displayed. 3. Use the Arrow buttons to highlight Date & Time and press MENU/OK. 4. Use the Arrow buttons to highlight Current Tiime. 5. Use the Arrow buttons to highlight individual numbers in the date and time. Use the Number Pad to enter the current date and time. 6. Press EXIT. 14
-
 1
1 -
2
-
3
-
4
-
5
-
6
-
7
-
8
-
9
-
10
-
11
-
12
-
13
-
14
-
15
-
16
-
 17
17 -
 18
18 -
 19
19 -
 20
20 -
 21
21 -
 22
22 -
 23
23 -
 24
24 -
 25
25 -
 26
26 -
 27
27 -
28
-
29
-
30
-
31
-
32
-
33
-
34
-
35
-
36
-
37
-
38
-
39
-
40
-
41
-
42
-
43
-
44
-
45
-
46
-
47
-
48
 |
 |
