Vizio E260VA E190VA User Manual - Page 20
Arrow, MENU/OK, Channels, Channel Scan, MENU/OK., Channel Name Edit
 |
View all Vizio E260VA manuals
Add to My Manuals
Save this manual to your list of manuals |
Page 20 highlights
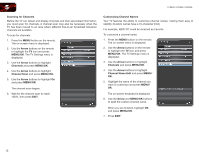
5 E190VA / E220VA / E260VA Scanning for Channels Before the TV can detect and display channels and their associated information, you must scan for channels. A channel scan may also be necessary when the TV has been moved to an area where different free-to-air broadcast television channels are available. To scan for channels: 1. Press the MENU button on the remote. The on-screen menu is displayed. 2. Use the Arrow buttons on the remote to highlight the TV icon and press MENU/OK. The TV Settings menu is displayed. 3. Use the Arrow buttons to highlight Channels and press MENU/OK. 4. Use the Arrow buttons to highlight Channel Scan and press MENU/OK. 5. Use the Arrow buttons to highlight On and press MENU/OK. The channel scan begins. 6. Wait for the channel scan to reach 100%, then press EXIT. Customizing Channel Names Your TV features the ability to customize channel names, making them easy to identify. (Custom names have a 10-character limit.) For example, KBOT-DT could be renamed as Favorite. To customize a channel name: 1. Press the MENU button on the remote. The on-screen menu is displayed. 2. Use the Arrow buttons on the remote to highlight the TV icon and press MENU/OK. The TV Settings menu is displayed. 3. Use the Arrow buttons to highlight Channels and press MENU/OK. 4. Use the Arrow buttons to highlight Channel Name Edit and press MENU/ OK. 5. Highlight the name of the channel you want to customize and press MENU/ OK. The on-screen keyboard is displayed. 6. Use the Arrow and MENU/OK buttons to spell the custom channel name. When you are finished, highlight OK and press MENU/OK. 7. Press EXIT. 12
-
 1
1 -
2
-
3
-
4
-
5
-
6
-
7
-
8
-
9
-
10
-
11
-
12
-
13
-
14
-
 15
15 -
 16
16 -
 17
17 -
 18
18 -
 19
19 -
 20
20 -
 21
21 -
 22
22 -
 23
23 -
 24
24 -
 25
25 -
26
-
27
-
28
-
29
-
30
-
31
-
32
-
33
-
34
-
35
-
36
-
37
-
38
-
39
-
40
-
41
-
42
-
43
-
44
-
45
-
46
-
47
-
48
 |
 |
