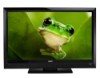
Vizio E390VL E390VL User Manual
Vizio E390VL Manual
 |
View all Vizio E390VL manuals
Add to My Manuals
Save this manual to your list of manuals |
Vizio E390VL manual content summary:
- Vizio E390VL | E390VL User Manual - Page 1
USER GUIDE MMOODDEELLS // E3D320VX // E3DE4230V9X0VL // E3D470VX Installing your new tv CONTROLS & CONNECTIONS connecting your devices using the on-screen menu using the usb media player TROUBLESHOOTING & SUPPORT Help, SPECs, warranty & LEGAL - Vizio E390VL | E390VL User Manual - Page 2
This product qualifies for ENERGY STAR in the "factory default" setting and this is the setting in which power savings will be achieved. Changing the factory default picture settings or enabling other features will increase power consumption that could exceed the limits necessary to qualify for - Vizio E390VL | E390VL User Manual - Page 3
service plan, visit www.VIZIO.com. When Reading this Manual When you see this symbol, please read the accompanying important warning or notice. It is intended to alert you to the presence of important operating instructions for replacement of the obsolete outlet. • Protect the power cord from being - Vizio E390VL | E390VL User Manual - Page 4
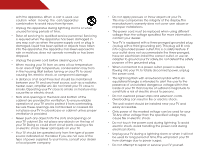
. To avoid electric shock, avoid handling the power cord during electrical storms. • Unplug your TV during a lightning storm or when it will not be used for long period of time. This will protect your TV from damage due to power surges. • Do not attempt to repair or service your TV yourself. - Vizio E390VL | E390VL User Manual - Page 5
or electric shock. • Follow instructions for moving your TV. Ensure that the power cord and any other cables are unplugged before moving your TV. • When unplugging your TV, hold the AC/DC power adapter, not the cord. Pulling on the power cord may damage the wires inside the cord and cause fire or - Vizio E390VL | E390VL User Manual - Page 6
stations to find out when they will turn off their analog signal and switch to digital-only broadcasting. Analog-only TVs should continue to work as before to receive low power, Class A or translator television stations and with cable and satellite TV services, gaming consoles, VCRs, DVD players - Vizio E390VL | E390VL User Manual - Page 7
periods of time, unplug the TV from the wall outlet and disconnect the antenna or cable system. Power Lines Do not locate the antenna near overhead light or power circuits, or where it could fall into such power lines or circuits. Remember, the screen of the coaxial cable is intended to be connected - Vizio E390VL | E390VL User Manual - Page 8
Table of Contents Installing the TV 3 Inspecting the Package Contents 3 Installing the TV 3 Installing the TV Stand 3 Installing the TV on a Wall 5 Controls and Connections 6 Rear Panel 6 Side Panel 7 Front Panel 8 Remote Control 9 Replacing the Batteries 10 Connecting Your Devices 11 - Vizio E390VL | E390VL User Manual - Page 9
Using USB Photo Slideshow 34 Connecting a USB Thumb Drive to the TV 34 Playing USB Media 34 Troubleshooting & Technical Support 36 Specifications 39 Limited Warranty 40 Legal & Compliance 41 2 - Vizio E390VL | E390VL User Manual - Page 10
TV can still fall over if: • It is placed on an uneven, unstable, or non-level surface • It is pushed, pulled, or otherwise improperly moved • If an earthquake occurs and the TV is not properly secured VIZIO LCD HDTV Quick Start Guide Remote Control with Batteries Package Contents 3 TV on Stand - Vizio E390VL | E390VL User Manual - Page 11
(BEST) RGB (PC) RGB (PC) AUDIO DVT / TV CABLE / ANTENNA Y/V Pb/Cb Pr/Cr AUDIO L R COMPOSITE (GOOD) COMPONENT (BETTER) AUDIO OUT OPTICAL AUDIO OUT Step 2 To install the TV stand: 1. Place the TV screen-down on a clean, flat surface. To prevent scratches or damage to the screen, place the TV - Vizio E390VL | E390VL User Manual - Page 12
your TV on a wall, you will need a wall mount. Consult the information below to find the appropriate mount for your TV model: Installing a TV on a wall requires lifting. To prevent injury or damage to the TV, ask someone to help you. Screw Size: Screw Length: Screw Pitch: Hole Pattern: E390VL M6 - Vizio E390VL | E390VL User Manual - Page 13
Controls and Connections Rear Panel 2 HDMI - Connect HDMI device. RGB - Connect RGB cable to PC. PC Audio In - Connect 3.5mm PC audio cable. Coaxial - Connect coaxial cable from cable, satellite, or antenna. Optical Audio Out - Connect optical/SPDIF audio device, such as home audio receiver. - Vizio E390VL | E390VL User Manual - Page 14
Side Panel POWER - Turn TV off or on. MENU - Open the on-screen menu. CHANNEL UP/DOWN - Change the channel. VOLUME UP/DOWN - Increase or decrease volume level. INPUT - Change input source. HDMI - Connect HDMI device. USB - Connect USB thumb drive to view photo slideshow. 7 2 Side Panel - Vizio E390VL | E390VL User Manual - Page 15
2 Front Panel REMOTE SENSOR When using the remote, aim it directly at this sensor. 8 Front Panel - Vizio E390VL | E390VL User Manual - Page 16
or decrease loudness of the audio. Mute Turn the audio off or on. Number Pad Manually enter a channel. WIDE Switch the display mode. 9 2 Power Turn TV on or off. Info Display the info window. Menu Display the on-screen menu. Arrow Navigate the on-screen menu. Guide Display the info window. V Button - Vizio E390VL | E390VL User Manual - Page 17
Batteries 1. Remove the battery cover. 2. Insert two batteries into the remote control. Make sure that the (+) and (-) symbols on the batteries match the (+) and (-) symbols inside the battery compartment. 3. Replace the battery cover. • Use only good quality batteries. • Inserting the batteries - Vizio E390VL | E390VL User Manual - Page 18
has a video port that matches an available port on the TV (HDMI, Component, etc). 2. Turn the TV and your device off. 3. Connect the appropriate cable (not included) to the TV and the device. 4. Turn the TV and your device on. Set the TV's input to match the connection you used (HDMI-1, HDM1-2, etc - Vizio E390VL | E390VL User Manual - Page 19
a PC display: 1. Connect an RGB cable (not included) to your PC and the RGB port on the back of the TV. This cable transmits video. 2. Connect a 3.5mm cable (not included) to your PC and the PC Audio In port on the back of the TV. This cable transmits audio. 3. Set your PC's resolution to match the - Vizio E390VL | E390VL User Manual - Page 20
available port on the TV (Optical, etc). 2. Turn the TV and your audio device off. 3. Connect the appropriate cable (not included) to the TV and the device. 4. Turn the TV and your device on. 3 Home Audio Receiver VIZIO Sound Bar BETTER Optical/SPDIF Cable GOOD 3.5mm Cable CONNECTING AUDIO DEVICE - Vizio E390VL | E390VL User Manual - Page 21
the First-Time Setup 4 The first time you turn on the TV, the Setup App will guide you through each of the steps necessary to get your TV ready for use. Before you begin the first-time setup: • Your TV should be installed and the power cord should be connected to an electrical outlet. • Your - Vizio E390VL | E390VL User Manual - Page 22
Change TV settings • Access USB photo slideshow • Access the help menu Navigating the On-Screen MCeCnu To open the on-screen menu, press the MENU button on the remote. EXIT Use the Arrow buttons to highlight a menu option, and press the OK button to select that option. BACK OK INFO MENU GUIDE - Vizio E390VL | E390VL User Manual - Page 23
input device: 1. Press the MENU button on the remote. The on-screen menu is displayed. 2. Use the Arrow buttons on the remote to highlight the Settings icon and press OK. The TV Settings menu is displayed. 3. Use the Up/Down Arrow buttons on the remote to highlight the input source and press OK. The - Vizio E390VL | E390VL User Manual - Page 24
you are viewing is not being broadcast with closed captions, the TV will not display them. To activate or deactivate closed captions: 1. Press the MENU button on the remote. The on-screen menu is displayed. 2. Use the Arrow buttons on the remote to highlight the CC icon and press OK. The Closed - Vizio E390VL | E390VL User Manual - Page 25
When activated, the TV's sleep timer will turn the TV off after a set period of time. Your TV display can be adjusted to suit your preferences and viewing conditions. To use the sleep timer: To adjust the picture settings: 1. Press the MENU button on the remote. The on-screen menu is displayed - Vizio E390VL | E390VL User Manual - Page 26
mode allows you to manually change each of the picture settings: Backlight - Adjusts the will not produce detail that does not otherwise exist. Adjusting the Advanced Picture Settings To adjust the advanced picture settings: 1. From the Picture Settings menu, use the Arrow buttons on the remote - Vizio E390VL | E390VL User Manual - Page 27
automatically adjusts the backlight for the best picture. Select Off, Low, Medium, or High. 4. When you have finished adjusting the Advanced Picture Settings, press the EXIT button on the remote. Adjusting the Color Temperature Adjusting the color temperature will change the "warmness" or "coolness - Vizio E390VL | E390VL User Manual - Page 28
OK. The TV displays, "Are you sure you want to RESET Picture Settings to the factory defaults?" 3. Highlight Yes and press OK. 4. Press the EXIT button on the remote. Adjusting the Audio Settings To adjust the audio settings: 1. Press the MENU button on the remote. The on-screen menu is displayed - Vizio E390VL | E390VL User Manual - Page 29
on page 23. 4. When you have finished adjusting the audio settings, press the EXIT button on the remote. Adjusting the Advanced Audio Settings To adjust the advanced audio settings: 1. From the Audio Settings Menu, use the Arrow buttons to highlight Advanced Audio, then press OK. The Advanced - Vizio E390VL | E390VL User Manual - Page 30
1. Press the MENU button on the remote. The on-screen menu is displayed. 2. Use the Arrow buttons on the remote to highlight the Audio icon and press OK. The Audio Settings menu is displayed. 3. Use the Arrow buttons to highlight Reset Audio Mode and press OK. The TV displays, "Are you sure you want - Vizio E390VL | E390VL User Manual - Page 31
an external antenna or cable TV connection, you must set the tuner mode. 1. Press the MENU button on the remote. The on-screen menu is displayed. 2. Use the Arrow buttons on the remote to highlight the Settings icon and press OK. The Settings menu is displayed. 3. Highlight Tuner and press OK. The - Vizio E390VL | E390VL User Manual - Page 32
on the remote. To add a single new analog channel: 1. From the Tuner Settings menu, remote to enter the number of the channel you are adding. 3. Highlight Add Channel and press OK. The TV scans for the channel. 4. When the TV is done scanning for the channel, press the EXIT button on the remote - Vizio E390VL | E390VL User Manual - Page 33
on the remote. Changing the Audio Language Some digital free-to-air and cable channels broadcast programs in more than one language.The TV's MTS ( OK. 3. Press the EXIT button on the remote. To use the Digital MTS feature: 1. From the Tuner Settings menu, highlight Digital MTS and press OK. The - Vizio E390VL | E390VL User Manual - Page 34
remote. The on-screen menu is displayed. 2. Use the Arrow buttons on the remote to highlight the Settings icon and press OK. The TV Settings menu is displayed. 3. Use the Arrow buttons on the remote Unlocking Channels When a channel is locked, it will be inaccessible. Locking a channel is a good way - Vizio E390VL | E390VL User Manual - Page 35
When this is the case, you can use the TV's Rating Block feature to block content based on its rating. For a list of content remote. Resetting the Content Locks To reset the content locks to the factory-default settings: 1. From the Parental Controls menu, highlight RESET LOCKS and press OK. The TV - Vizio E390VL | E390VL User Manual - Page 36
. Changing the On-Screen Menu Language Your TV can display the on-screen menu in different languages. To change the on-screen menu language: 1. Press the MENU button on the remote. The on-screen menu is displayed. 2. Use the Arrow buttons on the remote to highlight the Settings icon and press OK - Vizio E390VL | E390VL User Manual - Page 37
the CEC Settings The CEC function on your TV enables you to control HDMI-connected devices with the included remote without any additional programming. Not all HDMI devices support CEC. See your device's user manual for details. 1. Press the MENU button on the remote. The on-screen menu is - Vizio E390VL | E390VL User Manual - Page 38
through the system information. 5. When you are finished reviewing the system information, press the EXIT button on the remote. Resetting the TV Settings To reset the TV's picture and audio settings: 1. Press the MENU button on the remote. The on-screen menu is displayed. 2. Use the Arrow buttons on - Vizio E390VL | E390VL User Manual - Page 39
TV will reset shortly." 6. Wait for the TV to turn off. The TV will turn back on shortly afterward and the Setup App will begin. Using the Setup Wizard The TV's Setup App can be used to easily set up the TV tuner. To access guided setup: 1. Press the MENU button on the remote. The on-screen menu - Vizio E390VL | E390VL User Manual - Page 40
the Info Window The Info Window can be displayed by pressing the INFO or GUIDE button on the remote: • Press the INFO or GUIDE button one time to display channel and input information. • Press the INFO or GUIDE button two times to display the program title and closed captioning information. • Press - Vizio E390VL | E390VL User Manual - Page 41
the remote or touch the Power control on the side of the TV to turn it on. Playing USB Media To play USB media, you must first save your photos onto a USB thumb drive. Remember: • The USB thumb drive must be formatted as FAT32. • Files on the USB thumb drive must end in a supported file - Vizio E390VL | E390VL User Manual - Page 42
button and press OK if you would like to return to the previous screen. Back Button Highlight and press OK to return to left column. Current Folder buttons on the remote. Current Folder Start Fullscreen Slideshow Sort by Name or Date View Thumbnails/List View Folder Settings Toggle Music/Photos - Vizio E390VL | E390VL User Manual - Page 43
Troubleshooting & Technical Support A do you have questions? LET US HELP! YOUR PRODUCT INCLUDES FREE LIFETIME TECH SUPPORT The VIZIO support team is highly trained and is based in the United States. We can help with: • New Product Setup • Connecting Your Devices • Technical Problems • And More - Vizio E390VL | E390VL User Manual - Page 44
Press the Power/Standby button on the remote or on the side of the TV to turn the TV on. The power is on, but there is no image on the screen. • Ensure all cables are securely attached to the TV. • Ensure all devices are connected correctly. Devices differ; see your device's user manual for details - Vizio E390VL | E390VL User Manual - Page 45
and V-Position in the on-screen menu are set correctly. • If you are using TV, AV1, AV2, or Component with 480i input, press the WIDE button on the remote to change the screen mode. The TV has pixels (dots) that are always dark or always lit. • Your HDTV is precision-manufactured using an extremely - Vizio E390VL | E390VL User Manual - Page 46
) 1 1 1 English, Spanish, French Optical, Stereo 3.5mm 2 10W 39 Simulated Surround: Volume Normalizer: USB Functionality: Certifications/ Compliance: Voltage Range: Power Consumption: Standby Power Consumption: Remote Control Model: Panel Life: E390VL SRS StudioSurround HD, Dolby Digital Plus SRS - Vizio E390VL | E390VL User Manual - Page 47
material or packaging that affords an equal degree of protection.VIZIO Technical Support will provide instructions for packing and shipping the covered Product to the VIZIO service center. Limitations and Exclusions VIZIO's one-year limited warranty only covers defects in materials and workmanship - Vizio E390VL | E390VL User Manual - Page 48
. 2. Shielded interface cables and AC power cord, if any, must be used in order to comply with the emission limits. 3. The manufacturer is not responsible for any radio or TV interference caused by unauthorized modification to this equipment. It is the responsibilities of the user to correct such - Vizio E390VL | E390VL User Manual - Page 49
MODELS // E3D320VX // E3D420VX // E3D470VX © 2012 VIZIO INC. All rights reserved. 120406OC-NC
-
 1
1 -
 2
2 -
 3
3 -
 4
4 -
 5
5 -
 6
6 -
 7
7 -
8
-
9
-
10
-
11
-
12
-
13
-
14
-
15
-
16
-
17
-
18
-
19
-
20
-
21
-
22
-
23
-
24
-
25
-
26
-
27
-
28
-
29
-
30
-
31
-
32
-
33
-
34
-
35
-
36
-
37
-
38
-
39
-
40
-
41
-
42
-
43
-
44
-
45
-
46
-
47
-
48
-
49
 |
 |

USER
GUIDE
INSTALLING YOUR NEW TV
CONTROLS & CONNECTIONS
CONNECTING YOUR DEVICES
USING THE ON-SCREEN MENU
USING THE USB MEDIA PLAYER
TROUBLESHOOTING & SUPPORT
HELP, SPECS, WARRANTY & LEGAL
MODELS
//
E3D320VX
//
E3D420VX
//
E3D470VX
MODEL
E390VL