Vizio M3D550KD M3D550KD User Manual - Page 37
From the Network Connection - user manual
 |
View all Vizio M3D550KD manuals
Add to My Manuals
Save this manual to your list of manuals |
Page 37 highlights
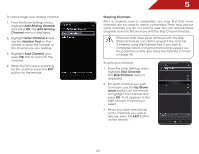
5 To connect to a wireless network whose network name (SSID) is not being broadcast: 1. Press the MENU button on the remote. The on-screen menu is displayed. 2. Use the Arrow buttons on the remote to highlight the Network icon and press OK. The Network Connection menu is displayed. 3. Highlight Enter Access Point Name and press OK. 4. Using the on-screen keyboard, enter your network's name (SSID), then highlight Connect and press OK. 5. Using the on-screen keyboard, enter your network's password, then highlight Connect and press OK. 6. Press the EXIT button on the remote. Changing the Advanced Network Settings Advanced users can fine-tune the network settings using the Manual Setup feature. To change advanced network settings: 1. From the Network Connection menu, highlight Manual Setup and press OK. The Change Settings menu is displayed. 2. Use the Arrow and OK buttons to adjust each setting: • DHCP - (Dynamic Host Configuration Protocol) This setting must be turned Off to change any of the other settings. • IP Address - The IP address assigned to the TV. • Subnet Mask - The subnet mask. • Default Gateway - Your network's default gateway address. • Pref. DNS Server - Your preferred domain name server address. • Alt DNS Server - Your alternate domain name server address. 3. If you need the RJ45 (ethernet) MAC address or the Wireless MAC address to set up your network, these are displayed at the bottom of the Change Settings menu. 4. Press the EXIT button on the remote. 30
-
 1
1 -
2
-
3
-
4
-
5
-
6
-
7
-
8
-
9
-
10
-
11
-
12
-
13
-
14
-
15
-
16
-
17
-
18
-
19
-
20
-
21
-
22
-
23
-
24
-
25
-
26
-
27
-
28
-
29
-
30
-
31
-
 32
32 -
 33
33 -
 34
34 -
 35
35 -
 36
36 -
 37
37 -
 38
38 -
 39
39 -
 40
40 -
 41
41 -
 42
42 -
43
-
44
-
45
-
46
-
47
-
48
-
49
-
50
-
51
-
52
-
53
-
54
-
55
-
56
-
57
-
58
-
59
-
60
-
61
-
62
-
63
-
64
-
65
-
66
-
67
-
68
 |
 |
