Vizio XMA1200 Quick Installation Guide - Page 17
tightening all 6 lag bolts.
 |
View all Vizio XMA1200 manuals
Add to My Manuals
Save this manual to your list of manuals |
Page 17 highlights
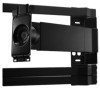
5. Remove the plastic covers from the mount. 5 Save the plastic covers. They will be reattached in Step 7. 6. Hang the mount on the wall using the 6 lag bolts, then slide the mount so the lag bolts are resting in the narrow part of the slot. Verify that the mount is level. Make small adjustments before tightening all 6 lag bolts. The mount is attached to the wall. Go to Step 6 on page 16. Narrow part of slot Mount, then slide 6 15
-
 1
1 -
2
-
3
-
4
-
5
-
6
-
7
-
8
-
9
-
10
-
11
-
 12
12 -
 13
13 -
 14
14 -
 15
15 -
 16
16 -
 17
17 -
 18
18 -
 19
19 -
 20
20 -
 21
21 -
 22
22 -
23
-
24
-
25
-
26
-
27
-
28
 |
 |

5
6
5. Remove the plastic covers from the mount.
Save the plastic covers. They will be reattached in Step 7.
6. Hang the mount on the wall using the 6 lag bolts, then slide the
mount so the lag bolts are resting in the narrow part of the slot.
Verify that the mount is level. Make small adjustments before
tightening all 6 lag bolts.
The mount is attached to the wall.
Go to Step 6 on page 16.
Narrow part of slot
Mount, then slide
15