Weider 148 English Manual - Page 7
onto the Dip Handle. Press a 25.4mm Round Inner - weights
 |
View all Weider 148 manuals
Add to My Manuals
Save this manual to your list of manuals |
Page 7 highlights
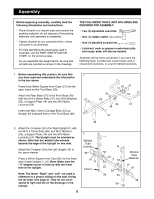
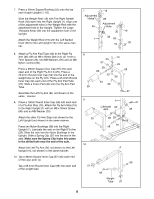
3. Attach an ÒLÓ Bracket (42) and the Right Upright (1) to the right side of the Rear Base (27) with two M10 x 75mm Bolts (46), three M10 Washers (53) and one M10 Nylon Locknut (54). Make sure the Uprights are oriented as shown, so the welded tube extends beyond the edge of the Upright on the indicated side. Note: The lower hole in the Rear Base is threaded, so this Bolt does not require a Nylon Locknut. Attach the Left Upright (16) and the remaining ÒLÓ Bracket (42) to the left side of the Rear Base (27) in the same manner. 4. Attach the Front Leg (8) to the Frame (2) with three M8 x 16mm Screws (51) and three M8 Washers (20). Note: Make sure you tighten the Screws very hard. 3 Welded Tube Extends 1 53 54 53 46 53 42 27 53 54 16 Welded Tube Extends 53 46 53 42 4 51 2 20 20 8 51 5. Attach the Frame (2) to the Crossbar (3) with two M10 x 60mm Bolts (47), four M10 Washers (53), a Support Plate (14) and two M10 Nylon Locknuts (54). Attach the Front Leg (8) to the Front Base (29) with two M8 x 50mm Carriage Bolts (45), two M8 Washers (20) and two M8 Nylon Locknuts (39). 6. Attach a Dip Handle (24) to one of the Weight Rests (19) with an M8 x 60mm Bolt (43), an 11mm x 10.5mm Spacer (44), two M8 Washers (20) and an M8 Nylon Locknut (39). Slide a Handgrip (12) onto the Dip Handle. Press a 25.4mm Round Inner Cap (59) into the end of the Dip Handle. Attach the other Dip Handle (24) to the other Weight Rest (19) in the same manner. Attach the Right Barbell Hook (28) to the Weight Rest (19) with an M8 Washer (20) and an M8 Nylon Locknut (39). The Barbell Hook must be oriented as shown. Attach the Left Barbell Hook (30) to the other Weight Rest (19) in the same manner. 7 5 8 39 20 53 47 2 20 3 14 54 53 47 29 45 6 12 39 20 24 39 20 59 19 28 30 19 44 20 43
-
 1
1 -
 2
2 -
 3
3 -
 4
4 -
 5
5 -
 6
6 -
 7
7 -
 8
8 -
 9
9 -
 10
10 -
 11
11 -
 12
12 -
13
-
14
-
15
-
16
-
17
-
18
-
19
-
20
 |
 |
