Weider 160 English Manual - Page 8
Lat Bar. Attach the Lat Bar to the Cable Clip 35
 |
View all Weider 160 manuals
Add to My Manuals
Save this manual to your list of manuals |
Page 8 highlights
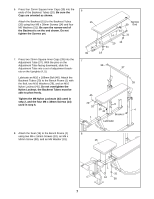
9. Press two 25mm Round Inner Caps (21) into the 9 weight tube of the Weight Carriage (12). Press two 45mm x 38mm Outer Bushings (23) onto the top and bottom of the Weight Carriage. Insert an M8 x 16mm Bolt (44) into the bracket on the Weight Carriage (12). Slide the Weight Carriage onto the Lat Tower (11) as shown. Route the Cable (25) through the slot of the Lat Tower (11) in the indicated direction. Connect the eyelet on the Cable to the Weight Carriage (12) using the M8 x 16mm Bolt (44) and an M8 Nylon Locknut (43). 10. Press a 38mm Square Inner Cap (32) into the top 10 of the Lat Tower (11). Route the Cable (25) around the Pulley (26) as indicated. Attach the Pulley inside the slot in the Lat Tower (11) with an M10 x 55mm Bolt (49), two M10 Washers (29), two M10 Spacers (42), and an M10 Nylon Locknut (45). Do not overtighten the Nylon Locknut; the Pulley must be able to turn freely. Attach the Cable Clip (35) to the end of the Cable (25). 11. Slide the Lat Tower (11) into the Front Leg (2). 11 Tighten it in place with the 44mm Adjustment Knob (34). Slot 25 21 43 Weight Tube 11 23 44 Bracket 12 21 23 29 42 45 26 11 32 42 29 49 25 35 34 11 2 12. Wet the ends of the Lat Bar (18) with soapy 12 water. Slide a Handgrip (19) onto each end of the Lat Bar. Attach the Lat Bar to the Cable Clip (35) and place it in the lat bar rest on the Lat Tower (11). 8 19 18 19 Lat Bar Rest 11 35
-
 1
1 -
2
-
 3
3 -
 4
4 -
 5
5 -
 6
6 -
 7
7 -
 8
8 -
 9
9 -
 10
10 -
 11
11 -
 12
12 -
 13
13 -
14
-
15
-
16
-
17
-
18
-
19
-
20
 |
 |
