Weider 230 Bench English Manual - Page 5
Weider 230 Bench Manual
 |
View all Weider 230 Bench manuals
Add to My Manuals
Save this manual to your list of manuals |
Page 5 highlights
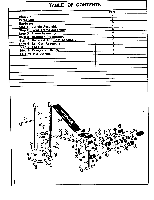
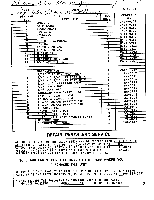
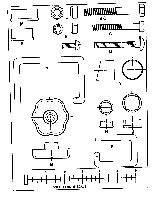
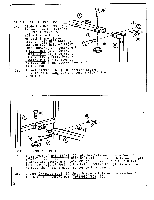
ASSEMBLY INSTRUCTIONS BEFORE STARTING, REMOVE ALL PIECES FROM THE BOX AND PACKING AND LAY THEM OUT ON A CLEAN SURFACE. CHECK THE PARTS LIST TO VERIFY THAT YOU HAVE ALL THE PIECES. THE DIAGRAM ON PAGE 1 WILL ALSO BE HELPFUL. TOOLS NEEDED: FLAT HEAD SCREWDRIVER ADJUSTABLE WRENCH PLIERS HAMMER 0 1 0 0 11 0 STEP 1 UPRIGHT ASSEMBLY 1A. Attach the 2 U-BRACKETS (11) to the U-BASE (12) by inserting two HEX HEAD BULLS (B) through the bottom of the U-BASE (12) and threading into the U-BRACKETS (11). Make sure that the holes on the U-BRACKETS (11) are facing toward the front of the U-BASE (12). Do not completely tighten. 1B. Lower the UPRIGHTS (1) over the U-BRACKETS (11). Insert 1 HEX HEAD BOLT (A) through each side of the UPRIGHT (1) aligning bolt holes on 0 UPRIGHT (1) with holes in U-BRACKET " 1 1111f0 (11). Secure bolts with 2 LOCK NUTS (E). Tighten all bolts. 1C. Insert 2 SQUARE PLASTIC CAPS (M) into the two ends of the U-BASE (12). 4
-
 1
1 -
 2
2 -
 3
3 -
 4
4 -
 5
5 -
 6
6 -
 7
7 -
 8
8 -
 9
9
 |
 |
