Weider 9645 Instruction Manual
Weider 9645 Manual
 |
View all Weider 9645 manuals
Add to My Manuals
Save this manual to your list of manuals |
Weider 9645 manual content summary:
- Weider 9645 | Instruction Manual - Page 1
MODEL NUMBER of the product (WESY96450). 2. The NAME of the product (WEIDER® PRO 9645 Home Gym System). 3. The SERIAL NUMBER of the product (see the front cover of this manual). 4. The KEY NUMBER and DESCRIPTION of the part(s) (see the PART LIST and EXPLODED DRAWING attached at the centre of this - Weider 9645 | Instruction Manual - Page 2
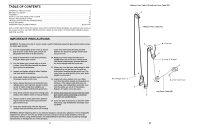
THE HOME GYM SYSTEM 22 WEIGHT RESISTANCE CHART 24 TROUBLE-SHOOTING AND MAINTENANCE 25 CABLE DIAGRAMS 26 ORDERING REPLACEMENT PARTS Back Cover Note: A PART IDENTIFICATION CHART and a PART LIST/EXPLODED DRAWING are attached to the centre of this manual. Remove the PART IDENTIFICATION CHART and - Weider 9645 | Instruction Manual - Page 3
help you to achieve the specific results you want. For your benefit, read this manual carefully before using the WEIDER® PRO 9645 Home Gym System. If you have additional questions, please call our Customer Service Department. To help us assist you, please note the product model number and serial - Weider 9645 | Instruction Manual - Page 4
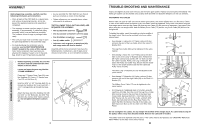
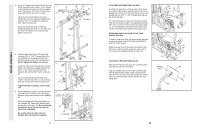
27 4 TROUBLE-SHOOTING AND MAINTENANCE Inspect and tighten all parts each time you use the home gym system. Replace any worn parts immediately. The home gym system can be cleaned using a damp cloth and mild non-abrasive detergent. Do not use solvents. TIGHTENING THE CABLES Woven cable, the type - Weider 9645 | Instruction Manual - Page 5
WEIGHT RESISTANCE CHART This chart shows the approximate weight resistance at each weight station. "Top may vary due to differences in individual weight plates, as well as friction between the cables, pulleys, and weight guides. 24 FRAME ASSEMBLY 2. Slide the Assist Upright (74) and the Leg Press - Weider 9645 | Instruction Manual - Page 6
5/16" x 2 3/4" Carriage Bolt (14) and the Seat Knob (40). For some exercises, the Seat (13) must be removed. First, be sure that the chain is not (52) to the Short Cable (23) with a Cable Clip (53). Attach the other end of the Chain to the Eyebolt (35) with a Cable Clip. ADJUSTING THE LEG PRESS - Weider 9645 | Instruction Manual - Page 7
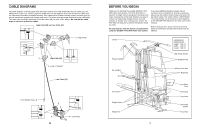
THE HOME GYM SYSTEM The instructions below describe how each part of the home gym system can be adjusted. IMPORTANT: When attaching the lat bar or nylon strap, make sure that the attachments are in the correct starting position for the exercise to be performed. If there is any slack in the cables - Weider 9645 | Instruction Manual - Page 8
the PRO 9645 48 decal and apply it to the home gym system as shown. Make sure that all parts have been properly tightened. The use of the remaining parts will be explained in HOW TO USE THE HOME GYM SYSTEM, beginning on page 22 of this manual. Before using the home gym system, pull each cable - Weider 9645 | Instruction Manual - Page 9
Arm. Arm identification is very important for step 14. Attach a "V"-Pulley (50) and a Long Cable Trap (31) to the Right Arm (48) with a 3/8" x 2 1/2" Bolt (86) 31 50 Welded Brackets 31 50 47 21 Attach a "V"-Pulley (50) and a Long Cable Trap (31) to the Left Arm (47) in the same 48 manner. 14. - Weider 9645 | Instruction Manual - Page 10
bracket on the Assist Upright (74). 33 101 84 3 Bracket 105 74 56 56 74 106 107 9 9 105 21 10 40. Locate and open the parts bag labelled 40 "SEAT ASSEMBLY." Insert a 1/4" x 2 1/2" Carriage Bolt (92) through the centre hole in a Seat Plate (37). Attach the Seat Plate to the Rear - Weider 9645 | Instruction Manual - Page 11
74 11 77 109 11 80 78 80 109 3 3 109 3 79 18. Locate and open the parts bags labelled "CABLE ASSEMBLY" and "PULLEYS." 18 During steps 19 through 39, refer to the CABLE DIAGRAMS on pages 26-27 of this manual to verify proper cable routing. Before beginning this section, fully unwind the four - Weider 9645 | Instruction Manual - Page 12
Locknut (3). Do not overtighten the Nylon Locknut; the Pulley Bracket must be able to move freely. See the inset drawing. Route the High Cable 55 66 (58) around the 3 1/2" Pulley (15) attached to the Pulley Bracket (20). Tighten the 3/8" x 2" 20 12 Bolt (12) and a 3/8" Nylon Locknut (not - Weider 9645 | Instruction Manual - Page 13
Cable and Pulley move smoothly. 24 66 21 57 25 55 58 15 12 57 Bracket 58 15 58 12 15 21 26. Note: This assembly step shows how to complete the assembly of several pre- 26 attached parts the Bolt. The Bolt has been shown removed for part identification. Reattach the 3 1/2" Low Pulley (102), - Weider 9645 | Instruction Manual - Page 14
(21) 21 and the 3/8" x 3 3/4" Bolt (88). 23 15 88 66 42 Inset shows view from other side 14 31. Attach the end of the Low Cable (23) to the 31 Long "U"-Bracket (57) with a 1/4" Nylon Locknut (2) and a 1/4" Flat Washer (10). Do not completely tighten the Nylon Locknut. It should be threaded - Weider 9645 | Instruction Manual - Page 15
THIS PART IDENTIFICATION CHART FROM THE MANUAL This chart is provided to help you identify the small parts used in assembly. Important: Some parts may is divided into four stages: 1) frame assembly, 2) arm assembly, 3) cable and pulley assembly, and 4) seat and backrest assembly. The hardware for - Weider 9645 | Instruction Manual - Page 16
x 3 1/4" Bolt (67)-2 3/8" x 3 1/2" Bolt (16)-1 3/8" x 3 3/4" Bolt (88)-6 5/16" x 5" Bolt (68)-1 5/16" x 3" Bolt (111)-1 1/4" x 1/2" Screw (18)-6 Cable Clip (53)-3 1" Retainer (69)-4 1 1/8" x 2 1/2" Plastic Bushing (89)-2 1" x 7/8" Plastic Bushing (90)-2 3 1/2" Pulley (15)-13 (Not shown to scale - Weider 9645 | Instruction Manual - Page 17
Retainer 1" Round Cover Cap Small "U"-Bracket Military Press Cable Short Weight Guide Assist Upright Left Pull-up Arm 3/8" x 1 3/4" Manual Note: "#" indicates a non-illustrated part. Specifications are subject to change without notice. REMOVE THIS PART LIST/EXPLODED DRAWING CHART FROM THE MANUAL - Weider 9645 | Instruction Manual - Page 18
EXPLODED DRAWING-Model No. WESY96450 R0996A 68 86 109 113 103 109 15 21 66 61 3 2 12 60 10 57 99 74 11 27 75 11 109 11 3 3 10 2 77 78 11 9 112 3 65 113 21 109 50 31 3 3 73 87 72 91 71 27 10 24 43 88 10 2 8 15 63 3 3 64 103 80 3 79 26 51 19 11 8 5 25 11 8 1 1 - Weider 9645 | Instruction Manual - Page 19
61 60 74 3 10 2 65 21 0 31 3 3 3 73 87 72 91 71 27 10 24 43 88 10 2 8 15 63 3 3 64 68 27 56 92 18 37 20 3 85 21 12 15 66 96 13 86 27 55 21 50 21 27 60 61 95 97 11 81 11 11 9 21 82 18 10 43 3 83 3 12 3 18 99 15 94 21 93 100 83 98 111 21 27 67 27 15 21 3 10 2 66 83
-
 1
1 -
 2
2 -
 3
3 -
 4
4 -
 5
5 -
 6
6 -
 7
7 -
8
-
9
-
10
-
11
-
12
-
13
-
14
-
15
-
16
-
17
-
18
-
19
 |
 |
QUESTIONS?
As a manufacturer, we are com-
mitted to providing complete
customer satisfaction. If you have
questions, or find that there are
missing or damaged parts, we
will guarantee you complete sat-
isfaction through our Customer
Service Department.
Please CALL:
0345-089009
Or WRITE:
ICON Fitness Lifestyle Ltd.
Greenwich House
223 North Street
Sheepscar
West Yorkshire
Leeds LS7 2AA
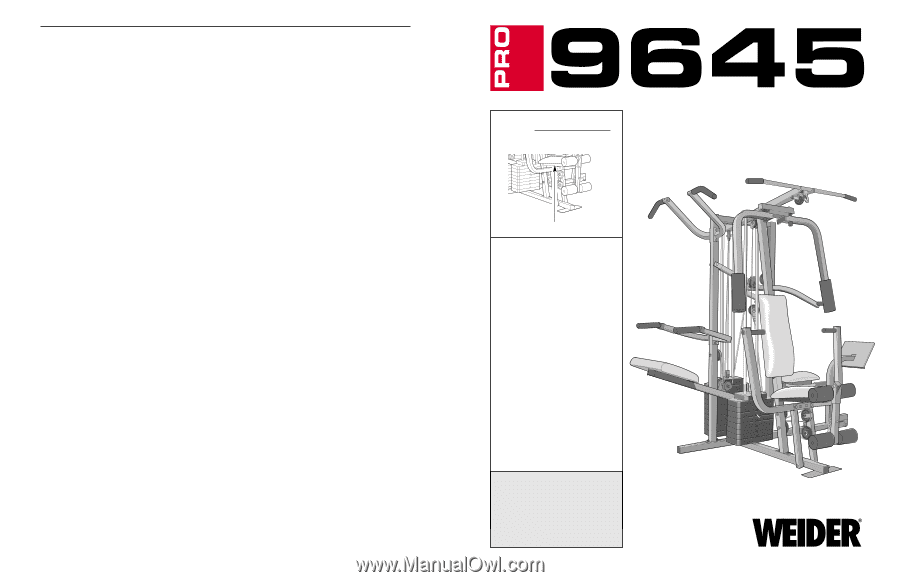
Model No. WESY96450
Serial No.
Write the serial number in the space
above for reference.
CAUTION
Read all precautions and instruc-
tions in this manual before using
this equipment. Save this manual
for future reference.
ORDERING REPLACEMENT PARTS
If you encounter any difficulties or problems with this product, contact the ICON Fitness Lifestyle Ltd. office, or
write:
ICON Fitness Lifestyle Ltd.
Greenwich House
223 North Street
Sheepscar
West Yorkshire
Leeds LS7 2AA
Tel: Country Code: 0345-089009
Fax: 113-241-1120
To help us assist you, please be prepared to give the following information:
1.
The MODEL NUMBER of the product (WESY96450).
2.
The NAME of the product (WEIDER
®
PRO 9645 Home Gym System).
3.
The SERIAL NUMBER of the product (see the front cover of this manual).
4.
The KEY NUMBER and DESCRIPTION of the part(s) (see the PART LIST and EXPLODED DRAWING
attached at the centre of this manual).
Part No. 141611 R0997A
WEIDER is a registered trademark of ICON Health & Fitness, Inc. © 1997
Printed in USA
USER'S MANUAL
TM
Serial Number Decal (Under Seat)