Weider Pro 260 English Manual - Page 8
and the Leg Lever 3 and Front Leg 2. - parts
 |
View all Weider Pro 260 manuals
Add to My Manuals
Save this manual to your list of manuals |
Page 8 highlights
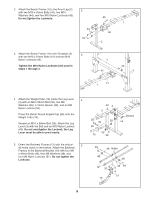
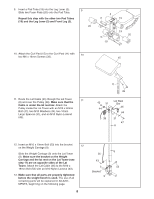
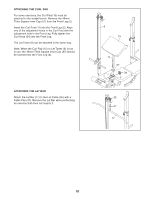
9. Insert a Pad Tube (19) into the Leg Lever (3). Slide two Foam Pads (20) onto the Pad Tube. Repeat this step with the other two Pad Tubes (19) and the Leg Lever (3) and Front Leg (2). 9 20 2 3 19 19 20 19 10. Attach the Curl Pad (15) to the Curl Post (11) with 10 two M6 x 16mm Screws (39). 15 11. Route the Lat Cable (35) through the Lat Tower 11 (8) and over the Pulley (38). Make sure that the Cable is under the lat rest bar. Attach the Pulley inside the Lat Tower with an M10 x 60mm Bolt (47), two M10 Washers (44), two 10mm Large Spacers (31), and an M10 Nylon Locknut (43). 11 39 43 31 44 38 Lat Rest Bar 35 44 31 47 8 12. Insert an M10 x 19mm Bolt (53) into the bracket 12 on the Weight Carriage (9). Slide the Weight Carriage (9) onto the Lat Tower (8). Make sure the bracket on the Weight Carriage and the lat rest on the Lat Tower (see step 11) are on opposite sides of the Lat Tower. Attach the Lat Cable (35) to the M10 x 19mm Bolt (53) with an M10 Nylon Locknut (43). 13. Make sure that all parts are properly tightened before the weight bench is used. The use of all remaining parts will be explained in ADJUSTMENTS, beginning on the following page. 8 35 43 Bracket 9 8 53
-
 1
1 -
2
-
 3
3 -
 4
4 -
 5
5 -
 6
6 -
 7
7 -
 8
8 -
 9
9 -
 10
10 -
 11
11 -
 12
12 -
 13
13 -
14
-
15
-
16
-
17
-
18
 |
 |
