Weider Pro 325 Bench English Manual - Page 8
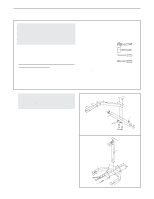
Attach the Curl Pad 29 to the Curl Post 28
 |
View all Weider Pro 325 Bench manuals
Add to My Manuals
Save this manual to your list of manuals |
Page 8 highlights
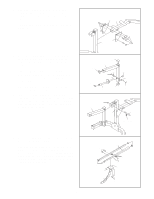
11. Attach the Curl Pad (29) to the Curl Post (28) with 11 two M6 x 16mm Screws (30). Press the two Weight Adapter Bushings (16) into 29 the Weight Adapter (15). 28 15 12. Press a Foot (51) onto the bottom of an Upright (45). Slide an Upright Bushing (46) onto the bottom of the Left Weight Rest (47). Make sure the tabs are on the side shown. Attach a Weight Rest Bushing (54) inside the bottom of the Left Weight Rest with two M4 x 16mm Screws (71). Press the tab on the Upright Bushing (46) into the indicated holes in the Left Weight Rest (47) Slide the Weight Rest and Upright Bushing into the Upright (45). Press the Upright Bushing into top of the Upright. Secure the Weight Rest with an Adjustment Knob (55). Repeat this step with the other Upright (45) and Right Weight Rest (48). 16 12 48 16 30 47 55 45 Hole 71 71 45 46 Tab 54 51 13. Attach the Frame (43) to an Upright (45) with two 13 Large Joint Plates (12), four M10 x 78mm Bolts (67), and four M10 Nylon Locknuts (11). Do not tighten the Locknuts yet. Attach the Frame (43) to the other Upright (45) in the same manner. Make sure the decals applied to the Upright and Frame are in the indicated locations. Decal 11 45 Decal 12 43 12 45 67 8
-
 1
1 -
2
-
 3
3 -
 4
4 -
 5
5 -
 6
6 -
 7
7 -
 8
8 -
 9
9 -
 10
10 -
 11
11 -
 12
12 -
 13
13 -
14
-
15
-
16
-
17
-
18
-
19
 |
 |
