Weider Pro 9000 Instruction Manual - Page 8
Attaching The Lat Bar To The High Pulley
 |
View all Weider Pro 9000 manuals
Add to My Manuals
Save this manual to your list of manuals |
Page 8 highlights
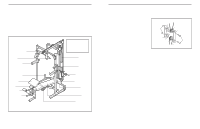
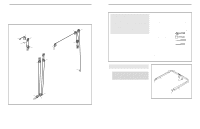
7. Slide the Carriage Stop (19) onto the Rear 7 Upright (6). Make sure that the Carriage Stop is oriented so the Carriage Stop Bushing (20) and the indicated hole are in the positions shown. Attach the Carriage Stop to the hole near the bottom of the Rear Upright with an M8 x 70mm Bolt (58) and an M8 Nylon Locknut (48). Press two 25mm Round Inner Caps (45) into the tube on the Weight Carriage (10). Insert an M10 x 19mm Bolt (61) into the bracket on the Weight Carriage. Slide the Weight Carriage onto the Rear Upright (6). Be sure the bracket is on the side shown. 8. Press three 50mm Square Inner Caps (43) into 8 the indicated ends of the Top Frame (8). 43 45 10 45 61 20 19 Hole 48 6 58 43 8 43 9. Attach the Top Frame (8) to the Crossbar (7) with 9 two M10 x 68mm Bolts (46), two M10 Washers (52), and two M10 Nylon Locknuts (49). Attach the Top Frame (8) to the Centre Upright (5) with two M10 x 68mm Bolts (46), two M10 Washers (52) and two M10 Nylon Locknuts (49). Do not tighten the M10 Nylon Locknuts (49) yet. 10. Attach the Top Frame (8) to the Rear Upright (6) 10 with three M10 x 68mm Bolts (46), two Support Plates (14), and three M10 Nylon Locknuts (49). Tighten the M10 Nylon Locknuts (49) used in steps 2-10. 8 46 52 46 8 49 7 49 52 5 49 14 49 14 8 46 6 ATTACHING THE LAT BAR TO THE HIGH PULLEY STATION OR THE LOW PULLEY STATION To use the high or low pulley station, attach the Lat Bar (73) to the High Cable (31) or the Low Cable (not shown) using a Cable Clip (30). The Row Bar (not shown) can be attached in the same manner. WARNING: Always remove the Lat Bar (73) when performing an exercise that does not require the use of the Lat Bar. ATTACHING WEIGHTS TO THE WEIGHT CARRIAGE To use the Weight Carriage (10), slide the desired amount of weight (not included) onto each side of the weight tube on the Weight Carriage. Secure the weight with the two Weight Pins (37). WARNING: Do not place more than 68 kg (150 lbs.) on the Weight Carriage (10). Always place the same amount of weight on each side of the Weight Carriage. To use Olympic weights, press two Adapter Bushings (44) into the ends of each Weight Adapter (23). Slide a Weight Adapter onto each side of the weight tube on the Weight Carriage (10). STORING WEIGHTS To store weights, slide them onto the Storage Tubes (22) on the Right and Left Bases (1, 2). 31 30 73 10 37 23 Weight Tube 22 1 2 22 ATTACHING WEIGHTS TO THE LEG LEVER To use the Leg Lever (66), slide the desired amount of weight (not included) onto the Weight Tube (65) and secure it with the Weight Pin (37). To use Olympic weights, slide the Weight Adapter (23) onto the Weight Tube (65). WARNING: Do not place more than 68 kg (150 lbs.) on the Weight Tube (65). 17 66 37 23 65
-
 1
1 -
2
-
 3
3 -
 4
4 -
 5
5 -
 6
6 -
 7
7 -
 8
8 -
 9
9 -
 10
10 -
 11
11 -
 12
12 -
 13
13 -
14
 |
 |
