Weslo 605s Bike English Manual - Page 5
with a Brass Handlebar Bushing 27, an M8 Zinc Washer 43, - exercise bike
 |
View all Weslo 605s Bike manuals
Add to My Manuals
Save this manual to your list of manuals |
Page 5 highlights
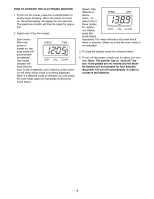
5. The Electronic Monitor (19) requires two ÒAAÓ batteries (not included). Alkaline batteries are recommended. Open the battery cover on the back of the Monitor. Insert two batteries into the Monitor. Make sure that the negative ends of the batteries (marked ÒÐÓ) are touching the springs in the Monitor. Close the battery cover. 5 19 Batteries 6. Connect the Sensor Wire (47) into the wire extending from the Electronic Monitor (19). Slide the Electronic Monitor onto the bracket on the Frame (46). Make sure that the Sensor Wire is not pinched between the Monitor and the Frame. 6 46 Cover 19 47 7. This step may have been completed. If not, please apply a small 7 amount of grease to the bolt welded in the Right Handlebar (38). Connect a Link Arm (26) to the lower end of the Right Handlebar (38) with a Brass Handlebar Bushing (27), an M8 Zinc Washer (43), and an 8mm Zinc Locknut (36) as shown. Attach the other Link Arm to the Left Handlebar in the same manner (not shown). 26 38 27 36 43 8. Note: Apply a small amount of grease to all of the small parts 8 assembled in this step. Slide a 13mm Washer (23) onto the 11 24 23 26 32 23 33 39 22 indicated end of a Pedal Axle (24). Insert the Pedal Axle into the right Link Arm (26). Slide a Steel Link Arm Bushing (32), a 13mm Washer (23), and a Pedal Spacer (33) onto the Pedal Axle. Firmly tighten the Pedal Axle clockwise into the right arm of the Crank (39). Tighten a 1/2Ó Locknut (22) onto the Pedal Axle. Attach the other Pedal to the left arm of the Crank (not shown) in the same manner. 9. Make sure that all parts of the exercise bike are properly tightened. 5
-
 1
1 -
 2
2 -
 3
3 -
 4
4 -
 5
5 -
 6
6 -
 7
7 -
 8
8 -
 9
9 -
 10
10 -
 11
11 -
12
 |
 |
