Weslo Cardioglide 950 English Manual - Page 5
Adjustment, Operation
 |
View all Weslo Cardioglide 950 manuals
Add to My Manuals
Save this manual to your list of manuals |
Page 5 highlights
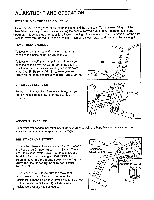
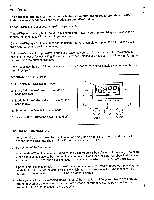
ADJUSTMENT AND OPERATION EXERCISING ON THE CARDIOGLIDE 950 Sit on the seat, place your feet on the pedals and hold the handlebar. To begin exercising, pull the handlebar towards your waist while pushing the pedals away with your legs. Return to the starting position. This completes one repetition. Repeat, moving with a smooth, continuous motion. For the best results, move through the full range of motion, maintain a steady pace, and keep your back straight. LOWER BODY EXERCISE To focus on the muscles of the lower body, rest your hands on the indicated bar as you exercise. To focus on the calf muscles, point your toes as you Bar push the pedals away. As you return to the starting position, raise your toes and rotate your heels down- ward. CAUTION: To avoid injury, keep you feet firmly on the pedals to prevent them from slipping. UPPER BODY EXERCISE To focus on the muscles of the upper body, rest your feet on the foot pegs rather than the pedals as you exercise. Foot Peg ABDOMINAL EXERCISE To exercise your abdominal muscles, keep your arms straight and bend back at the waist as you exercise. Remember t6 keep your back straight. RESISTANCE ADJUSTMENT To vary the intensity of your exercise, the resistance of the Resistance Cylinder (9) can be adjusted. There are 9 resistance levels-level 1 is the easiest, and level 9 is the most challenging. CAUTION: The Resistance Cylinder becomes very hot during use. Allow the Resistance Cylinder to cool before touching it. To increase the resistance, turn the resistance adjustment collar clockwise; to decrease the resistance, turn the collar counterclockwise. The arrow on the Resistance Cylinder (9) will show which 6 resistance level you have selected. Resistance Adjustment Collar 9 Resistance Adjustment Collar A4,AP„AllA 9
-
 1
1 -
 2
2 -
 3
3 -
 4
4 -
 5
5 -
 6
6 -
 7
7 -
 8
8 -
 9
9 -
 10
10 -
 11
11
 |
 |
