Weslo Momentum 950 Elliptical User Manual - Page 7
Attach the Upper Handlebar Cover with an M4 x
 |
View all Weslo Momentum 950 Elliptical manuals
Add to My Manuals
Save this manual to your list of manuals |
Page 7 highlights
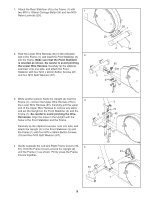
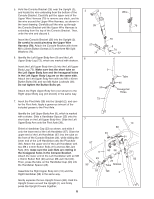
8. Hold the halves of the Upper Handlebar Cover (86) around the tube on the front of the Console Bracket (26). Attach the Upper Handlebar Cover with an M4 x 16mm Round Head Screw (89). 8 89 86 86 26 9. The Console (5) requires four "D" batteries (not included); alkaline batteries are recommended. See 9 the inset drawing. Press the tab on the battery cover, and lift off the battery cover. Insert four batteries into the Console. Make sure that the batteries are ori- ented as shown by the diagram inside the Console. Reattach the battery cover. Battery Cover Tab Batteries 5 10. Connect the wire harness on the Handgrip Pulse 10 Sensor (63) to the indicated wire harness on the Console (5). Insert both wire harnesses into the open- ing in the bottom of the Console. See the inset drawing. Insert the metal tube on the Handgrip Pulse Sensor (63) into the metal bracket inside of the Console (5) as shown. Be careful not to pinch the wire harnesses. Align the holes in the metal tube with the holes in the metal bracket, and tighten two M4 x 12mm Screws (80) into the indicated holes. 5 80 Bracket 5 Tube 80 63 Wire Harnesses 63 11. While another person holds the Console (5) in the 11 position shown, connect the wire harness on the Bookrack Console to the Upper Wire Harness (79). Insert the excess wire harness into the Console Bracket (26). Attach the Console to the Console Bracket with an M10 x 32mm Button Screw (85), two M10 x 27mm Button Screws (39), and three M10 Split Washers (67). Be careful to avoid pinching the wire har- 5 Wire Harness nesses. Snap the bookrack onto the Console (5). 79 85 67 39 67 39 26 7
-
 1
1 -
 2
2 -
 3
3 -
 4
4 -
 5
5 -
 6
6 -
 7
7 -
 8
8 -
 9
9 -
 10
10 -
 11
11 -
 12
12 -
13
-
14
-
15
-
16
-
17
-
18
-
19
-
20
 |
 |
