Weslo Pursuit E40 Bike English Manual - Page 6
Seat Post.
 |
View all Weslo Pursuit E40 Bike manuals
Add to My Manuals
Save this manual to your list of manuals |
Page 6 highlights
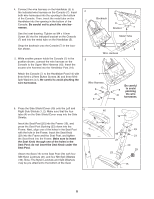
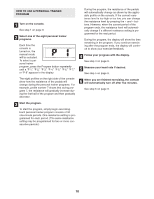
4. Connect the wire harness on the Handlebar (5) to the indicated wire harness on the Console (7). Insert both wire harnesses into the opening in the bottom of the Console. Then, insert the metal tube on the Handlebar into the opening in the bottom of the Console. Be careful not to pinch the wire harnesses. See the inset drawing. Tighten an M4 x 16mm Screw (9) into the indicated bracket on the Console (7) and into the metal tube on the Handlebar (5). Snap the bookrack onto the Console (7) in the location shown. 5. While another person holds the Console (7) in the position shown, connect the wire harness on the Console to the Upper Wire Harness (10). Insert the excess wire harness into the Handlebar Post (14). Attach the Console (7) to the Handlebar Post (14) with three M10 x 27mm Button Screws (8) and three M10 Split Washers (41). Be careful to avoid pinching the wire harnesses. 4 5 Bookrack 7 9 Bracket 7 Metal Tube 5 Wire Harness 5 7 Wire Harness 8 10 41 8 8 41 14 Be careful to avoid pinching the wire harnesses. 6. Press the Side Shield Cover (40) onto the Left and Right Side Shields (1, 2). Make sure that the four tabs (A) on the Side Shield Cover snap into the Side Shields. Insert the Seat Post (20) into the Frame (15), and press the Seat Post Bushing (23) down into the Frame. Next, align one of the holes in the Seat Post with the hole in the Frame. Insert the Seat Knob (29) into the Frame and the Seat Post, and tighten the Seat Knob into the Frame. Make sure to insert the Seat Knob through one of the holes in the Seat Post; do not insert the Seat Knob under the Seat Post. Attach the Seat (19) to the Seat Post (20) with four M8 Nylon Locknuts (21) and four M8 Split Washers (49). Note: The Nylon Locknuts and Split Washers may be pre-attached to the bottom of the Seat. 6 1 40 19 A 2 49 21 23 49 21 20 29 15 6
-
 1
1 -
 2
2 -
 3
3 -
 4
4 -
 5
5 -
 6
6 -
 7
7 -
 8
8 -
 9
9 -
 10
10 -
 11
11 -
 12
12 -
13
-
14
-
15
-
16
 |
 |