Western Digital WDBAAH0015HCH User Manual - Page 64
Enabling the Backup and Retrieve Functions, Uninstalling the WD SmartWare Software
 |
UPC - 718037751443
View all Western Digital WDBAAH0015HCH manuals
Add to My Manuals
Save this manual to your list of manuals |
Page 64 highlights
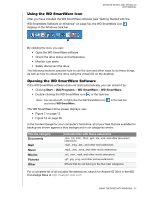
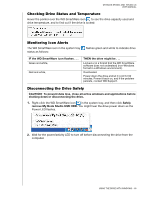
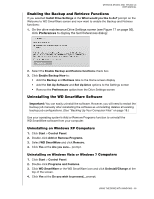
MY BOOK STUDIO AND STUDIO LX USER MANUAL Enabling the Backup and Retrieve Functions If you selected Install Drive Settings at the What would you like to do? prompt on the Welcome to WD SmartWare screen and now want to enable the Backup and Retrieve functions: 1. On the drive maintenance Drive Settings screen (see Figure 17 on page 56), click Preferences to display the Set Preferences dialog: 2. Select the Enable Backup and Restore functions check box. 3. Click Enable Backup Now to: • Add the Backup and Retrieve tabs to the Home screen display • Add the Set Up Software and Set Up Drive options to the Settings screen • Remove the Preferences option from the Drive Settings screen Uninstalling the WD SmartWare Software Important: You can easily uninstall the software. However, you will need to restart the backup job manually after reinstalling the software as uninstalling deletes all existing backup job configurations. (See "Backing Up Your Computer Files" on page 18.) Use your operating system's Add or Remove Programs function to uninstall the WD SmartWare software from your computer: Uninstalling on Windows XP Computers 1. Click Start > Control Panel. 2. Double-click Add or Remove Programs. 3. Select WD SmartWare and click Remove. 4. Click Yes at the Are you sure... prompt. Uninstalling on Windows Vista or Windows 7 Computers 1. Click Start > Control Panel. 2. Double-click Programs and Features. 3. Click WD SmartWare or the WD SmartWare icon and click Uninstall/Change at the top of the screen. 4. Click Yes at the Do you wish to proceed... prompt. USING THE DRIVE WITH WINDOWS - 59
-
 1
1 -
2
-
3
-
4
-
5
-
6
-
7
-
8
-
9
-
10
-
11
-
12
-
13
-
14
-
15
-
16
-
17
-
18
-
19
-
20
-
21
-
22
-
23
-
24
-
25
-
26
-
27
-
28
-
29
-
30
-
31
-
32
-
33
-
34
-
35
-
36
-
37
-
38
-
39
-
40
-
41
-
42
-
43
-
44
-
45
-
46
-
47
-
48
-
49
-
50
-
51
-
52
-
53
-
54
-
55
-
56
-
57
-
58
-
 59
59 -
 60
60 -
 61
61 -
 62
62 -
 63
63 -
 64
64 -
 65
65 -
 66
66 -
 67
67 -
 68
68 -
 69
69 -
70
-
71
-
72
-
73
-
74
-
75
-
76
-
77
-
78
-
79
-
80
-
81
-
82
 |
 |
