Whirlpool GU3100XTVQ Installation Instructions
Whirlpool GU3100XTVQ Manual
 |
View all Whirlpool GU3100XTVQ manuals
Add to My Manuals
Save this manual to your list of manuals |
Whirlpool GU3100XTVQ manual content summary:
- Whirlpool GU3100XTVQ | Installation Instructions - Page 1
: Conserver pour consultation par l'inspecteur local des installations électriques. Installateur : Remettre les instructions d'installation au propriétaire. Propriétaire : Conserver les instructions d'installation pour référence ultérieure. Models/Modèles GU3100XTVB GU3100XTVQ GU3100XTVS W10167841A - Whirlpool GU3100XTVQ | Installation Instructions - Page 2
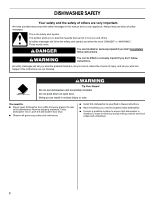
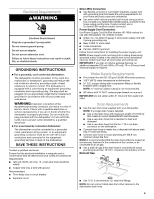
DISHWASHER SAFETY Your safety and the safety of others are very important. We have provided many important safety messages in this manual and tell you what can happen if the instructions are not followed. WARNING Tip Over Hazard Do not use dishwasher until completely installed. Do not push down on - Whirlpool GU3100XTVQ | Installation Instructions - Page 3
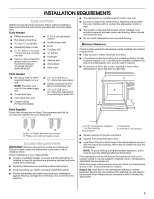
Tools and Parts Gather the required tools and parts before starting installation. Read and follow the instructions provided with service personnel. Make sure pipes, wires and drain hose are within the shaded area shown in the "Cutout dimensions" section. Helpful Tip: If the floor in the dishwasher - Whirlpool GU3100XTVQ | Installation Instructions - Page 4
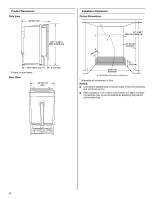
* To front of door frame Rear View 4" (10 cm) 24" (61 cm) max. Installation Clearances Cutout Dimensions 34" to 35"* (86.4 cm to 88.9 cm) A (10.2 c4m" ) 24" (61 cm) in shaded area of cabinet walls or floor for plumbing and electrical service. ■ ADA installation-32¹⁄₂" (82.5 cm) beneath 34" - Whirlpool GU3100XTVQ | Installation Instructions - Page 5
500 ⁷⁄₈" strain relief ■ 3 wire connectors ■ Part No. 302797 grommet Follow the kit instructions for installing the power supply cord. NOTE: Power supply cord must plug into a mating three prong, grounded outlet, located in the cabinet next to the dishwasher opening. Outlet must meet all local codes - Whirlpool GU3100XTVQ | Installation Instructions - Page 6
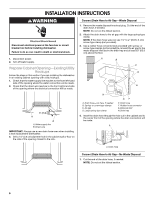
INSTRUCTIONS WARNING Electrical Shock Hazard Disconnect electrical power at the fuse box or circuit breaker box before installing dishwasher supply line B. Direct wire IMPORTANT: Always use a new drain hose even when installing a new replacement dishwasher. 3. Drill a 1¹⁄₂" (3.8 cm) diameter hole in - Whirlpool GU3100XTVQ | Installation Instructions - Page 7
hose through the hole cut in the cabinet and to the center front of the opening where the drain connection will be made. A A. Drain hose A. Drain hose Connect Drain Hose-No Waste Disposal or Air Gap 1. Cut the end of the drain hose, if needed. NOTE: Do not cut the ribbed section. 2. Attach the - Whirlpool GU3100XTVQ | Installation Instructions - Page 8
service representative if you are in doubt whether the dishwasher is properly grounded. Do not modify the plug provided with the dishwasher terminal or lead on the dishwasher. SAVE THESE INSTRUCTIONS A. Optional locations B. Preferred (Part Number 302797) included with power supply cord kit. 8 - Whirlpool GU3100XTVQ | Installation Instructions - Page 9
3. Attach the copper tubing to the water supply line with a manual shutoff valve. 4. Slowly feed the copper tubing through the hole in the shutoff valve. Connect Drain Hose to Air Gap-Waste Disposal IMPORTANT: Always use a new drain hose even when installing a new replacement dishwasher. 1. Drill a - Whirlpool GU3100XTVQ | Installation Instructions - Page 10
cabinet wall or floor on the side of the opening closest to the sink. - Connect Drain Hose to Waste Disposal-No Air Gap IMPORTANT: Always use a new drain hose even when installing a new replacement dishwasher. 1. Drill a 1¹⁄₂" (3.8 cm) diameter hole in the cabinet wall or floor on the side of the - Whirlpool GU3100XTVQ | Installation Instructions - Page 11
and lower panel to the dishwasher. B C E D A. Drain hose-cut here, if needed B. Screw-type clamp C. Drain hose D. Drain trap E. Waste tee A supply cord kit that is U.L. listed and marked for use with dishwashers (Part Number 4317824). 7. Measure the shortest opening height between the underside - Whirlpool GU3100XTVQ | Installation Instructions - Page 12
reduces the sound level when the dishwasher is operating. 6. If needed, support the front of the dishwasher by raising, lowering or shimming the front legs. 7. Remove cardboard from beneath the dishwasher. Level the Dishwasher 1. Align the front of the dishwasher door panel with the cabinet doors - Whirlpool GU3100XTVQ | Installation Instructions - Page 13
instructions can result in death, fire, or electrical shock. 1. Route the direct wire so that it does not touch the dishwasher motor or lower part of the dishwasher connect direct wire to 16gauge dishwasher wire, connect the white wire from the power supply to the white wire on the terminal box. - Whirlpool GU3100XTVQ | Installation Instructions - Page 14
drain loop from the side of the dishwasher. 2. Place the shallow pan under the end of the drain hose. The pan will collect any water in the drain hose. A. White wire to white cord does not touch the dishwasher motor or lower part of dishwasher tub. Connect Dishwasher to Water Supply 1. Route the - Whirlpool GU3100XTVQ | Installation Instructions - Page 15
hose ends with hose clamps. B A A A. Hose clamps B. Coupler 6. Connect the drain hose to the air gap, waste tee or disposal with clamps. Attach Dishwasher to Cabinet WARNING Tip Over Hazard Do not use dishwasher until completely installed. Do not push down on open door. Doing so can result - Whirlpool GU3100XTVQ | Installation Instructions - Page 16
properly. If you need Assistance or Service Please reference the "Assistance or Service" section of your User Instructions or contact the dealer from whom you purchased your dishwasher. Electrical Shock Hazard Disconnect power before servicing. Replace all parts and panels before operating. Failure - Whirlpool GU3100XTVQ | Installation Instructions - Page 17
est le danger potentiel et vous disent comment réduire le risque de blessure et ce qui peut se produire en cas de non-respect des instructions. AVERTISSEMENT Risque de basculement Ne pas utiliser le lave-vaisselle jusqu'à ce qu'il soit complètement installé. Ne pas appuyer sur la porte ouverte - Whirlpool GU3100XTVQ | Installation Instructions - Page 18
parée des pièces et accessoires disponibles pour le lave-vaisselle. ■ Réaliser l'installation du lave-vaisselle tel que spécifié dans ces instructions. ■ Assurez-vous d'avoir à disposition tout ce dont vous avez besoin pour l'installation du lave-vaisselle. ■ Abritez les lignes de lave-vaisselle et - Whirlpool GU3100XTVQ | Installation Instructions - Page 19
,6 cm) 20¹⁄₂" (52,1 cm) 4" (10 cm) *Jusqu'à l'avant du châssis de la porte Vue arrière 24" (61 cm) max. Distances de dégagement à respecter Dimensions de l'ouverture à découper 34" to 35"* (86,4 cm to 88,9 cm) A (10,2 c4m" ) 24" (61 cm) minimum 6" (15,2 cm) 24 (61 cm) maximum A. Toutes les - Whirlpool GU3100XTVQ | Installation Instructions - Page 20
ble de rallonge. Le non-respect de ces instructions peut causer un décès, un incendie ou un choc électrique. INSTRUCTIONS DE MISE À LA TERRE ■ Pour un lectrique. Vérifier avec un électricien compétent ou un représentant de service si vous avez des doutes si le lave-vaisselle est correctement relié - Whirlpool GU3100XTVQ | Installation Instructions - Page 21
l'alimentation électrique avant d'installer le lave-vaisselle (au niveau du tableau de distribution fusible ou disjoncteur) Le non-respect de cette instruction peut causer un décès ou on choc électrique. 1. Déconnecter la source de courant électrique. 2. Fermer l'alimentation en eau. Préparation de - Whirlpool GU3100XTVQ | Installation Instructions - Page 22
Raccordement du tuyau d'évacuation au dispositif de brise-siphon - Broyeur de déchets 1. Ôter l'opercule arrachable du broyeur à déchets. Couper l'extrémité du tuyau d'évacuation si nécessaire. REMARQUE : Ne pas couper la section ondulée. 2. Connecter le tuyau d'évacuation au dispositif de brise- - Whirlpool GU3100XTVQ | Installation Instructions - Page 23
. Ne pas utiliser un câble de rallonge. Le non-respect de ces instructions peut causer un décès, un incendie ou un choc électrique. A. Tuyau de électrique. Vérifier avec un électricien compétent ou un représentant de service si vous avez des doutes si le lave-vaisselle est correctement relié à la - Whirlpool GU3100XTVQ | Installation Instructions - Page 24
Raccordement électrique - Méthode de raccordement direct 1. Percer un trou de ³⁄₄" (1,9 cm) dans la paroi de droite du placard, la paroi arrière ou le plancher de l'ouverture d'encastrement. A B Installation de la canalisation d'eau 1. Percer un trou de ¹⁄₂" (1,3 cm) dans la paroi de gauche du - Whirlpool GU3100XTVQ | Installation Instructions - Page 25
4. Utiliser un connecteur de tuyau de caoutchouc (non fourni) avec une bride à vis ou à ressort (non fournie) pour raccorder le dispositif de brise-siphon à l'entrée du tuyau d'évacuation situé au-dessus du siphon et à au moins 20" (50,8 cm) audessus du plancher. A B C D E 2. Couper l'extrémit - Whirlpool GU3100XTVQ | Installation Instructions - Page 26
1. Percer un trou de diamètre 1¹⁄₂" (3,8 cm) dans la paroi ou dans le plancher du placard sur le côté de l'ouverture d'encastrement la plus proche de l'évier. - Raccordement du tuyau d'évacuation - Sans broyeur à déchets ni dispositif de brise-siphon IMPORTANT : On doit toujours utiliser un tuyau - Whirlpool GU3100XTVQ | Installation Instructions - Page 27
utiliser le lave-vaisselle jusqu'à ce qu'il soit complètement installé. Ne pas appuyer sur la porte ouverte. Le non-respect de ces instructions peut causer des blessures graves ou des coupures. AVERTISSEMENT Risque du poids excessif Utiliser deux personnes ou plus pour déplacer et installer le lave - Whirlpool GU3100XTVQ | Installation Instructions - Page 28
Contrôle de la tension des ressorts de la porte 1. À l'aide d'au moins 2 personnes, placer le lave-vaisselle debout devant l'ouverture du placard. 2. Alors qu'une autre personne retient le lave-vaisselle pour l'empêcher de basculer, ouvrir et refermer la porte du lavevaisselle plusieurs fois. Si la - Whirlpool GU3100XTVQ | Installation Instructions - Page 29
borne. Ne pas utiliser un câble de rallonge. Le non-respect de ces instructions peut causer un décès, un incendie ou un choc électrique. 1. Acheminer le câ . Ne pas utiliser un câble de rallonge. Le non-respect de ces instructions peut causer un décès, un incendie ou un choc électrique. 4. À l' - Whirlpool GU3100XTVQ | Installation Instructions - Page 30
REMARQUE : Le cordon d'alimentation électrique doit être branché dans une prise de configuration correspondante à trois alvéoles reliée à la terre dans le placard, près de l'ouverture du lave-vaisselle. La prise doit être conforme à tous les codes et règlements locaux. IMPORTANT : Si l'on prévoit d' - Whirlpool GU3100XTVQ | Installation Instructions - Page 31
pas utiliser le lave-vaisselle jusqu'à ce qu'il soit complètement installé. Ne pas appuyer sur la porte ouverte. Le non-respect de ces instructions peut causer des blessures graves ou des coupures. 1. Ouvrir la porte du lave-vaisselle et retirer le panier inférieur. 2. Placer une serviette sur la - Whirlpool GU3100XTVQ | Installation Instructions - Page 32
correctement. Si vous avez besoin d'assistance ou de service Consulter la section "Assistance ou service" des Instructions d'utilisation ou contacter le marchand auprès duquel le lavevaisselle a été acheté. W10167841A © 2008 Whirlpool Corporation. All rights reserved. ® Registered Trademark/TM
-
 1
1 -
 2
2 -
 3
3 -
 4
4 -
 5
5 -
 6
6 -
 7
7 -
8
-
9
-
10
-
11
-
12
-
13
-
14
-
15
-
16
-
17
-
18
-
19
-
20
-
21
-
22
-
23
-
24
-
25
-
26
-
27
-
28
-
29
-
30
-
31
-
32
 |
 |

DISHWASHER SAFETY
.............................................................................
2
INSTALLATION REQUIREMENTS
...........................................................
3
Tools and Parts
.......................................................................................
3
Location Requirements
...........................................................................
3
Electrical Requirements
..........................................................................
5
Water Supply Requirements
...................................................................
5
Drain Requirements
................................................................................
5
INSTALLATION INSTRUCTIONS
.............................................................
6
Prepare Cabinet Opening—Existing Utility Hookups
.............................
6
Prepare Cabinet Opening—No Existing Utility Hookups
.......................
8
Install Dishwasher
.................................................................................
11
Make Electrical Connections—Direct Wire Method
.............................
13
Make Electrical Connections—Power Supply Cord Method
...............
13
Connect Dishwasher to Water Supply
.................................................
14
Connect Dishwasher to Drain
...............................................................
14
Attach Dishwasher to Cabinet
..............................................................
15
Complete Installation
............................................................................
15
SÉCURITÉ DU LAVE-VAISSELLE
..........................................................
17
EXIGENCES D’INSTALLATION
..............................................................
18
Outils et pièces
.....................................................................................
18
Exigences d'emplacement
...................................................................
18
Spécifications électriques
.....................................................................
20
Spécifications de l’alimentation en eau
................................................
20
Exigences d'évacuation
........................................................................
21
INSTRUCTIONS D’INSTALLATION
.......................................................
21
Préparation de l'ouverture d'encastrement du placard
- Moyens de raccordement préexistants
.............................................
21
Préparation de l'ouverture d'encastrement du placard-
Sans moyens de raccordement préexistants
.....................................
23
Installation du lave-vaisselle
.................................................................
27
Raccordement électrique - Méthode de raccordement direct
............
29
Raccordement électrique - Méthode avec cordon
d'alimentation électrique
......................................................................
29
Raccordement du lave-vaisselle à l'alimentation en eau
.....................
30
Raccordement du lave-vaisselle au circuit d'évacuation
....................
30
Fixation du lave-vaisselle au placard
...................................................
31
Achever l'installation
.............................................................................
32
IMPORTANT:
Save for local electrical inspector’s use.
Installer:
Leave installation instructions with the homeowner.
Homeowner:
Keep installation instructions for future reference.
IMPORTANT :
Conserver pour consultation par l’inspecteur local des installations électriques.
Installateur :
Remettre les instructions d’installation au propriétaire.
Propriétaire :
Conserver les instructions d’installation pour référence ultérieure.
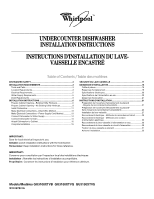
UNDERCOUNTER DISHWASHER
INSTALLATIONINSTRUCTIONS
INSTRUCTIONS D’INSTALLATION DU LAVE-
VAISSELLE ENCASTRÉ
Table of Contents / Table des matières
Models/Modèles GU3100XTVB
GU3100XTVQ
GU3100XTVS
W10167841A