Whirlpool WGG755S0BS Use & Care Guide - Page 10
Rack Positions - Upper Oven
 |
View all Whirlpool WGG755S0BS manuals
Add to My Manuals
Save this manual to your list of manuals |
Page 10 highlights
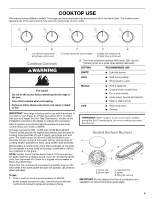
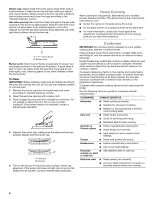
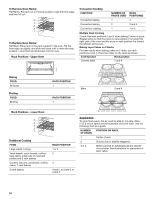
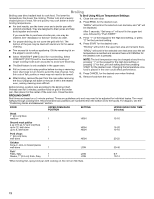
To Remove Oven Racks: Flat Racks: Pull rack out to the stop position, raise the front edge, and then lift out. 5 4 3 2 1 To Replace Oven Racks: Flat Rack: Place rack on the rack support in the oven. Tilt the front edge up slightly, and slide rack back until it clears the stop position. Lower front and slide back into the oven. Rack Positions - Upper Oven Convection Cooking FUNCTION NUMBER OF RACK RACKS USED POSITION(S) Convection baking 1 3 Convection baking 2 2 and 4 Convection roasting 1 1 or 2 Multiple Rack Cooking 2-rack: Use rack positions 2 and 4 when baking 2 racks of pizza. Stagger pizza so that the pizza on rack position 2 is toward the right side of the oven and the pizza on rack position 4 is toward the left side of the oven. Baking Layer Cakes on 2 Racks For best results when baking cakes on 2 racks, use rack positions 2 and 4. Place the cakes on the racks as shown. Cook function Rack position Convect bake 2 and 4 Baking FOOD All foods Broiling FOOD Broiling 2 1 RACK POSITION 1 RACK POSITION 1 Bake 2 and 4 Rack Positions - Lower Oven 5 4 3 2 1 Traditional Cooking FOOD Large roasts, turkeys Yeast breads, quick breads, muffins, tube cakes, small cuts of meat and poultry and 2-rack baking Cookies, biscuits, casseroles, muffins, cakes, 1-rack baking 2-rack baking RACK POSITION 1 or 2 2 3 4 and 5, or 2 and 4, or 2 and 5 BAKEWARE To cook food evenly, hot air must be able to circulate. Allow 2" (5.0 cm) of space around bakeware and oven walls. Use the following chart as a guide. NUMBER POSITION ON RACK OF PAN(S) 1 Center of rack. 2 Side by side or slightly staggered. 3 or 4 Make sure that no bakeware piece is directly over another. See illustrations for placement of layer cakes. 10
-
 1
1 -
2
-
3
-
4
-
 5
5 -
 6
6 -
 7
7 -
 8
8 -
 9
9 -
 10
10 -
 11
11 -
 12
12 -
 13
13 -
 14
14 -
 15
15 -
16
-
17
-
18
-
19
-
20
-
21
-
22
-
23
-
24
-
25
-
26
-
27
-
28
-
29
-
30
-
31
-
32
-
33
-
34
-
35
-
36
-
37
-
38
-
39
-
40
-
41
-
42
-
43
-
44
-
45
-
46
-
47
-
48
 |
 |
