Whirlpool WGG755S0BS Use & Care Guide - Page 15
Timed/Delay Cooking, To Deactivate Sabbath Mode, To Set a Cook Time, To Set a Delay Cooking Time
 |
View all Whirlpool WGG755S0BS manuals
Add to My Manuals
Save this manual to your list of manuals |
Page 15 highlights
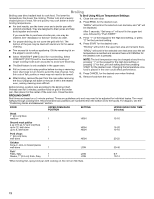
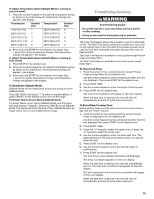
To Adjust Temperature (when Sabbath Mode is running in only one oven): 1. Press the number keypad for the desired temperature setting as shown in the chart below. No temperature change will appear in the display. Temperature Number Temperature Pad Number Pad 170°F (76.7°C) 1 325°F (162.8°C) 6 200°F (93.3°C) 2 350°F (176.7°C) 7 225°F (107.2°C) 3 375°F (190.6°C) 8 250°F (121.1°C) 4 400°F (204.4°C) 9 300°F (148.9°C) 5 450°F (232.2°C) 0 2. Press and hold START for the desired oven longer than 1 second to set the temperature change. No temperature change will appear in the display. To Adjust Temperature (when Sabbath Mode is running in both ovens): 1. Press BAKE for the desired oven. 2. Press the number keypad for the desired temperature setting as shown in the chart above. No temperature change will appear in the display. 3. Press and hold START for the desired oven longer than 1 second to set the temperature change. No temperature change will appear in the display. To Deactivate Sabbath Mode: Sabbath Mode can be deactivated at any time during an active Sabbath Mode. Press SETTINGS, then press "7" to return to regular baking, or press CANCEL for the desired oven to turn off the range. If a Power Failure Occurs During Sabbath Mode If a power failure occurs during Sabbath Mode, and the upper text area displays "Sabbath," press any CANCEL to exit Sabbath Mode. The display will show the time of day. Sabbath Mode is no longer active, but it is still enabled for the range. Timed/Delay Cooking WARNING Food Poisoning Hazard Do not let food sit in oven more than one hour before or after cooking. Doing so can result in food poisoning or sickness. The Cook Time feature allows the oven(s) to cook for a set length of time. The Start Time feature allows the oven(s) to be set to turn on at a certain time of day. The Start Time feature should not be used for food such as breads and cakes because they may not bake properly. The Cook Time feature is available on most cycles except Precise Clean and Keep Warm. The Start Time feature is available on the most cycles except Keep Warm. To Set a Cook Time: 1. Press the button for any cooking function except Precise Clean or Keep Warm for the desired oven. Use the number keypad to enter a temperature other than the one displayed. Then press START for the desired oven. 2. Press COOK TIME. 3. Use the number keypad to enter the length of time to cook. 4. Press START for the desired oven. The cook time countdown will appear on the oven display. When the stop time is reached, the oven will shut off automatically, and end-of-cycle tones will sound. To Set a Delay Cooking Time: Before setting, make sure the clock is set to the correct time of day. See the "Clock" section. 1. Press the button for any cooking function except Precise Clean or Keep Warm for the desired oven. Use the number keypad to enter a temperature other than the one displayed then press START for the desired oven. 2. Press START TIME. 3. Press the "1" keypad to select the upper oven, or press the "2" keypad to select the lower oven. 4. Use the number keypad to enter the delay start time. The delay start time is the amount of time by which you want to delay the start. 5. Press START for the desired oven. 6. Use the number keypad to enter the desired length of cooking time. 7. Press START for the desired oven. The start time is automatically calculated and displayed. The delay countdown appears on the oven display. When the start time is reached, the oven will automatically turn on. The cook time countdown will appear on the oven display. The set temperature and minute time countdown will appear on the oven display. When the stop time is reached, the oven will shut off automatically, and end-of-cycle tones will sound. 15
-
 1
1 -
2
-
3
-
4
-
5
-
6
-
7
-
8
-
9
-
 10
10 -
 11
11 -
 12
12 -
 13
13 -
 14
14 -
 15
15 -
 16
16 -
 17
17 -
 18
18 -
 19
19 -
 20
20 -
21
-
22
-
23
-
24
-
25
-
26
-
27
-
28
-
29
-
30
-
31
-
32
-
33
-
34
-
35
-
36
-
37
-
38
-
39
-
40
-
41
-
42
-
43
-
44
-
45
-
46
-
47
-
48
 |
 |
