Whirlpool WGT4027EW Installation Guide - Page 5
Installation Requirements
 |
View all Whirlpool WGT4027EW manuals
Add to My Manuals
Save this manual to your list of manuals |
Page 5 highlights
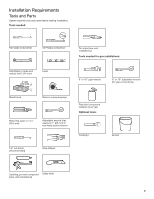
Installation Requirements Tools and Parts Gather required tools and parts before starting installation. Tools needed: Flat-blade screwdriver #2 Phillips screwdriver Tin snips (new vent installations) Tools needed for gas installations: Adjustable or open-end wrench 9/16" (14 mm) 4" min (102 mm) Level 8" or 10" pipe wrench 8" or 10" adjustable wrench (for gas connections) Wood block Ruler or measuring tape Pliers that open to 19/16" (39.5 mm) Adjustable wrench that opens to 1" (25 mm) or hex-head socket wrench Pipe-joint compound resistant to LP gas Optional tools: Flashlight Bucket 1/4" nut driver (recommended) Wire stripper Caulking gun and compound Utility knife (new vent installations) 5
-
 1
1 -
 2
2 -
 3
3 -
 4
4 -
 5
5 -
 6
6 -
 7
7 -
 8
8 -
 9
9 -
 10
10 -
 11
11 -
12
-
13
-
14
-
15
-
16
-
17
-
18
-
19
-
20
-
21
-
22
-
23
-
24
-
25
-
26
-
27
-
28
-
29
-
30
-
31
-
32
-
33
-
34
-
35
-
36
-
37
-
38
-
39
-
40
-
41
-
42
-
43
-
44
-
45
-
46
-
47
-
48
-
49
-
50
-
51
-
52
-
53
-
54
-
55
-
56
-
57
-
58
-
59
-
60
-
61
-
62
-
63
-
64
-
65
-
66
-
67
-
68
 |
 |

5
Optional tools:
4" min
(102 mm)
Wood block
Adjustable or open-end
wrench 9/16" (14 mm)
Ruler or measuring tape
Level
Flashlight
Bucket
Tools needed:
Flat-blade screwdriver
#2 Phillips screwdriver
Adjustable wrench that
opens to 1" (25 mm) or
hex-head socket wrench
1/4" nut driver
(recommended)
Wire stripper
Caulking gun and compound
(new vent installations)
Utility knife
Pliers that open to 1
9
/
16
"
(39.5 mm)
Tools and Parts
Gather required tools and parts before starting installation.
Installation Requirements
Tin snips (new vent
installations)
Tools needed for gas installations:
8" or 10" pipe wrench
Pipe-joint compound
resistant to LP gas
8" or 10" adjustable wrench
(for gas connections)