Whirlpool WML75011HN Installation Instructions - Page 4
Installation Instructions
 |
View all Whirlpool WML75011HN manuals
Add to My Manuals
Save this manual to your list of manuals |
Page 4 highlights
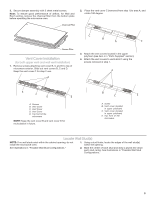
INSTALLATION INSTRUCTIONS Wall Venting Installation Only 1. Using diagonal wire cutting pliers, gently snip out the rectangular vent cover on the damper plate. Roof Venting Installation Only 1. Remove screws attaching damper plate to top of microwave oven exterior. Slide damper plate toward the front of the microwave oven and lift up. A B A B A. Diagonal wire cutting pliers B. Damper vent covers A. Screws B. Damper plate Install Damper Assembly (for wall venting only) 1. Check that damper blade moves freely, and opens fully. 2. Position the damper assembly on the back of the microwave oven so that the damper blade hinge is at the top, and the damper blade opens away from the microwave oven. Install Damper Assembly (for roof venting only) 1. Check that damper blade moves freely, and opens fully. 2. Position the damper assembly on the top of microwave oven so that the damper blade hinge is at the top, and the damper blade opens away from the microwave oven. A BC D B A C A. Back of microwave oven B. Damper assembly C. Damper blade D. Sheet metal screw 3. Secure damper assembly with 2 sheet metal screws. D A. Screws B. Damper assembly C. Damper blade D. Top of the microwave oven 4
-
 1
1 -
 2
2 -
 3
3 -
 4
4 -
 5
5 -
 6
6 -
 7
7 -
 8
8 -
 9
9 -
 10
10 -
11
-
12
 |
 |
