Whirlpool WOS51EC7A Installation Instructions - Page 7
Replace Oven Doors, Positioning Oven Feet for Multiple Cabinet, Cutout Heights
 |
View all Whirlpool WOS51EC7A manuals
Add to My Manuals
Save this manual to your list of manuals |
Page 7 highlights
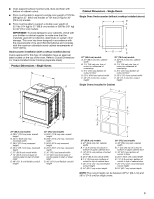
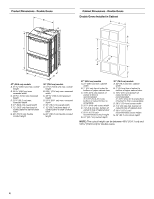
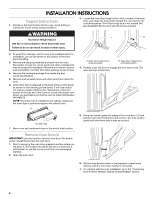
Replace Oven Door(s) IMPORTANT: Do not replace the oven door(s) until after the oven has been installed into the cabinet. 1. Using two hands, grasp side edges of door at the midpoint. Face the oven cavity. 2. Locate the slots on each side of the oven cavity for the door hinge locks. A A. Slot in the oven cavity for door hinge lock 3. At a 45° angle, align door hinges with slots in the lower front of the oven cavity. Slowly insert door, making sure you maintain the 45° angle. You will know the door is engaged in the slot when you feel a slight drop. 6. Close the oven door. 7. When the hinges are properly installed and the door closed, there should be an even gap between the door and the control panel. If one side of the oven door is hanging lower than the other, the hinge on that side is not properly installed. Positioning Oven Feet for Multiple Cabinet Cutout Heights Single Ovens The positioning of the oven feet allow a single oven to be installed in a cutout height between 26 68.4 cm) and 29 74.8 cm). Refer to the following instructions to position the feet for the size of your cabinet cutout. Cutout height is between 27⁵⁄₈" (70.2 cm) and 28⁵⁄₈" (72.7 cm) The oven feet do not need to be changed. They are positioned correctly as received. Go to the "Make Electrical Connection" section. 4. Lower the oven door to the fully open position. If the oven door does not open to a full 90 degrees, repeat steps 1-3. 5. Locate the oven door hinge locks in the corners of the oven door, and rotate the hinge locks toward the oven cavity to the locked position. See Step 3 (illustration A) in the "Remove Oven Door(s)" section for proper locked position. 7
-
 1
1 -
 2
2 -
 3
3 -
 4
4 -
 5
5 -
 6
6 -
 7
7 -
 8
8 -
 9
9 -
 10
10 -
 11
11 -
 12
12 -
13
-
14
-
15
-
16
-
17
-
18
-
19
-
20
-
21
-
22
-
23
-
24
-
25
-
26
-
27
-
28
-
29
-
30
-
31
-
32
 |
 |
