Whirlpool WRR56X18F Owners Manual - Page 7
Refrigerator Leveling and Door Closing, Normal Sounds
 |
View all Whirlpool WRR56X18F manuals
Add to My Manuals
Save this manual to your list of manuals |
Page 7 highlights
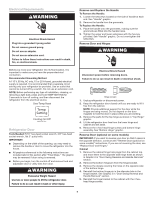
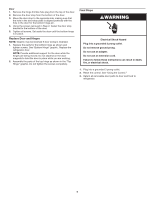
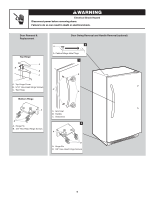
Refrigerator Leveling and Door Closing Your refrigerator has two front adjustable legs - one on each side. The back of the refrigerator rests on two fixed rollers. The base grille covers the adjustable brake feet and roller assemblies located at the bottom of the refrigerator below the refrigerator door. Before making any adjustments, remove the base grille and move the refrigerator to its final location. Tools Needed: 1/4" hex driver, Phillips head screwdriver 1. Remove the base grille screws. Grasp the grille firmly and pull it toward you. Open the refrigerator door to access the brake feet. NOTE: To allow the refrigerator to roll more easily, raise the brake feet by turning them counterclockwise. The front rollers will be touching the floor. 2. Move the refrigerator to its final location. 3. Lower the brake feet, by turning them clockwise, until the rollers are off the floor and both brake feet are snug against the floor. This keeps the refrigerator from rolling forward when you are opening the refrigerator door. IMPORTANT: If you need to make further adjustments involving the brake feet, you must turn both brake feet the same amount to keep the refrigerator level. 4. Make sure the door closes easily. If you are satisfied with the door opening and closing, skip the next section. If, however, the door does not close easily or the door pops open, adjust the tilt. To Adjust the Cabinet Tilt: NOTE: Having someone push against the top of the refrigerator takes some weight off the brake feet. This makes it easier to turn them. ■■ Open the refrigerator door. Use a 1/4" hex driver to turn both brake feet clockwise the same amount. This will raise the front of the refrigerator. It may take several turns to allow the door to close more easily. 5. Make sure the refrigerator is steady. If the refrigerator seems unsteady or rolls forward when the door is pulled open, adjust the brake feet. To Steady the Refrigerator: ■■ Open the refrigerator door. Using a 1/4" hex driver, turn both brake feet clockwise the same amount until the brake feet are snug against the floor. Check again. If not satisfied, continue to adjust the brake feet by half turns of the screw until the refrigerator does not roll forward when the door is opened. 6. Replace the base grille by aligning the ends of the grille with the leveling assemblies on each side and snapping the grille into place. Reinstall the Phillips screws. Normal Sounds Your new refrigerator may make sounds that your old one didn't make. Because the sounds are new to you, you might be concerned about them. Most of the new sounds are normal. Hard surfaces, like the floor, walls, and cabinets, can make the sounds seem louder. The following describes the kinds of sounds and what may be making them. ■■ Your refrigerator is designed to run more efficiently to keep your food items at the desired temperatures and to minimize energy usage. The high-efficiency compressor and fans may cause your refrigerator to run longer than your old one. You may also hear a pulsating or high-pitched sound from the compressor or fans adjusting to optimize performance. ■■ You may hear the evaporator fan motor circulating air through the refrigerator compartment. The fan speed may increase as you open the doors or add warm food. ■■ Rattling noises may come from the flow of refrigerant or items stored on top of the refrigerator. ■■ Water dripping on the defrost heater during a Defrost cycle may cause a sizzling sound. ■■ As each cycle ends, you may hear a gurgling sound due to the refrigerant flowing in your refrigerator. ■■ Contraction and expansion of the inside walls may cause a popping noise. ■■ You may hear air being forced over the condenser by the condenser fan. ■■ You may hear water running into the drain pan during the Defrost cycle. C A B A. Brake foot B. Front roller C. 1/4" hex driver 7
-
 1
1 -
 2
2 -
 3
3 -
 4
4 -
 5
5 -
 6
6 -
 7
7 -
 8
8 -
 9
9 -
 10
10 -
 11
11 -
 12
12 -
13
-
14
-
15
-
16
-
17
-
18
-
19
-
20
-
21
-
22
-
23
-
24
-
25
-
26
-
27
-
28
 |
 |
