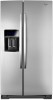
Whirlpool WRS970CIDM Use & Care Guide - Page 14
Convertible Drawer, Temperature Control, Crisper Humidity Control, Water and Ice Dispensers - manual
 |
View all Whirlpool WRS970CIDM manuals
Add to My Manuals
Save this manual to your list of manuals |
Page 14 highlights
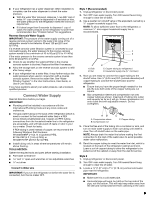
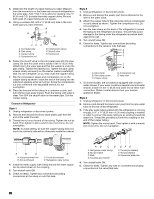
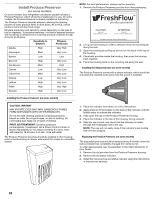
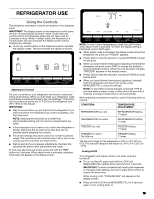
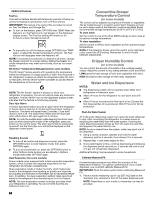
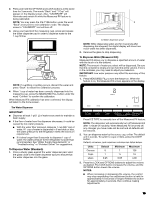
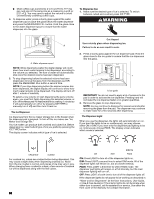
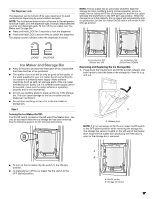
Additional Features Fast Ice The Fast Ice feature assists with temporary periods of heavy ice use by increasing ice production over a 24-hour period. IMPORTANT: This feature only works if the ice maker is turned on. See "Ice Maker and Storage Bin." ■ To turn on the feature, press OPTIONS then TEMP. When the feature is on, the Fast Ice icon will appear on the dispenser display screen. The Fast Ice setting will remain on for 24 hours unless manually turned off. ■ To manually turn off the feature, press OPTIONS then TEMP again, or adjust the freezer temperature set point. The Fast Ice icon will disappear when the feature is off. NOTE: If increased ice production is desired at all times, change the freezer set point to a lower setting. Setting the freezer to a colder temperature may make some foods, such as ice cream, harder. 6th Sense® Temperature Management (on some models) The 6th Sense® feature assists with regulating the temperature inside the refrigerator. If a large quantity of warm food is placed in the refrigerator or warm air enters the refrigerator while the door is held open, the 6th Sense® system activates to quickly restore the temperature to the set point. NOTE: The 6th Sense® system is always on when your refrigerator is operating. You do not need to press any buttons to activate it. The 6th Sense® icon on the dispenser display screen indicates that the feature is functioning properly. Door Ajar Alarm The Door Ajar Alarm feature sounds an alarm when the refrigerator or freezer door is open for 5 minutes and the product cooling is turned on. The alarm will repeat every 2 minutes. Close both doors to turn it off. The feature then resets and will reactivate when either door is left open again for 5 minutes. NOTE: To mute the audible alarm while keeping the doors open, such as while cleaning the inside of the refrigerator, press any button on the control panel. The alarm sound will be temporarily turned off, but the Door Ajar icon will still be displayed on the dispenser control panel. Disabling Sounds ■ To turn off all control and dispenser sounds, press the OPTIONS button to enter Options mode, then press OPTIONS again. ■ To turn all sounds back on, press the OPTIONS button to enter Options mode (unless you are already in Options mode), then press OPTIONS again. Dual Evaporator (on some models) Some models come equipped with a dual sequential evaporation system, which includes two separate evaporators for the refrigerator and freezer compartments. Dual evaporation results in higher humidity, which helps keep foods in the refrigerator from spoiling as quickly and improves food quality and freshness in the freezer due to decreased freezer burn. In addition, the dual evaporation system helps keep food smells in the refrigerator from transferring to ice in the freezer. NOTE: The dual evaporation system is always activated when your refrigerator is operating. You do not need to press any buttons to turn it on. Convertible Drawer Temperature Control (on some models) The control can be adjusted to properly chill meats or vegetables. The air inside the pan is cooled to avoid "spot" freezing and can be set to keep meats at the National Livestock and Meat Board recommended storage temperatures of 28° to 32°F (-2° to 0°C). To store meat: Set the control to one of the three MEAT settings to store meat at its optimal storage temperature. To store vegetables: Set the control to VEG to store vegetables at their optimal storage temperatures. NOTE: If food starts to freeze, move the control to the right (less cold), toward the VEG setting. Remember to wait 24 hours between adjustments. Crisper Humidity Control (on some models) You can control the amount of humidity in the moisture-sealed crisper. Adjust the control to any setting between LOW and HIGH. LOW (open) for best storage of fruits and vegetables with skins. HIGH (closed) for best storage of fresh, leafy vegetables. Water and Ice Dispensers NOTES: ■ The dispensing system will not operate when either door (refrigerator or freezer) is open. ■ Allow 24 hours for the refrigerator to cool down and chill water. ■ Allow 24 hours to produce the first batch of ice. Discard the first three batches of ice produced. Wait 72 hours for full ice production. Flush the Water System Air in the water dispensing system can cause the water dispenser to drip. After connecting the refrigerator to a water source or replacing the water filter, flush the water system. Flushing the water dispensing system forces air from the water line and filter, and prepares the water filter for use. NOTE: As air is cleared from the system, water may spurt out of the dispenser. 1. Using a sturdy container, depress and hold the water dispenser pad for 5 seconds, then release it for 5 seconds. 2. Repeat Step 1 until water begins to flow. 3. Once water begins to flow, continue depressing and releasing the dispenser pad (5 seconds on, 5 seconds off) until a total of 3 gal. (12 L) has been dispensed. Additional flushing may be required in some households. Calibrate Measured Fill Household water pressure may affect the accuracy of the Measured Fill feature. For optimum performance of your water dispenser, you must first calibrate Measured Fill. IMPORTANT: Flush the water system before calibrating Measured Fill. 1. Place a sturdy measuring cup (1 cup [237 mL] size) on the dispenser tray, centered in front of the water dispenser pad. NOTE: Depending on your model, a measuring cup may be provided. 14
-
 1
1 -
2
-
3
-
4
-
5
-
6
-
7
-
8
-
 9
9 -
 10
10 -
 11
11 -
 12
12 -
 13
13 -
 14
14 -
 15
15 -
 16
16 -
 17
17 -
 18
18 -
 19
19 -
20
-
21
-
22
-
23
-
24
-
25
-
26
-
27
-
28
-
29
-
30
-
31
-
32
-
33
-
34
-
35
-
36
-
37
-
38
-
39
-
40
-
41
-
42
-
43
-
44
-
45
-
46
-
47
-
48
-
49
-
50
-
51
-
52
-
53
-
54
-
55
-
56
-
57
-
58
-
59
-
60
-
61
-
62
-
63
-
64
-
65
-
66
-
67
-
68
-
69
-
70
-
71
-
72
-
73
-
74
-
75
-
76
-
77
-
78
-
79
-
80
-
81
-
82
-
83
-
84
-
85
-
86
-
87
-
88
 |
 |
