Whirlpool WRS970CIDM Use & Care Guide - Page 6
Replace the Doors and Hinges, IMPORTANT, Water Connection Style 1, Water Connection Style 2,
 |
View all Whirlpool WRS970CIDM manuals
Add to My Manuals
Save this manual to your list of manuals |
Page 6 highlights
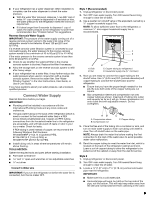
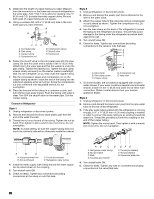
Replace the Doors and Hinges 1. Replace both bottom hinges, if removed. Make sure that the leveler brackets are assembled behind the hinges. Tighten screws. IMPORTANT: When the screws are tightened properly, there should not be any gaps between the refrigerator, leveler bracket and hinge. NOTE: There are two wiring bundles that run underneath the freezer - a large bundle with a large grommet and two white plugs at the end, and a small bundle with a small grommet and one yellow plug at the end. WARNING Excessive Weight Hazard Use two or more people to lift the freezer door. Failure to do so can result in back or other injury. ■ Align the clip's screw hole with the left hole in the electrical housing and the right hole in the crossbar, and screw in the clip using a single screw. Tighten screw. See Graphic 3. IMPORTANT: Once connected, the wiring bundles should not be taut. Some flexibility is needed to allow the freezer door to open properly. 6. Replace the refrigerator door by lifting the door onto the bottom right hinge. 7. Align and replace the top right hinge as shown. See Graphic 6. Tighten screws. 8. Replace the ice storage bin (on some models) and any adjustable door or utility bins. WARNING 2. Before replacing the freezer door on the bottom left hinge, feed the small wiring bundle through the hinge. Assistance may be needed. IMPORTANT: Do not feed the large wiring bundle through the hinge. This bundle is intended to run directly from the door to the connections beneath the freezer. Forcing the large bundle through the hinge may damage the door and/or the wiring and will keep the door from closing properly. 3. Feed both water tubes through the bottom left hinge, then replace the freezer door on the hinge. Assistance may be needed. NOTE: Provide additional support for the doors while the top hinges are being replaced. Do not depend on the door magnets to hold the doors in place while you are working. 4. Align and replace the top left hinge as shown. See Graphic 4. Tighten screws. 5. Reconnect water tubing and wiring. IMPORTANT: Do not intertwine the water tubing and wiring bundles when reconnecting them. ■ Water Connection Style 1: Push the larger 7.94 mm) water tube into the blue fitting until it stops, then push the smaller ¹⁄₄" (6.35 mm) water tube into the green fitting until it stops. See Graphic 2A. Water Connection Style 2: Push the black water tube with the blue tip into the blue fitting until it stops. Close the clasp around the tubing, making sure it snaps into place. Repeat this process to connect the red-tipped black water tube and the red fitting. See Graphic 2B. ■ Reinstall the P-clamp around the small wiring bundle (with one yellow plug), then replace the P-clamp on the top screw hole of the routing plate. See Graphic 3. ■ Gently route the large wiring bundle (with two white plugs) through the hole in the routing plate so that the wiring runs behind the right side of the routing plate. See Graphic 3. NOTE: The large wiring bundle should always remain below the small wiring bundle. ■ Reconnect the wiring plugs to the electrical housing, then push the housing back under the refrigerator. Align the left hole in the front lip of the housing with the right hole in the refrigerator's base crossbar. See Graphic 3. ■ Reinstall the wiring clip over the grommets. First install the smaller grommet into the top of the clip, then install the larger grommet into the bottom of the clip (closest to the screw hole). See Graphic 3. 6 Electrical Shock Hazard Plug into a grounded 3 prong outlet. Do not remove ground prong. Do not use an adapter. Do not use an extension cord. Failure to follow these instructions can result in death, fire, or electrical shock. 9. Plug refrigerator into a grounded 3 prong outlet. Leveling and Door Closing Your refrigerator has two adjustable front feet - one on the right and one on the left. In most cases, the refrigerator should be steady when both feet are touching the floor. If your refrigerator seems unsteady or if you want the doors to close more easily, adjust the refrigerator's tilt using the instructions below: 1. Move the refrigerator into its final location. If necessary, open both doors to 90° and remove the base grille. See Graphic 1. 2. The two leveling feet are located on the brackets on each side of the product. See Graphic 8. NOTE: Having someone push against the top of the refrigerator takes some weight off the leveling feet. This makes it easier to make adjustments. 3. Use a ¹⁄₄" open-ended or adjustable wrench to adjust the leveling feet. Turn the leveling foot to the left to raise that side of the product, or turn it to the right to lower that side of the product. NOTE: Both leveling feet should be snug against the floor, and the rollers should not touch the floor. This keeps the refrigerator from rolling forward when opening the doors. 4. Open both doors again and check that they close as easily as you like. If not, tilt the refrigerator slightly more to the rear by turning the leveling feet to the left. It may take several more turns, and you should turn both leveling feet the same amount. 5. Use a bubble level to check the leveling of the refrigerator. NOTE: Whenever you need to move the refrigerator, turn the leveling feet to the right until they are no longer touching the ground. This will allow the refrigerator to roll more easily.
-
 1
1 -
 2
2 -
 3
3 -
 4
4 -
 5
5 -
 6
6 -
 7
7 -
 8
8 -
 9
9 -
 10
10 -
 11
11 -
 12
12 -
13
-
14
-
15
-
16
-
17
-
18
-
19
-
20
-
21
-
22
-
23
-
24
-
25
-
26
-
27
-
28
-
29
-
30
-
31
-
32
-
33
-
34
-
35
-
36
-
37
-
38
-
39
-
40
-
41
-
42
-
43
-
44
-
45
-
46
-
47
-
48
-
49
-
50
-
51
-
52
-
53
-
54
-
55
-
56
-
57
-
58
-
59
-
60
-
61
-
62
-
63
-
64
-
65
-
66
-
67
-
68
-
69
-
70
-
71
-
72
-
73
-
74
-
75
-
76
-
77
-
78
-
79
-
80
-
81
-
82
-
83
-
84
-
85
-
86
-
87
-
88
 |
 |
