Xerox 2121MB Network Guide - Page 30
Optional Procedure 4
 |
UPC - 095205428667
View all Xerox 2121MB manuals
Add to My Manuals
Save this manual to your list of manuals |
Page 30 highlights
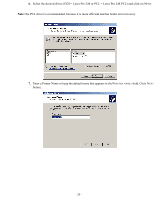
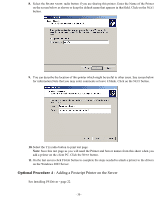
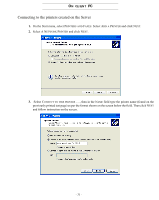
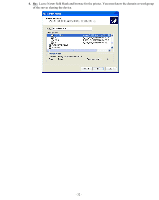
8. Select the SHARE NAME: radio button if you are sharing this printer. Enter the Name of the Printer on the screen below as shown or keep the default name that appears in that field. Click on the NEXT button. 9. You can describe the location of this printer which might be useful to other users. See screen below for information.Note that you may enter comments or leave it blank. Click on the NEXT button. 10. Select the YES radio button to print test page. Note: Save this test page as you will need the Printer and Server names from this sheet when you add a printer on the client PC. Click the NEXT button. 11. On the last screen click FINISH button to complete the steps needed to attach a printer to the drivers on the Windows 2003 Server. Optional Procedure 4 - Adding a Postcript Printer on the Server See Installing PS Driver - page 22. - 30 -
-
 1
1 -
2
-
3
-
4
-
5
-
6
-
7
-
8
-
9
-
10
-
11
-
12
-
13
-
14
-
15
-
16
-
17
-
18
-
19
-
20
-
21
-
22
-
23
-
24
-
 25
25 -
 26
26 -
 27
27 -
 28
28 -
 29
29 -
 30
30 -
 31
31 -
 32
32 -
 33
33 -
 34
34 -
 35
35 -
36
-
37
-
38
-
39
-
40
-
41
-
42
-
43
-
44
-
45
-
46
-
47
-
48
-
49
-
50
-
51
-
52
-
53
-
54
-
55
-
56
-
57
-
58
-
59
-
60
-
61
-
62
-
63
-
64
-
65
-
66
-
67
-
68
-
69
-
70
-
71
-
72
-
73
-
74
-
75
-
76
-
77
-
78
-
79
-
80
-
81
-
82
-
83
-
84
-
85
-
86
-
87
-
88
-
89
-
90
-
91
-
92
-
93
-
94
-
95
-
96
-
97
-
98
-
99
-
100
-
101
-
102
-
103
-
104
-
105
-
106
-
107
-
108
-
109
-
110
-
111
-
112
 |
 |
