Xerox 2121MB Network Guide - Page 35
This document is intended for installing the F, on the network using a static TCP/IP address.
 |
UPC - 095205428667
View all Xerox 2121MB manuals
Add to My Manuals
Save this manual to your list of manuals |
Page 35 highlights
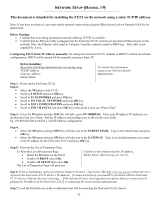
NETWORK SETUP (MANUAL IP) This document is intended for installing the F2121 on the network using a static TCP/IP address. Note: If you have not done so, you must enable network connectivity using the Blue Smart Card see Network/LAN kit for instructions. Before Starting: 1. Confirm that an existing operational network utilizing TCP/IP is available. 2. Confirm that the Ethernet cable is plugged into the FaxCentre F2121 and into an operational Ethernet port on the network. Note: the Ethernet cable must be Category 5 and the connector must be RJ45 type. This cable is not supplied by Xerox. Configuring F2121 Static IP Address manually: On startup the FaxCentre F2121 defaults to DHCP to obtain its network configurations, DHCP will be turned off by manually entering a Static IP. Before Installing: Record the following information for use during setup: TCP/IP Address: Gateway Address: Subnet Mask: To obtain this information contact your Network System Administrator Step 1: Power on the FaxCentre F2121. Step 2: • Select the M button on the F2121 • Scroll to 2 SETUP and press OK key. • Scroll to 25 NETWORKS and press OK key • Scroll to 253 LOCAL NETWORK and press OK key • Scroll to 2531 CONFIGURATION and press OK key • Scroll to 25311 MANUAL and press OK key at this point it may say "Please Wait" Step 3: Select the M button and type 2532 this will take you to IP ADDRESS. Enter your IP address -IP addresses are divided into four octet fields. Pad the IP address with leading zeros to fill out the octet fields. Eg. 192.010.025.004 would be a valid IP address configuration. Step 4: • Select the M button and type 2533 this will take you to the SUBNET MASK. Type in the subnet mask and press OK key. • Select the M button and type 2534 this will take you to the GATEWAY. Type in the default gateway associated to the IP address for the FaxCentre F2121 and press OK key. Step 5: Print out the List of Parameters Page. To Print the List of Parameters Page: • Select the M button on the F2121 • Scroll to 5 PRINT select OK, • Scroll to 54 SETUP then select OK. The List of Parameters Page will print out. Confirm on the printout that the IP Address, Subnet Mask, and Gateway are correct. Step 6: From a workstation, open your Internet Explorer browser. Type in the URL http://xxx.xxx.xxx.xxx (where the xxx's represent the FaxCentre F2121 device's IP address). If connected properly you should be presented with the FaxCentre F2121 device's Internet Services web page. . If the Internet Services web page does not appear then test connectivity by pinging the IP address of the FaxCentre F2121 or contacting the local network administrator. Step 7: Load the Print Drivers on the workstations that will be accessing the FaxCentre F2121 device. - 35 -
-
 1
1 -
2
-
3
-
4
-
5
-
6
-
7
-
8
-
9
-
10
-
11
-
12
-
13
-
14
-
15
-
16
-
17
-
18
-
19
-
20
-
21
-
22
-
23
-
24
-
25
-
26
-
27
-
28
-
29
-
 30
30 -
 31
31 -
 32
32 -
 33
33 -
 34
34 -
 35
35 -
 36
36 -
 37
37 -
 38
38 -
 39
39 -
 40
40 -
41
-
42
-
43
-
44
-
45
-
46
-
47
-
48
-
49
-
50
-
51
-
52
-
53
-
54
-
55
-
56
-
57
-
58
-
59
-
60
-
61
-
62
-
63
-
64
-
65
-
66
-
67
-
68
-
69
-
70
-
71
-
72
-
73
-
74
-
75
-
76
-
77
-
78
-
79
-
80
-
81
-
82
-
83
-
84
-
85
-
86
-
87
-
88
-
89
-
90
-
91
-
92
-
93
-
94
-
95
-
96
-
97
-
98
-
99
-
100
-
101
-
102
-
103
-
104
-
105
-
106
-
107
-
108
-
109
-
110
-
111
-
112
 |
 |
